Planned service operations (SVC)
The Planned service operations (SVC) supports the process of handling service orders and changing parts on product units during service jobs. It allows operators to view a list of jobs and work order operations with all the relevant information and perform various actions on the service operations without changing the context. This application is dedicated to service managers and operators.
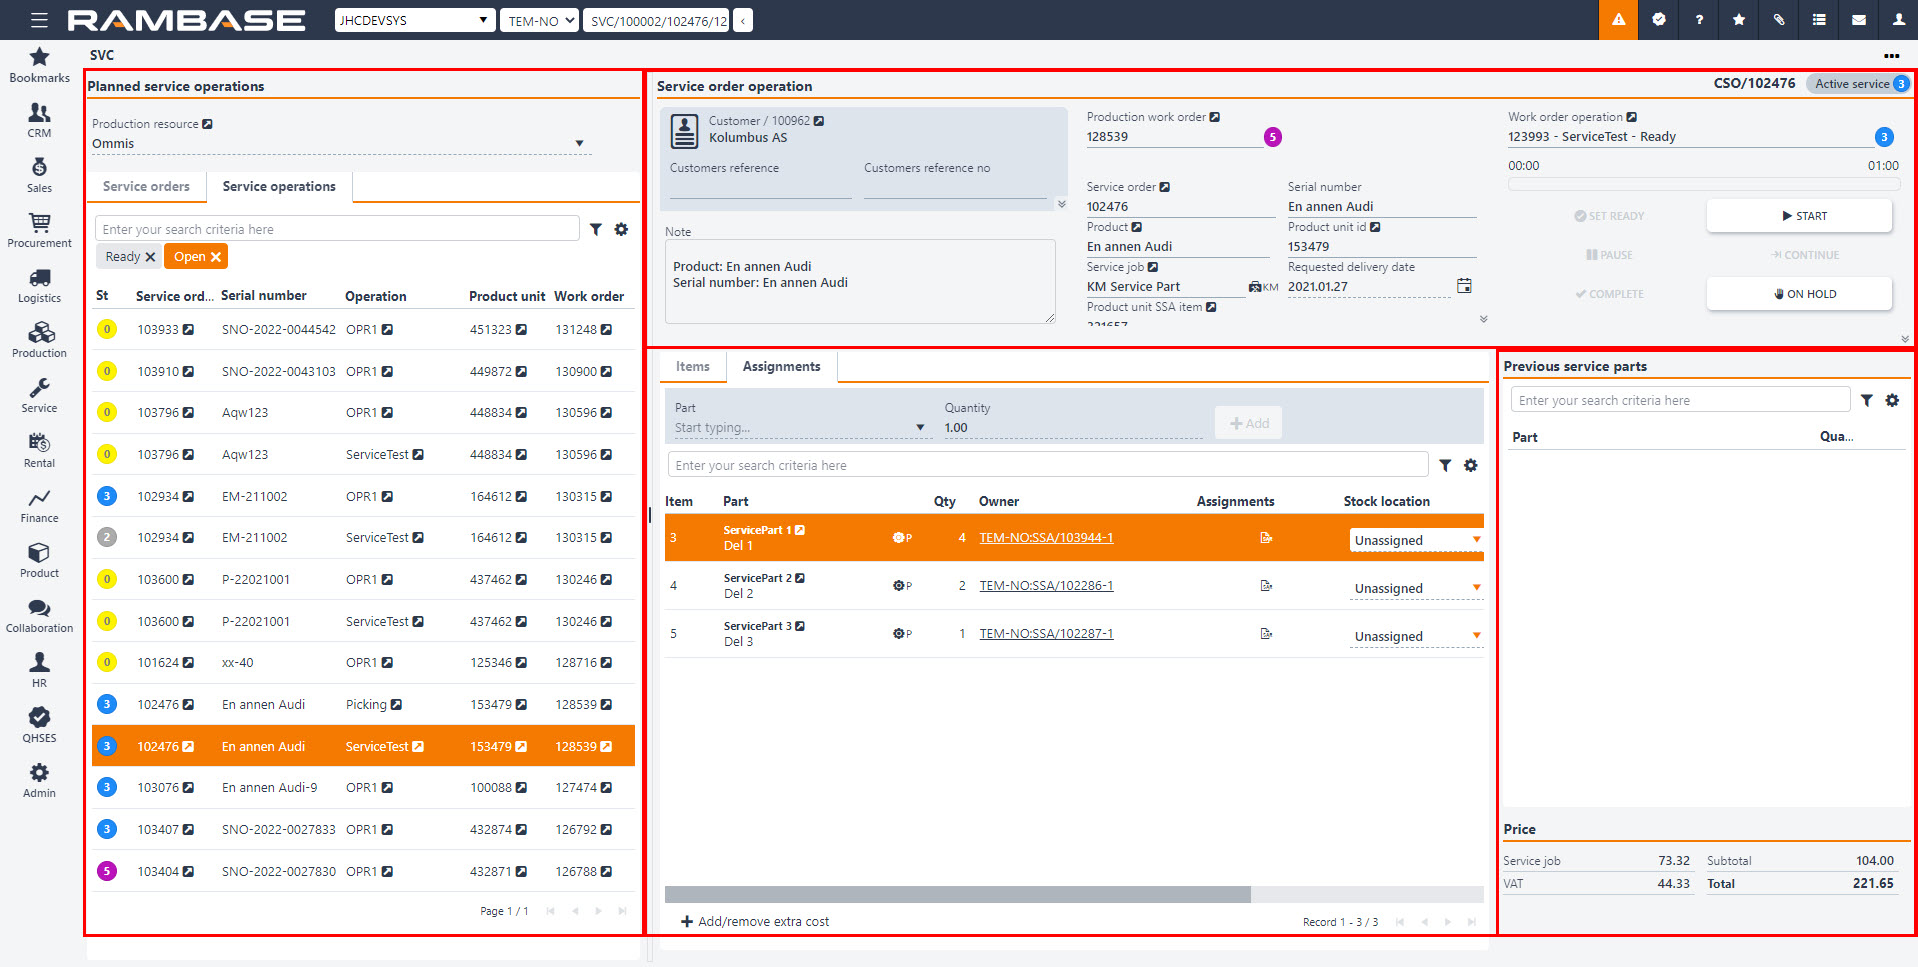
The application is divided into four main areas;
Planned service operations area
Service order operation area
Items, Assignments and Custom fields tabs
Previous service parts area
The Planned service operations area
The Planned service operations area includes the Production resource field, the Service orders tab and Service operations tab.
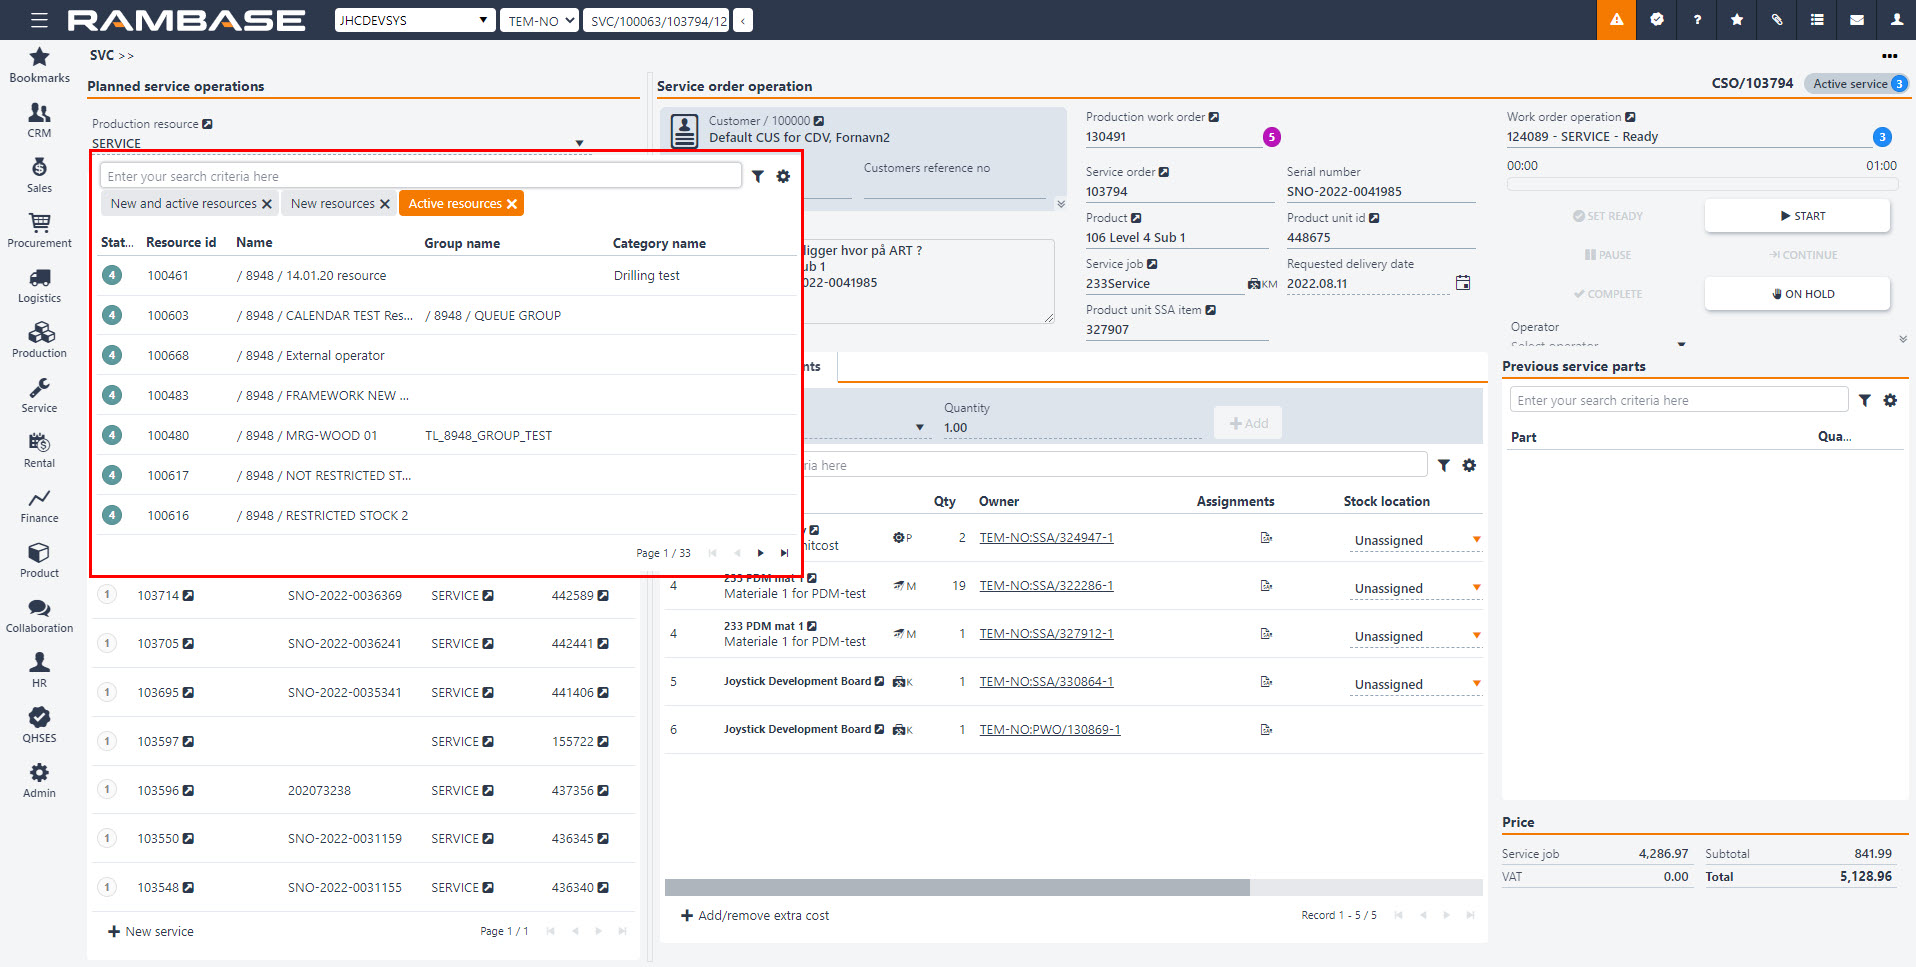
Production resource drop-down menu - An input field where the user can search for or look up production resources. Production resources (RESCONFIG) can be filtered on by clicking the Filter builder icon and selecting from the following list:
Active resources - Filters on Production resources (RESCONFIG) in Status 4 (Active).
New resources - Filters on Production resources (RESCONFIG) in Status 1 (Pending registration). See note.
New and active resources - Filters on Production resources (RESCONFIG) in Status 4 (Active) and Status 1 (Pending registration). See note.
Note
The Planned service operations (SVC) application displays only Production resources in Status 4 (Active). Selecting the filter New resources will therefore not display any Production resources (RESONFIG).
The displayed columns can also be edited by clicking the Column settings icon and selecting from the following list:
Status - Display status and corresponding icon.
Resource id - The document identifier number. In this column only the number is displayed. In the program field the application abbreviation is displayed with the number. I.e. RESCONFIG/100003.
Name - The name of the Production resource (RESONFIG). The field is derived and editable from the Production resources (RESCONFIG) application.
Group name - The name of the Production resource group (REGCONFIG) the Production resource (RESCONFIG) is a member of. The field is derived from the Production resource group (REGCONFIG) application.
Category name - The name of the Production resource category (REC) the Production resource (RESCONFIG) is categorized as. The field is derived from the Production resource category (REC) application.
If a Production resource has been selected, clicking the View icon will open the Production resource details (RESCONFIG) application to view and edit details on the selected Production resource (RESCONFIG).
If a Production resource (RESCONFIG) has not been selected, clicking the View icon will open the Production resources (RESCONFIG) application and list all Production resources (RESCONFIG).
The Service orders tab
The Service orders tab contains Service orders (CSO) that are imported from a file or still pending registration.
The following columns are available, click the Column settings icon to limit which columns are displayed.
Icon | Column | Description |
|---|---|---|
| St | An icon indicating the status of the Service order (CSO). |
Service order | An informational field that is derived from the Service order (CSO) application, displaying the Service order (CSO) identifier. Clicking the View icon will open the Service order (CSO) application. Relevant information for the Service order (CSO) can be viewed and edited here; Invoice address, ship to address etc. | |
Serial number | An informational field that is derived from the Product unit (LCM) application, displaying the serial number of the Product unit (LCM). | |
Operation | An informational field displaying the name of the Production operation (OPR). Clicking the View icon will open the Production operation (OPR) application. Relevant information can be found and edited from the Production operation (OPR) application; Type, resource, service interval etc. | |
Product unit | An informational field that is derived from the Product unit (LCM) application, displaying the identifier of the Product unit (LCM) document. Clicking the View icon will open the Product unit (LCM) application. | |
Service order group | An informational field that is derived from the Service order group (SRO) identifier. This identifier can be searched for in the search field in in the Service orders tab with the field ServiceOrderGroupId. I.e. ServiceOrderGroupId = 100135. The list will then return all Service orders (CSO) in that Service order group (SRO). |
The Service operations tab
The Service operation tab contains all the Work order operations (WOO) linked to the service jobs that have been forwarded to the customer. Each operation is displayed in a separate row and may be filtered using search criteria or one of the predefined filters. Columns can also be selected by clicking the Column settings icon.
Next to the search field, the Filter builder icon can be clicked to select the following Standard filters:
Completed - Filters on Service orders (CSO) with the Work order operation (WOO) in Status 9 (Completed).
In service - Filters on Service orders (CSO) with the Work order operation (WOO) in Status 5 (In production).
My tasks - Filters on Service orders (CSO) with the logged in Personnel id number (PID) as operator.
Open - Filters on Service orders (CSO) with the Work order operation (WOO) in Status 0 (Not released), Status 2 (Pending purchase or production), Status 3 (Ready for start) and Status 5 (Processing).
Ready - Filters on Service orders (CSO) with the Work order operation (WOO) in Status 3 (Ready for start).
Wait - Filters on Service orders (CSO) with the Work order operation (WOO) in Status 2 (Pending purchase or production).
Column settings
Icon | Column | Description |
|---|---|---|
| Status | An icon indicating the status of the Service order (CSO). |
Service order | An informational field that is derived from the Service order (CSO) application, displaying the Service order (CSO) identifier. Clicking the View icon will open the Service order (CSO) application. Relevant information for the Service order (CSO) can be viewed and edited here; Invoice address, ship to address etc. | |
Serial number | An informational field that is derived from the Product unit (LCM) application, displaying the serial number of the Product unit (LCM). | |
Operation | An informational field displaying the name of the Production operation (OPR). Clicking the View icon will open the Production operation (OPR) application. Relevant information can be found and edited from the Production operation (OPR) application; Type, resource, service interval etc. | |
Product unit | An informational field that is derived from the Product unit (LCM) application, displaying the identifier of the Product unit (LCM) document. Clicking the View icon will open the Product unit (LCM) application. This is the Product unit (LCM) being serviced. | |
Work order | An informational field that is derived from the Production work order (PWOD) application, displaying the identifier for the Production work order (PWO) document. Clicking the View icon will open the Production work order (PWOD) application. | |
Customer reference | An informational field derived from the Sales order (COA) application. The field can be set or edited by the owner of the Service order (CSO) document in the Planned service operations (SVC) application, or in the Sales order (COA) application. | |
Customer reference number | An informational field derived from the Sales order (COA) application. The field can be set or edited by the owner of the Service order (CSO) document in the Planned service operations (SVC) application, or in the Sales order (COA) application. | |
Planned start at | An informational field derived from the Production work order (PWO) application, displaying the planned start of the Service order operation (SVC). This can be edited by changing the Scheduled start in the Production work order (PWOD) application. | |
Planned finished at | An informational field derived from the Production work order (PWO) application, displaying the planned start of the Service order operation (SVC). This can be edited by changing the Scheduled completion in the Production work order (PWOD) application. | |
Operator | An information field derived from the Production work order (PWOD) application, displaying the name of the operator for the Planned service operation (SVC). This can be edited in the Production work order (PWOD) application in the Planner drop-down menu. Clicking the View icon will open the Personnel (PER) application where user information can be viewed and edited. | |
Service job | Lists the name of the service job being performed. This is the Service product selected when clicking the New service button in the Service orders tab. Service jobs are Product (ART) structures with type KM. |
Service order operation (SVC) area
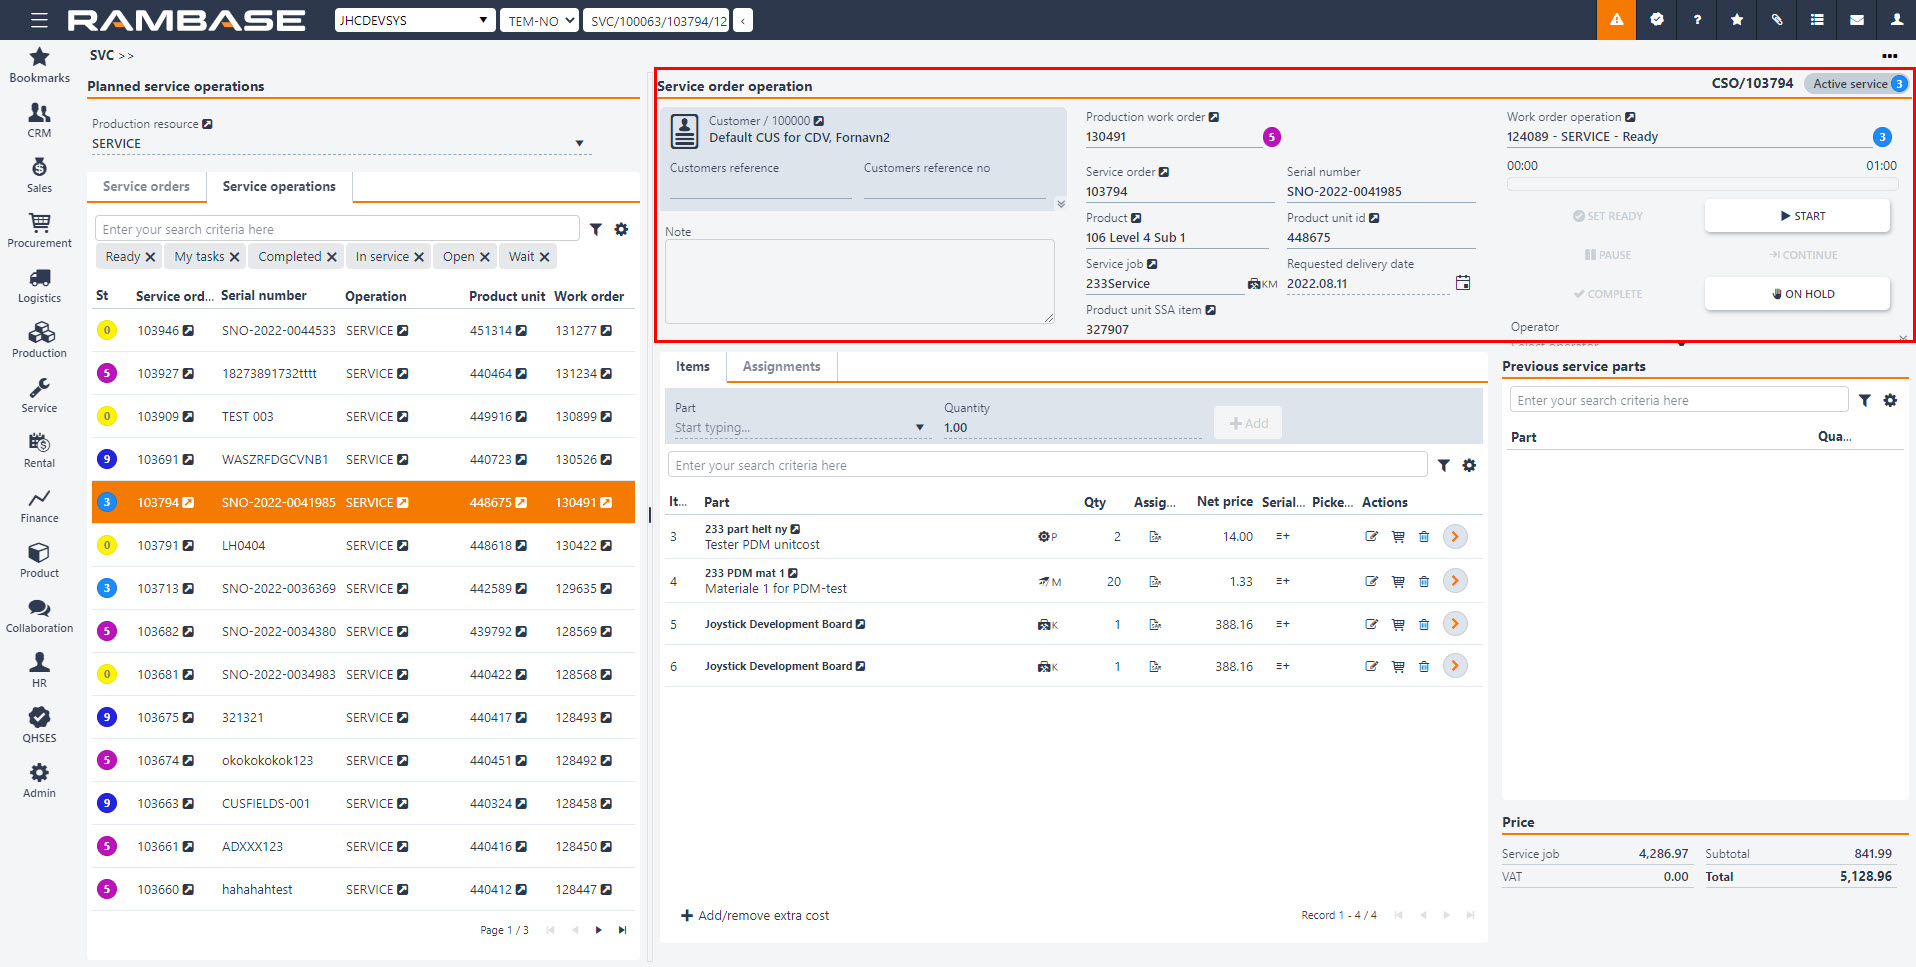
The Service order operation (SVC) area contains key information about the associated objects:
The Customer section contains a Customer identifier, Customers reference (typically a contact person) and a Reference number to a sales order in the external system used by the customer. Click either of the fields or the related Edit icon to edit the information. This area can be expanded by clicking the arrow in the lower left corner of the area to display Invoice address and Shipping address.
The Note can be filled automatically with a serviced product name, description, and a serial number, if the Company setting (CSV) setting WriteProductUnitInformationToServiceOrderNote is active. Otherwise, the fields can be edited by the owner of the document.
The Production work order field is supplied when the service order is forwarded to the customer. It contains a link to a Production work order (PWO) on which the service will be performed. Users can track the status of the Production work order (PWO) and release it for production. The process is described in detail in the Perform the service operation section.
The Service order details section provides crucial information about the serviced item, such as associated Service order (CSO) and the product unit that will be serviced, along with its serial number, product that the unit is based on, and the requested delivery date for the service (which can be changed by the users). If the Service operation (CSO) requires delivery of the unit, the link to product unit goods reception item is provided as well.
Users can also perform actions on the Work order operation (WOO) linked to the service order.
The table below contains descriptions on the fields and buttons for the area.
Fields and buttons | Description |
|---|---|
Customer name and identifier | An informational field listing the customer name and identifier, click the View icon to open the Customer (CUS) application. |
Customers reference | An informational field listing the customers reference. The field is derived from the Sales order (COA) application. Typically a contact person. |
Customers reference no | The reference number for the Sales order (COA) used in the customers external system. The owner of the Service order (CSO) can change the reference number manually. |
Invoice address | An informational field derived from the Customer (CUS) application or set on the Sales order (COA). |
Shipping address | An informational field derived from the Customer (CUS) application or set on the Sales order (COA). |
Note | The Note can be filled automatically with a serviced product name, description, and a serial number, if the WriteProductUnitInformationToServiceOrderNote setting is active in the Company settings (CSV). Otherwise, the fields can be edited by the owner of the document. |
Production work order | The Production work order field is supplied when the service order is forwarded to the customer. It contains a link to a Production work order (PWO) on which the service will be performed. Users can track the status of the Production work order (PWO) and release it for production. To view details and open the Production work order (PWOD) application, click the related View details icon. |
Service order | An informational field listing the Service order number. Click on the View icon to open the Service order (CSO) application and view details. |
Serial number | An informational field that is derived from the Product unit (LCM) application, displaying the serial number of the Product unit (LCM). |
Product | An informational field that is derived from the Product (ART) application, displaying the product name. Click the View icon to open the Product (ART) application. |
Product unit id | An informational field listing the Product unit (LCM) number. Used to identify Product unit (LCM). This is the Product unit (LCM) being serviced. |
Service job | An informational field listing the name of the Product (ART) structure with type KM . |
Requested delivery date | An informational field listing the requested delivery date of the service job. Click the Calender icon change the date. |
Product unit SSA item | An informational field listing the Goods reception (SSA) number of the Product unit (LCM). Click the View icon to open the Goods reception (SSAITEM) item application. |
Work order operation | An informational field with the name and number of the Work order operation (WOO). A status icon will state the current status of the Work order operation (WOO). Click the View icon to open the Work order operation (WOO) application. |
Work time progress bar | An informational progress bar indicating the used work time on the Work order operation (WOO). |
Set ready | The Set ready button is used when external work is involved in the Work order operation (WOO). When the external work has been completed, click the Set ready button. Read more about external work here. |
Start | Clicking the Start button will set the Work order operation (WOO) from Status 3 (ready to start) to Status 4 (Setup), or directly to Status 5 (Processing). The following functions will be available:
The work time will also start counting as evident in the Work time area in the lower right corner. |
Pause | Clicking the Pause button will momentarily stop the Work order operation (WOO), including stopping counting of work time. This function is useful in case of machine breakdown or pending other unforeseen event or even a break. |
Continue | Clicking the Continue button will continue the counting of work time and allow the same actions as starting the Work order operation (WOO). |
Complete | Clicking the Complete button will set the Work order operation (WOO) in Status 9 (Completed). |
On hold | Clicking the On hold button will halt the Work order operation (WOO) and notify the planner via Production work order (PWOD) application. The Work order operation (WOO) must first be paused, before it can be put On hold. The following fields will be available to detail the halt:
|
Operator | An informational field derived from the Production work order (PWOD) application, displaying the name of the operator for the Planned service operation (SVC). This can be edited in the Production work order (PWOD) application in the Planner drop-down menu. |
The Items, Assignments, Custom fields tabs, and the Previous service parts area
The Items and Assignments tabs provide the users with the list of parts and costs that can be used during the service process, allowing the operator to pick or add new items and costs to the list. The Custom fields tab can be activated in the Custom fields (CUSTOMFIELDS) application. While the Previous service parts list contains all items used during the previous service on the Product unit (LCM), enabling the operator to quickly add the same parts to the current order.
The Items tab
Icon | Column | Description |
|---|---|---|
| Item | The item number for the part. The number applies to both the Assignments tab and Items tab. |
Part | An informational field listing the name and description of the Product(ART). Click the View icon to open the Product (ART) application. | |
Qty | The default part quantity set on the Product unit (LCM) part list. Click the Change quantity icon in the Actions column to change quantity. | |
| Assignments | Click the SAR icon to open the Stock assignment (Read more about the Stock assignment (SAR) application here. |
Net price | Final price per unit converted to company currency. | |
Net amt. | Total net amount converted to company currency. | |
Cur | The currency used on the net price and net amount. | |
| Serial numbers | Add serial numbers. Opens the Serial number registration popup. |
Picked Qty | Displays the picked part quantity. | |
| Actions | Change quantity of parts. Click the Change quantity icon to make the Qty field editable. |
| Actions | Confirm picking. Click the Confirm picking icon to pick the part. |
| Actions | Remove part. Click the Remove part icon to open a popup to either confirm or cancel the removal of part. Click OK to confirm. |
| Actions | Undo picking. Click the Undo picking icon to undo the picking of part. |
| Actions | Click the Radio button to open the Service order item (CSO) application. Alternatively press ENTER after clicking on the intended part. |
The Assignments tab
Users can add, pick, remove and adjust the quantity of the parts used in the service job. Furthermore, it is possible to view the linked Goods reception (SSA) item documents and select a specific stock location from which the service part is picked. Note that the same part, with different Goods reception (SSA) will have the same item number.
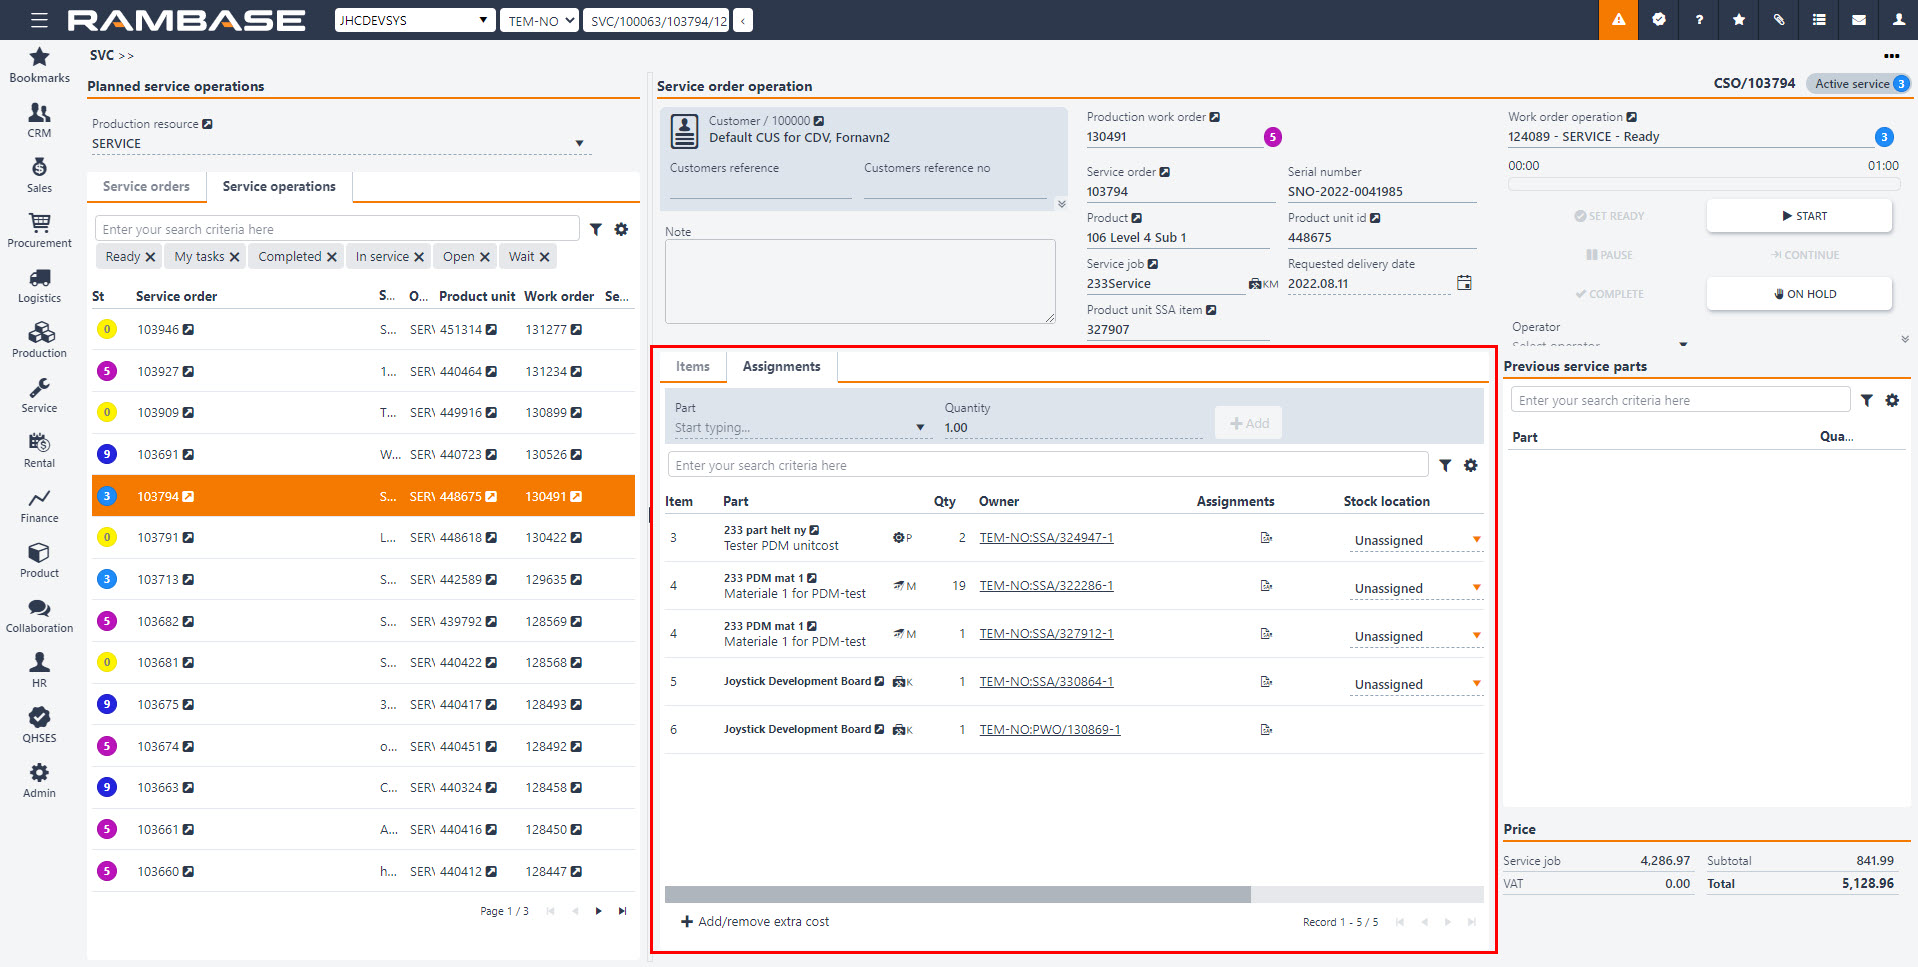
Icons | Column/Icon name | Description |
|---|---|---|
| Item | The item number for the part. The number applies to both the Assignments tab and Items tab. |
Part | An informational field listing the name and description of the Product(ART). Click on the View icon to open the Product (ART) application. | |
Qty | The default part quantity set on the Product unit (LCM) part list. Click the Change quantity icon in the Actions column to change quantity. | |
Owner | Displays the Goods reception (SSA) or the Production work order (PWO) of the part. Click to attached link to open the relevant application to view details. | |
| Assignments | Click the SAR icon to open the Stock assignment (SAR) application. |
Stock location | Select a Location (STL) to pick the part from. | |
Net price | Displays the net price of the part. | |
Net amt. | Displays the net amount of the part. | |
Cur | Displays the currency selected in the Customer (CUS) application. | |
| Serial number | Add serial numbers. Opens the Serial number registration popup. |
| Actions | Change quantity. Makes the Qty column editable. Used to change the item quantity. |
| Actions | Confirm picking. Will pick the part from the selected Location (STL) in the Stock location column. |
| Actions | Remove part. Will open a popup to confirm or cancel the removal of the part. Click OK to confirm. |
| Actions | Undo picking. |
Note
In both the Items and Assignments tab:
To add a note describing in example the reason for why a part has been changed, click the Radio button on the intended part or select the intended part and press ENTER to open the Service order (CSO) item application. Type the reason in the Note field in the Notes area.
A note describing the reason for change will now be added.
Previous service parts area
RamBase will remember the changed parts on a Product unit (LCM) by a previously performed Service order (CSO) and list the previously changed service parts as suggestion for easy picking.
Icon | Column | Description |
|---|---|---|
Part | The part name and description derived from the Product (ART) application. Click the View icon to open the Product (ART) application and view and edit details. | |
Quantity | The previously changed part quantity. | |
| Click the Add icon to add the suggested part. |
Create a service job
The Planned service operations (SVC) application allows the users to create new Service orders (CSO). This section will follow you through the process, from supplying all the necessary data for the new document and to forwarding it to the customer.
From the Planned service operations area, select a production resource from the Production resource drop-down menu.
The Planned service operations (SVC) application does not display resources which are used to perform operations on Grouped worked orders (GWOO).
Click on the New service button in the bottom left corner of the Service orders tab to open the popup containing all the needed fields for creating a service order.
In the popup, you can provide information for the new document.
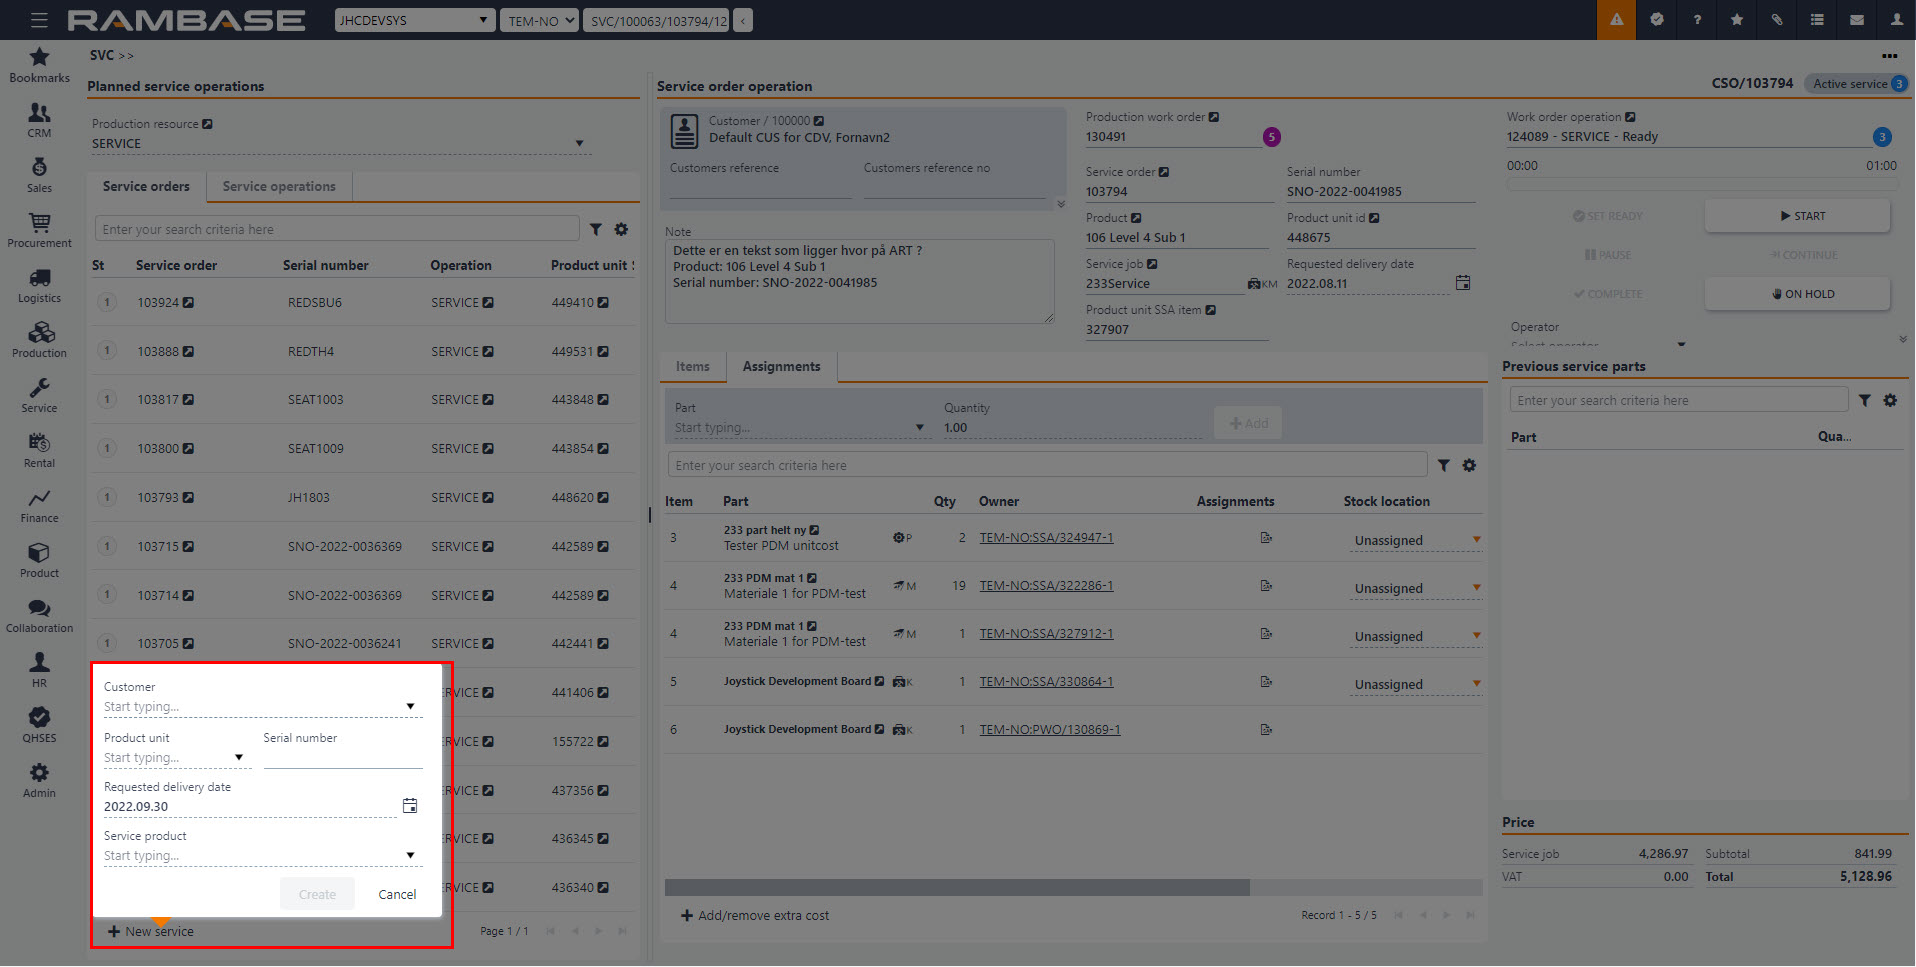
Customer drop-down menu – The mandatory identifier of the customer for which the service order will be created.
Product unit drop-down menu – The mandatory identifier of the product unit on which the service will be performed. It is possible to create a new Product unit (LCM) instead of selecting an already existing one.
Serial number – This informational field is supplied automatically after the Product unit is selected.
Requested delivery date – The requested delivery date for the serviced item.
Service product drop-down menu – The Product (ART) with type KM that will be used to perform the service. Remember, that this operation might not be linked to the production resource that was selected in the beginning of the process.
Click on the Create button to generate a new document. If the Product (ART) type KM is linked to the selected production resource, then the new Service order (CSO) will be listed in the Service orders tab. If not, search for the correct resource. Otherwise, you need to search for the correct resource first.
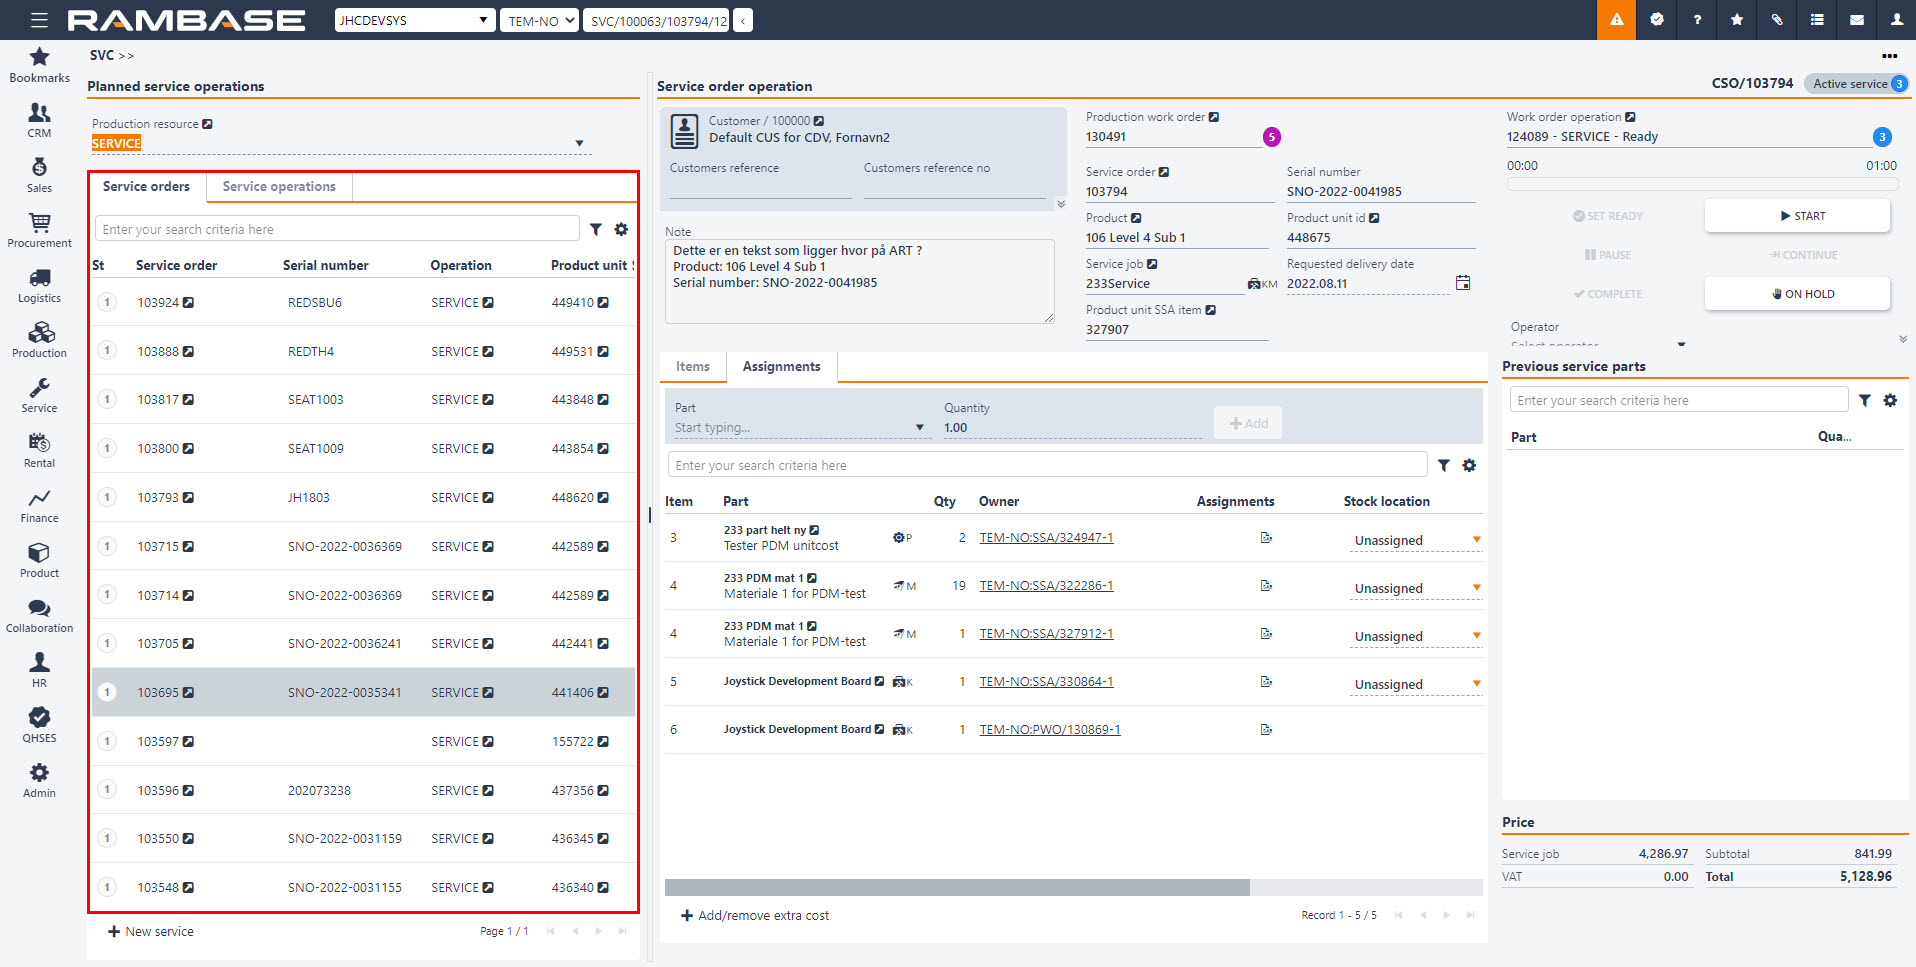
The list contains service orders that are imported from a file or still pending registration. At this point there are no Production work orders (PWO) or Operations (OPR) linked to the Service order (CSO).
To proceed with the operation, use the Forward to Customer option in the context menu to send the document to the customer.
In case a document already exists for the selected Product unit (LCM), an error message will be prompted when forwarding.
You can complete the ongoing service to register a new one or delete the duplicate while it is not yet registered.
Perform the service operation
The Service operation tab contains all the Work order operations (WOO) linked to the service jobs. Each operation is displayed in a separate row and may be filtered using the search criteria or one of the predefined filters.
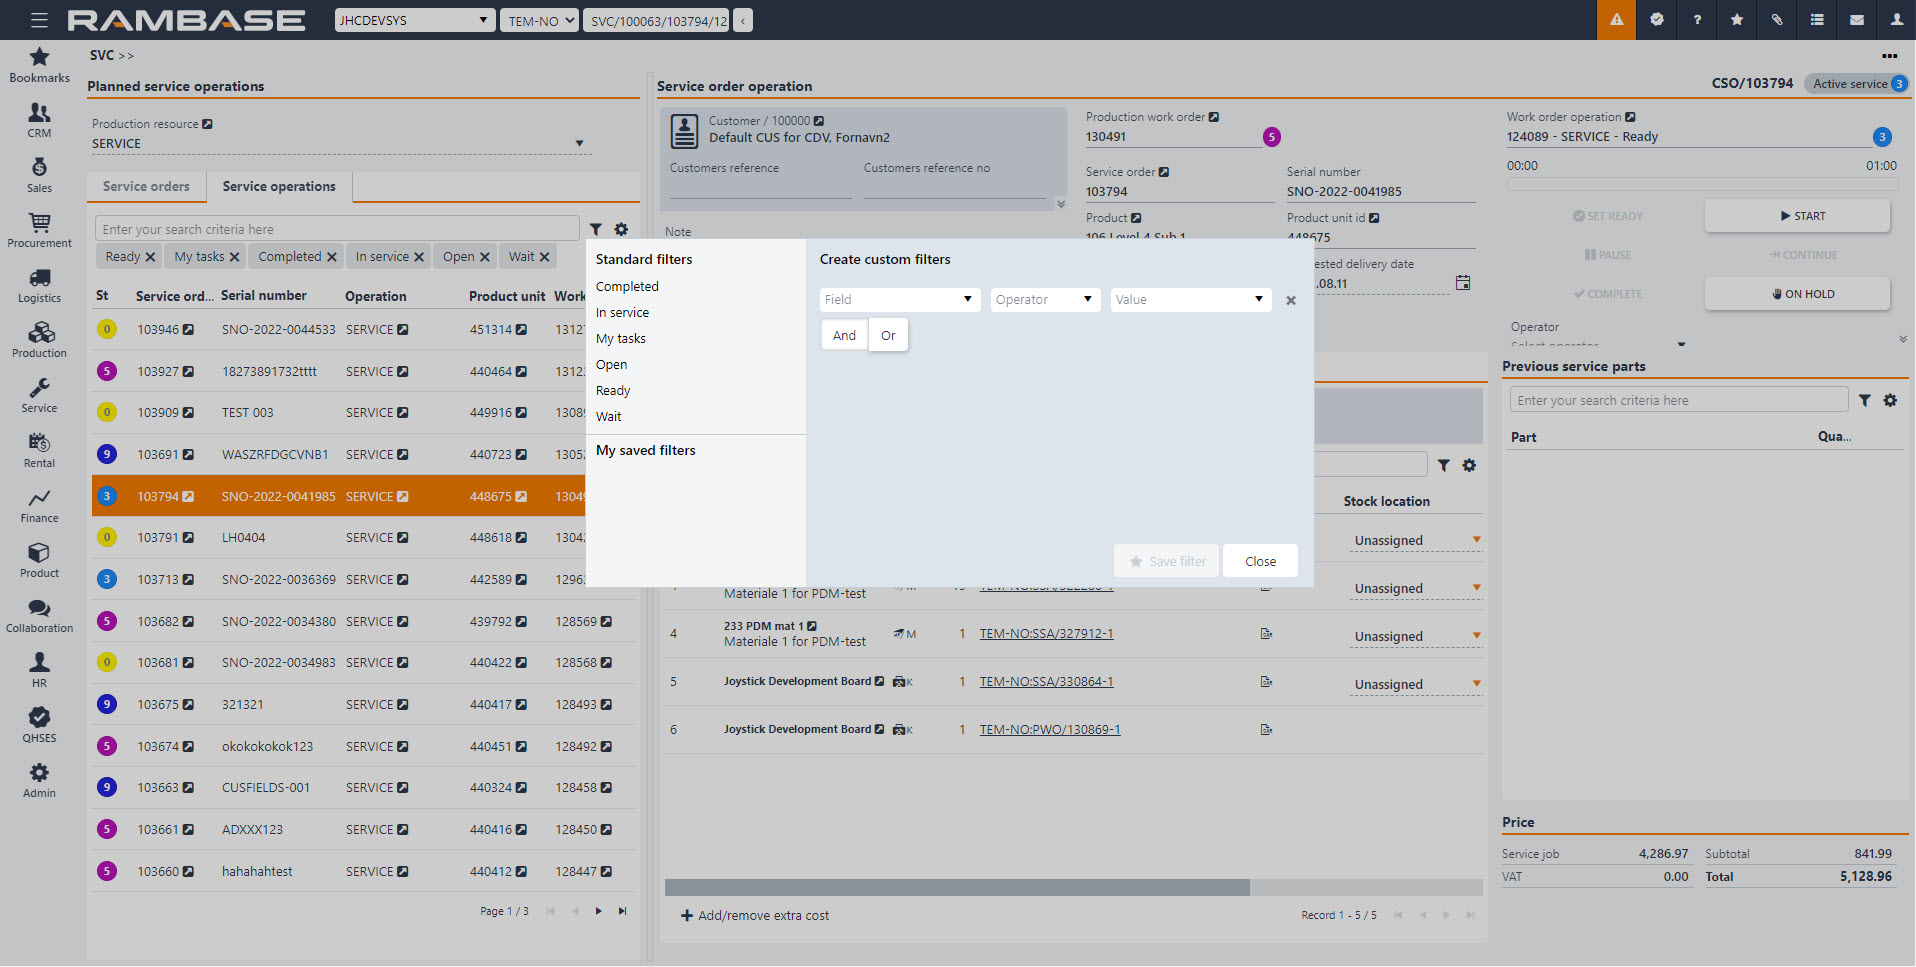
Forwarded Service orders (CSO) may require picking a Goods reception (SSA) item before the actual job is initialized. This is indicated by the Status 2 (Pending purchase or production) in the Service job (CSO) application and is displayed in the upper right corner of the Service job detail view in the Planned service operation (SVC) application.
If the serviced product unit is picked, then the service job is set as in Status 3 (Active). You can now release the linked Production work order (PWO). This process will generate all the planned operations.
The Work order operation view contains all the relevant actions and buttons. Depending on the operation status, you can manipulate the operation by clicking ready, start, pause, or complete . The planned time is visible below the operation label.
Multiple operators can work on the same operation in parallel, depending on the production resource settings.
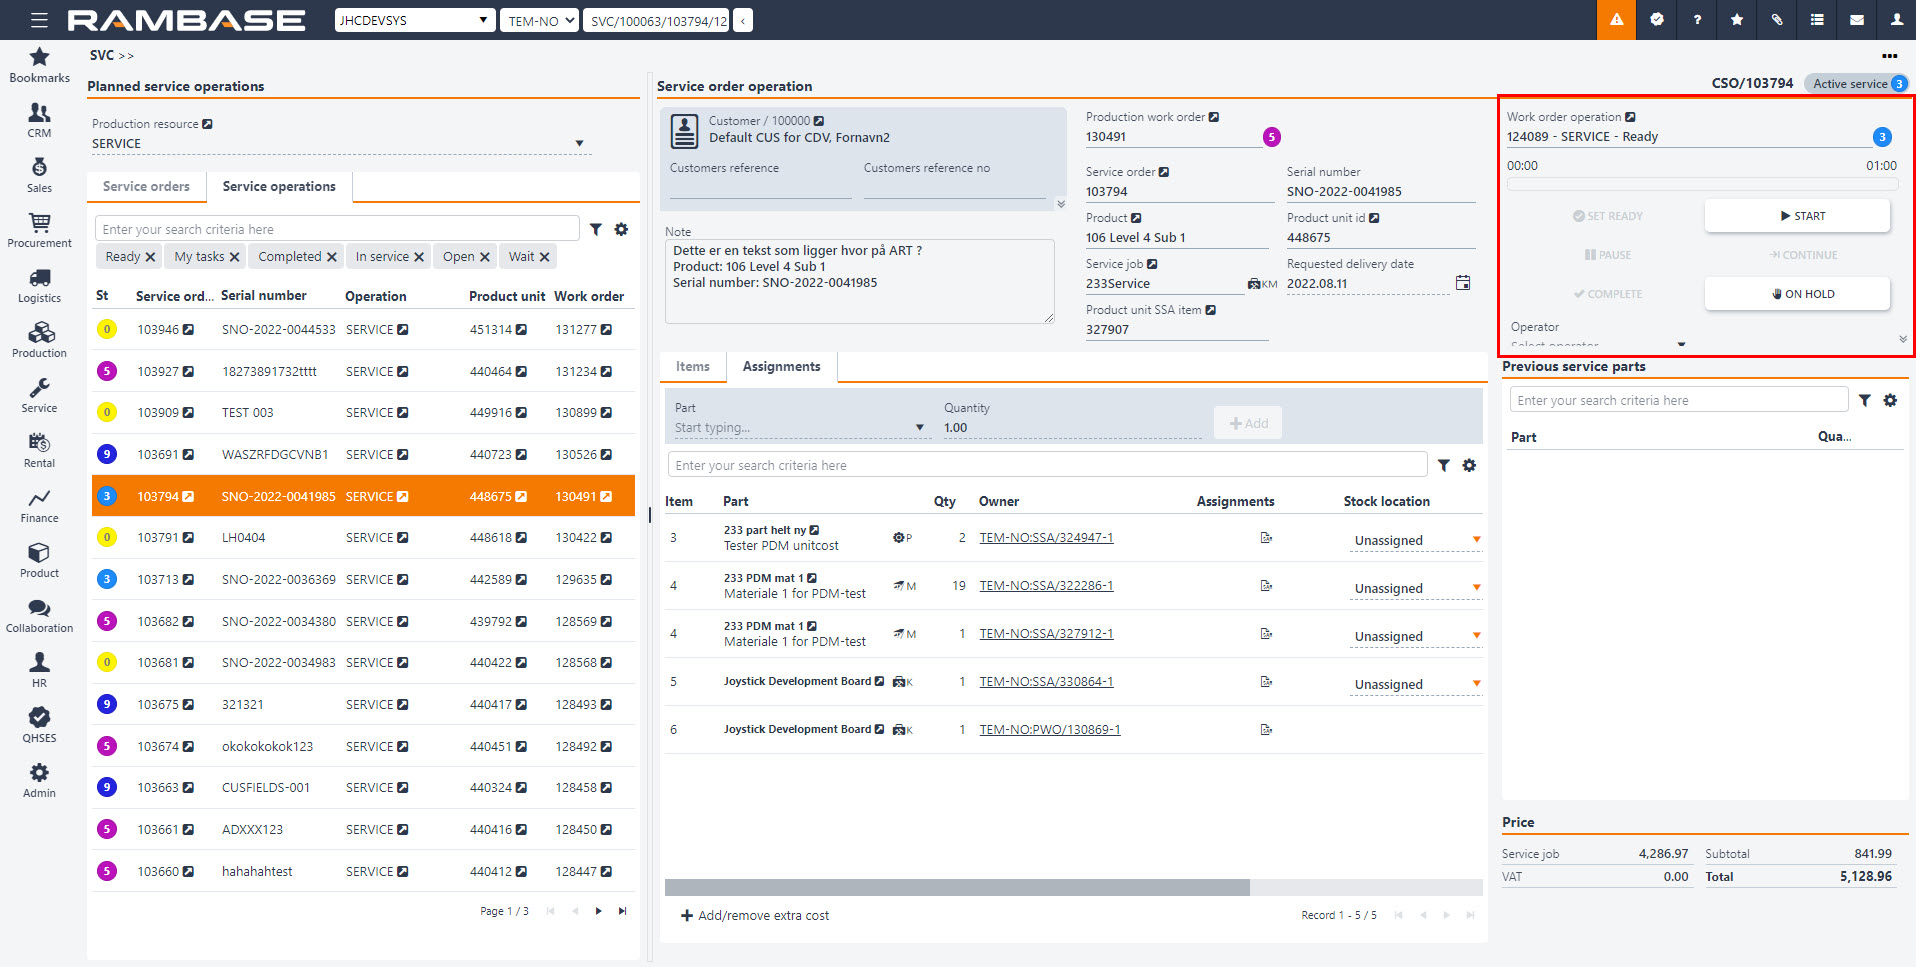
When the last operation on the list is finished, it is possible to complete the entire Work order operation (WOO).
Manage service parts
During an active service operation, users may be inquired to pick certain consumables, parts, or additional costs for the given job.
Add a new part
To add parts, you need to select an active service, select the consumable from the list in the desired quantity and click the Add button. Each new item will be visible in the linked service order item list.
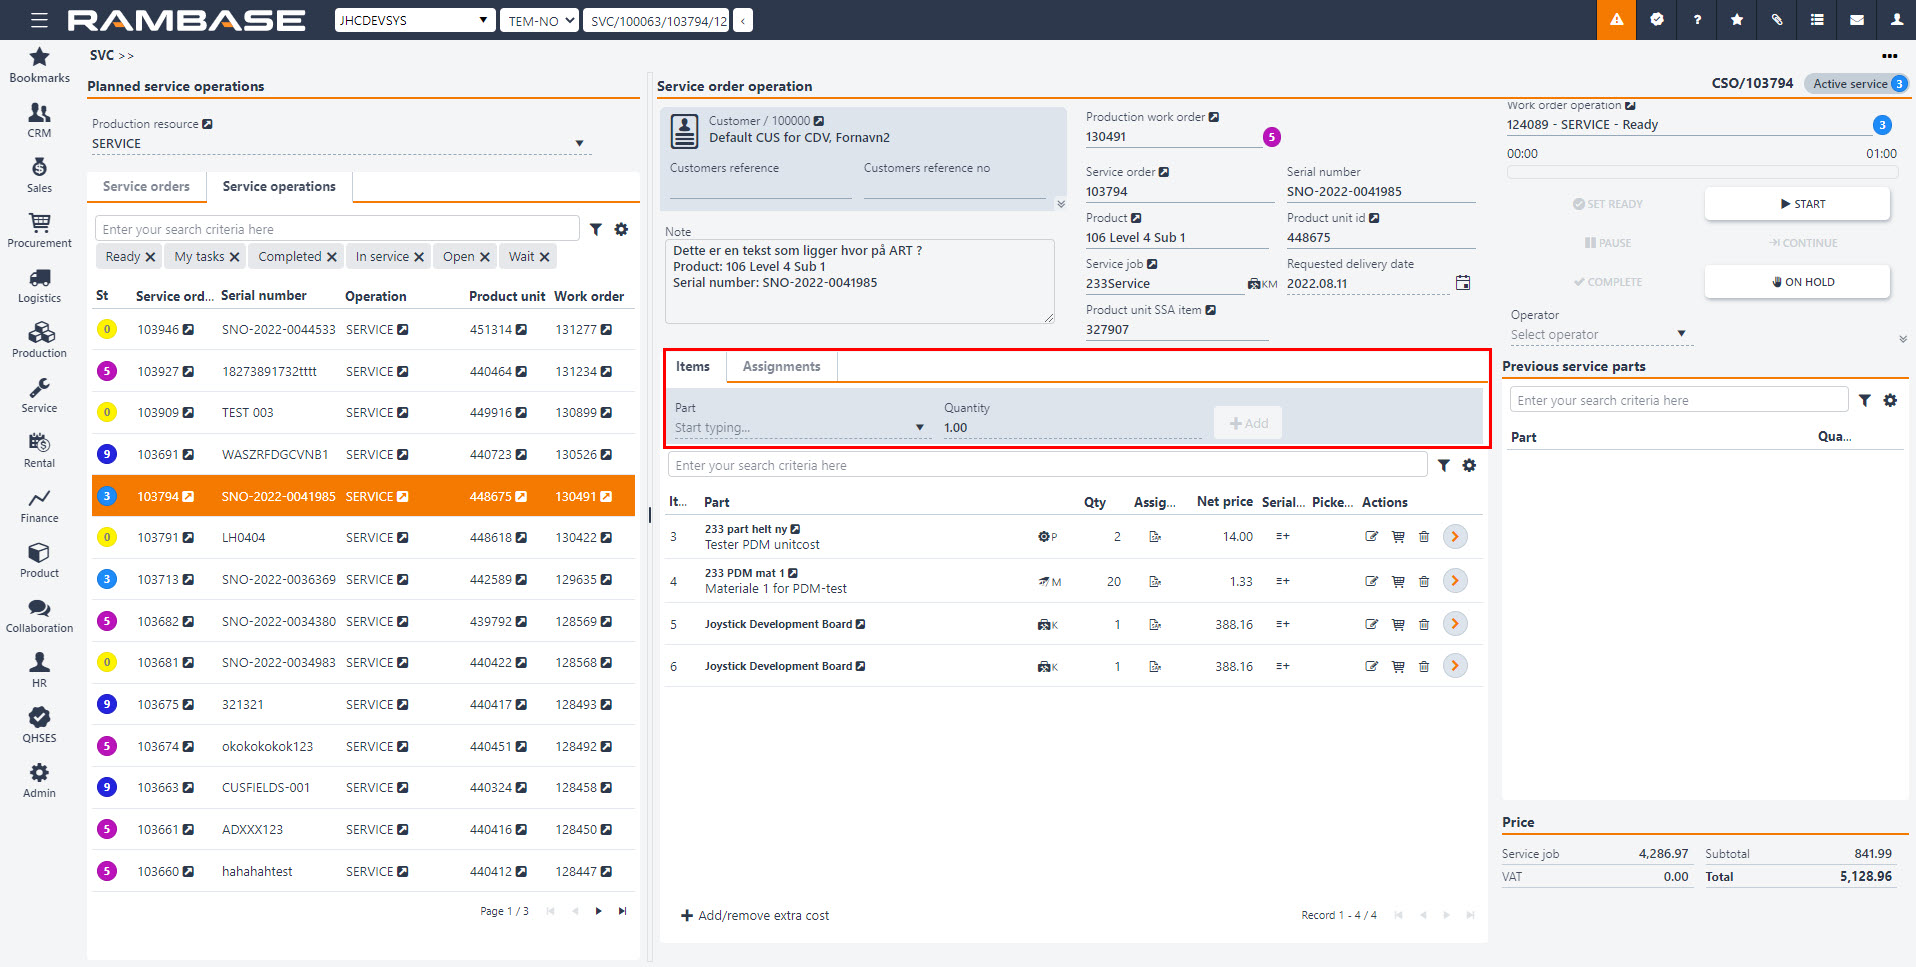
Alternatively, it is possible to add parts that were picked during previous services for the same Product unit (LCM) in the Previous service parts area.
Perform actions on the added part
To change the quantity of the items that require picking, click the Change quantity icon in the Actions column for the desired part.
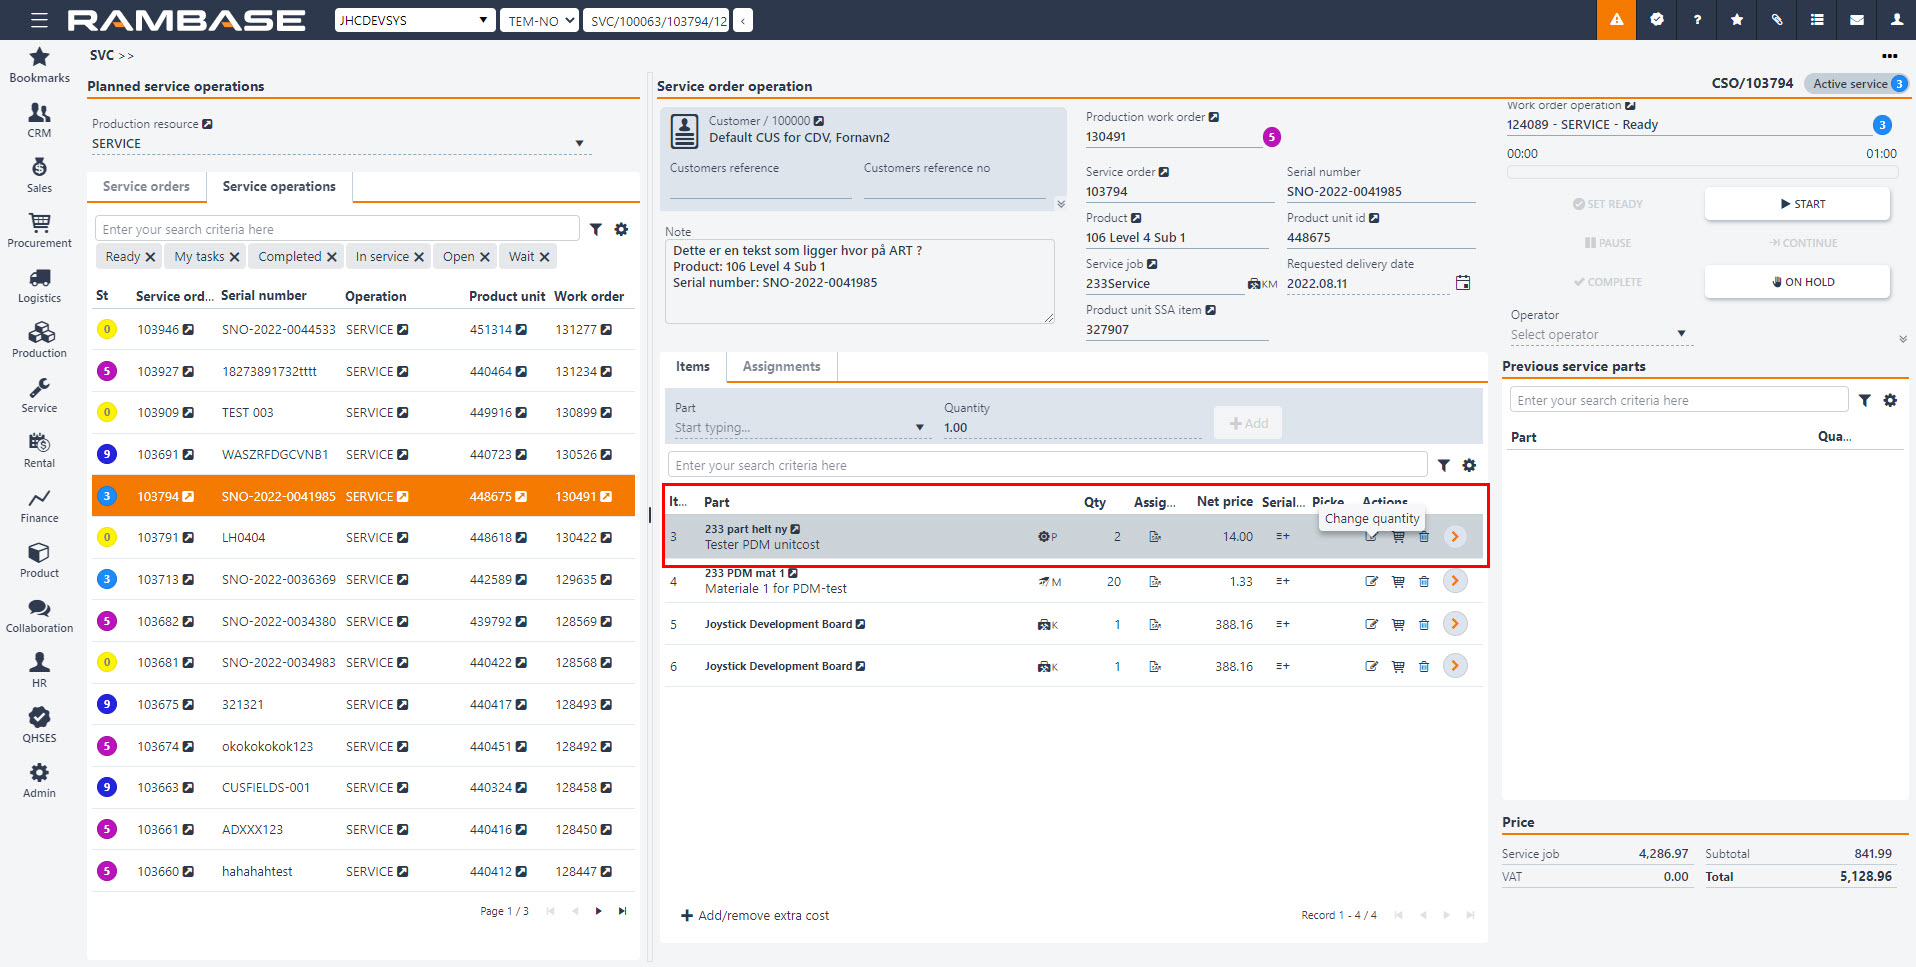
When the quantity is adjusted according to the order requirements, you can confirm picking. This will link the quantity from the Goods reception (SSA) document to the current Service order (CSO).
Each part that will not be used during the service job can be removed from the list by clicking on the Remove part icon in the Actions column.
The picking process can also be undone by clicking on the Undo picking icon for the given part.
Add or remove extra cost items
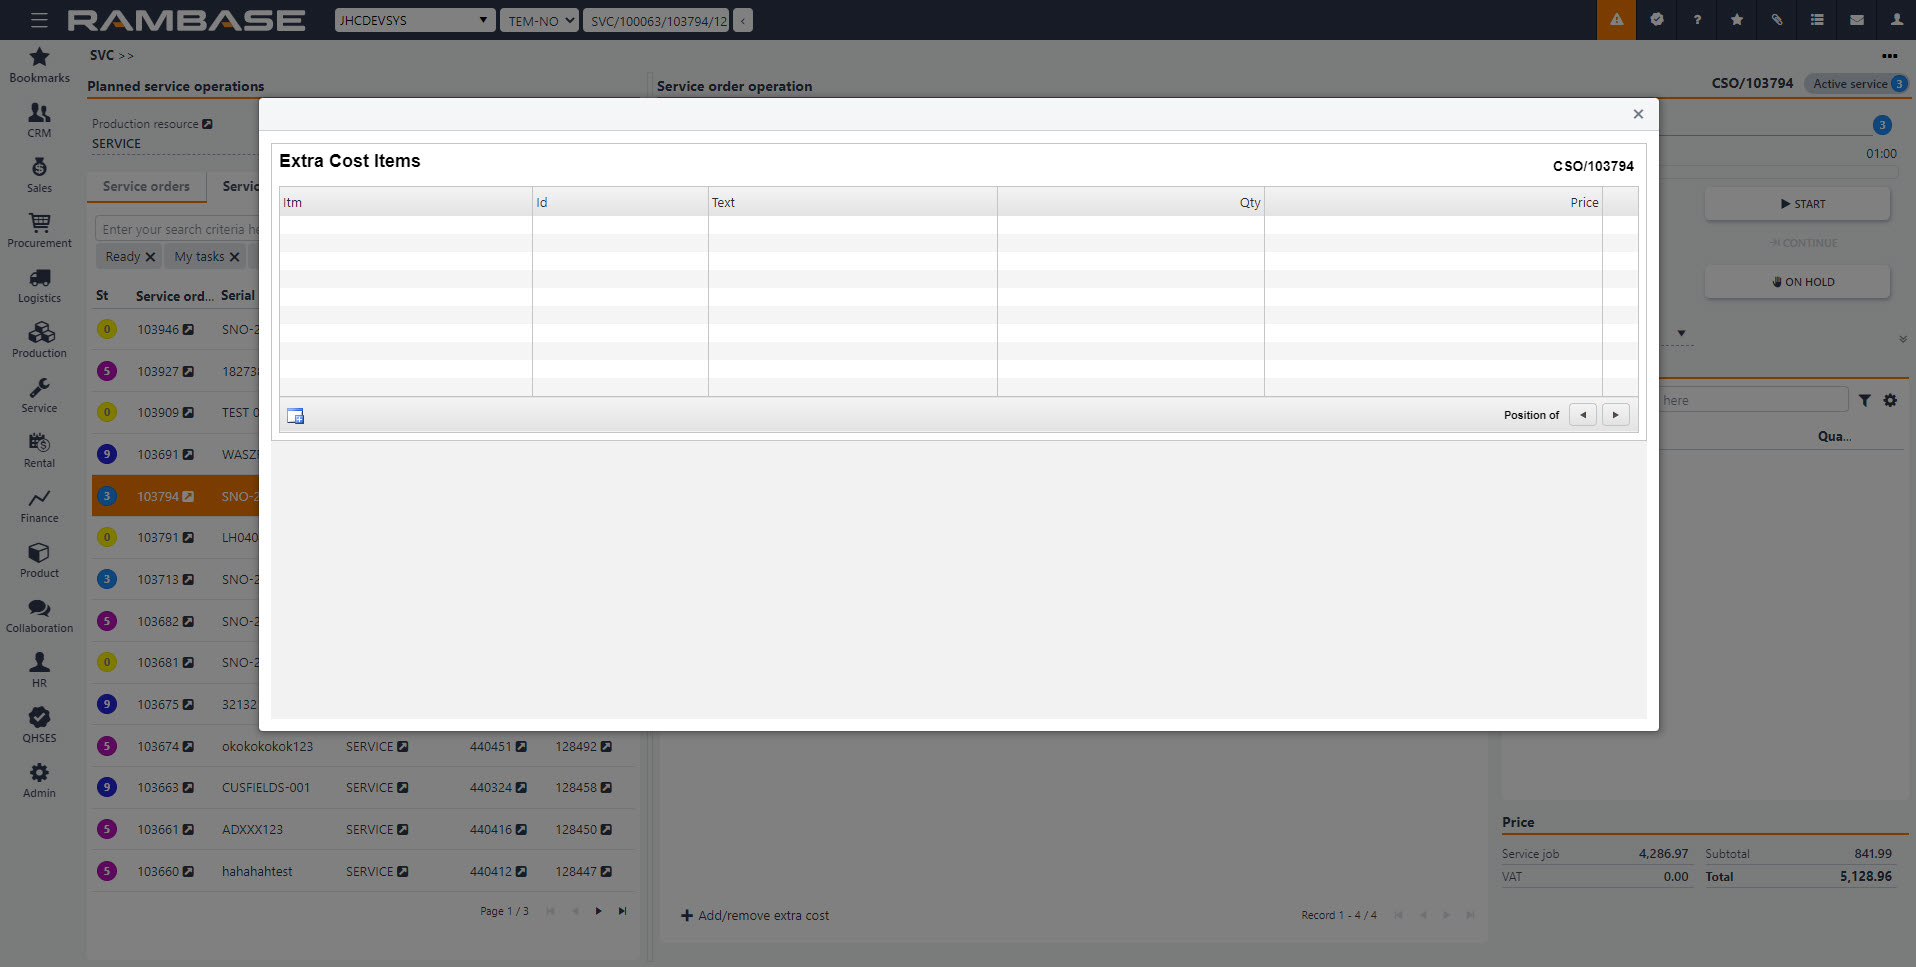
Certain parts, type V, that affect the total cost of the service, are not linked to any Goods receptions (SSA). These cost elements can be added to the part list by clicking on the Add/remove extra cost button.
Clicking on the Add/remove extra cost button opens a separate popup where users can see the list of extra cost items, adjust their quantity, price, and add new items.
Available options in the context menu
Delete - Removes the Service order (CSO) if it has not been forwarded to the customer.
Forward to Customer - Forwards Service orders (CSO) in Status 0 or 1 to the customer.


