Customer (CUS)
The Customer (CUS) application is designed to create new customers efficiently, as well as viewing details on existing customers and the option of editing these details.
Note
In RamBase, a Customer (CUS) can be defined as a private person, or a company. This is decided when creating the customer by selecting either Business or Private in the Create customer popup.
Navigate to the application
Option 1: RamBase menu → Sales → Customer management → Customers
Option 2: Click the Program field and type "CUS" and press ENTER.
Click here to read more about the user interface.
Overview
The application is divided into three (3) main areas; the list of customers on the left, the header on the right with base customer and financial information, and the tabs area where detailed information is categorized.
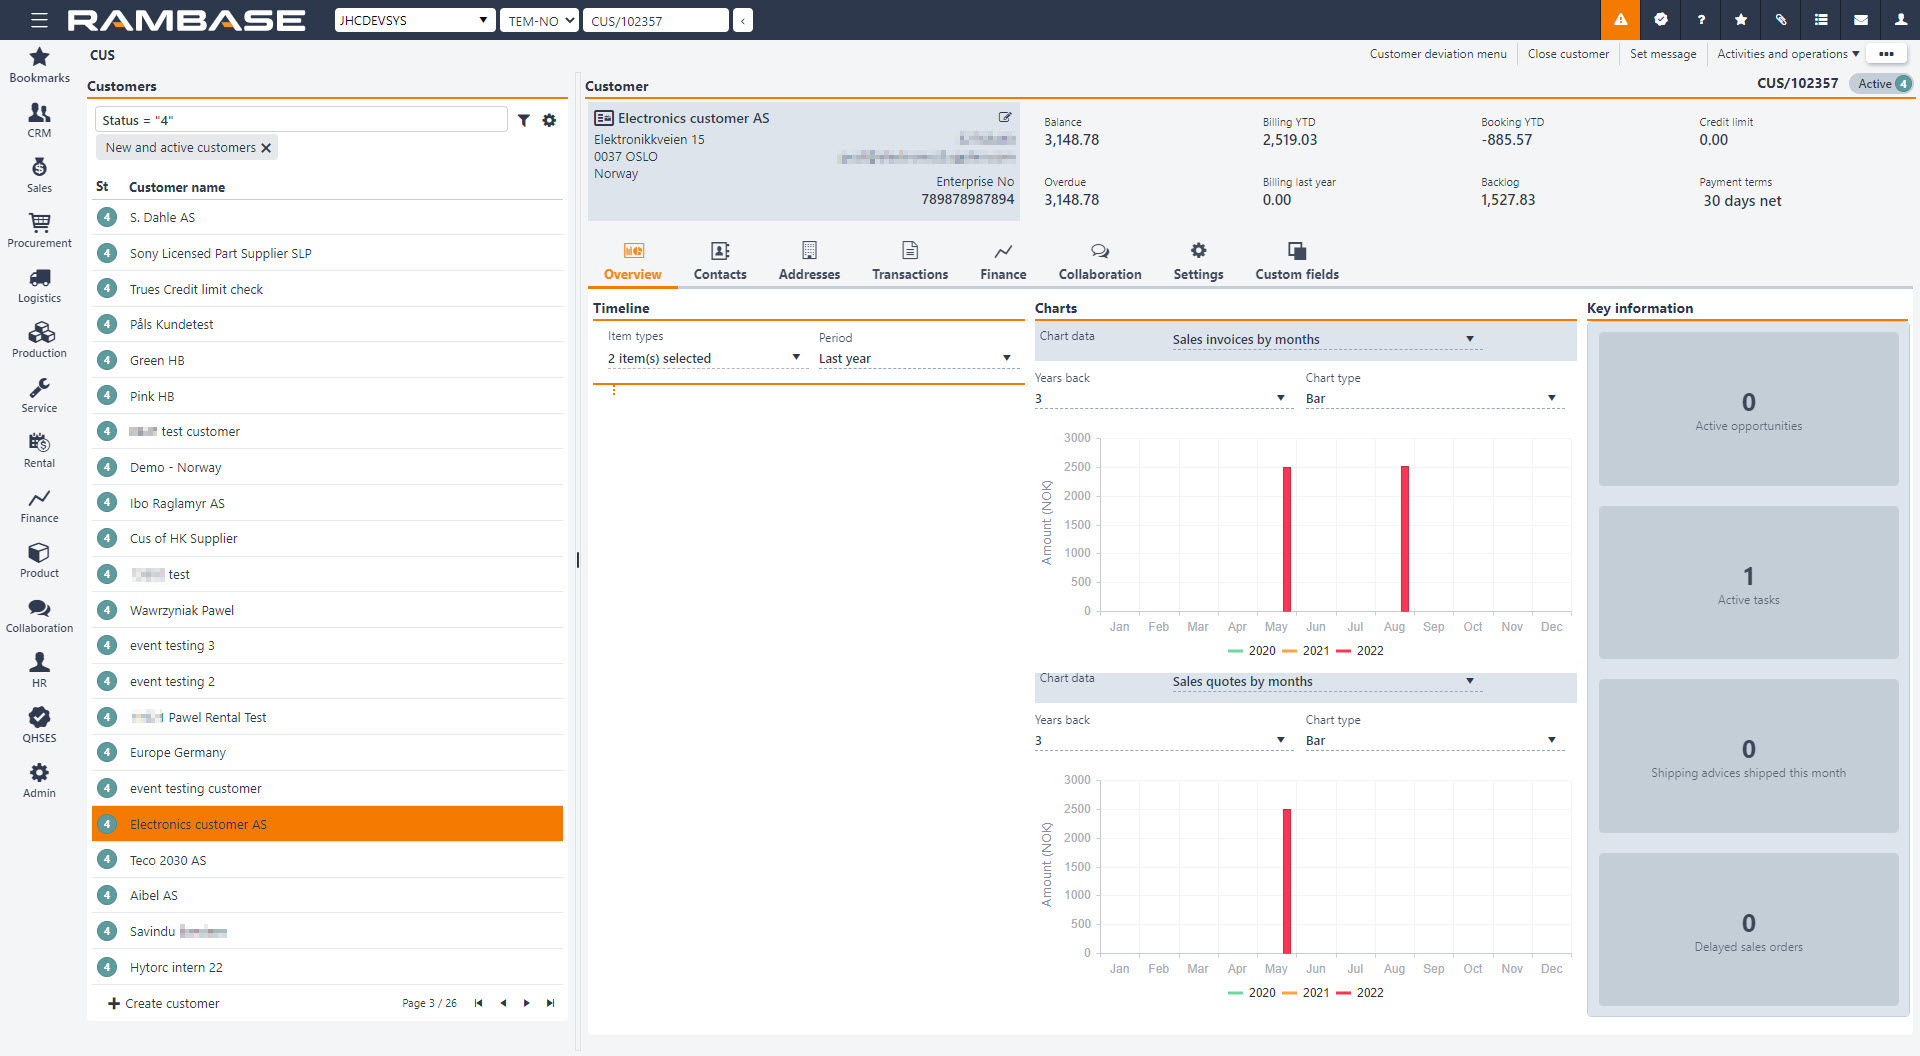
List - Left side
The list of Customers (CUS) can be filtered and customized. This is also the area where the creation of new customers is performed. The information in the list is detailed in the table below, describing each column and icon.
Search field, filter builder and column settings
The header contains multiple options to filter the list:
Active customers - Filters on customers in Status 4 - Active.
Active and closed customers - Filters on customers in Status 4 - Active and Status 9 - Inactive.
Business customers - Filters on customers set as Business during creation.
Closed customers - Filters on customers in Status 9 - Inactive.
Invoiced this year - Filters on customers who have been invoiced in the current year. For details, click the Billing YTD in the Header area on the top-right.
My customers - Filters on customers where the current user is set as the Account manager.
New and active customers - Filters on customer in Status 1 - New and Status 4 - Active.
Pending activation - Filters on customers in Status 1- New.
Private customers - Filters on customers set as Private during creation.
With overdue payments - Filters on customer with Sales invoices (CIN) in Status 4 - Pending payment past the Due date.
Column | Icons | Description |
|---|---|---|
St |
| Displays an icon indicating the status of Customers (CUS). Potential statuses for Customers (CUS):
|
Id | Displays identifier of the Customer (CUS). Example: "CUS/123456" | |
Customer name |
| Displays the primary system name of the customer. The Information icon will be displayed if there is set a message on the Customer (CUS). Messages can be set via the Context menu option, Set message. |
First name | Secondary name of a company or first name of a person. | |
Last name | Name of customer (name of company or surname/family name/last name of a person). | |
Country | Displays the English name of the customer's country. | |
Classification | Classification of the customer. | |
Billing YTD | Total amount of invoices and credit notes that has been invoiced this year (to current date). |


Create customer button - To create a Customer (CUS) in Status 1 - New and activate it via the Context menu
| Create customer button |
To open the Customer (CUS) application, find Sales in the RamBase menu and then Customer management. Click Customers to enter the Customer (CUS) application.
Click the Create customer button in the lower left hand corner of the Customer (CUS) application
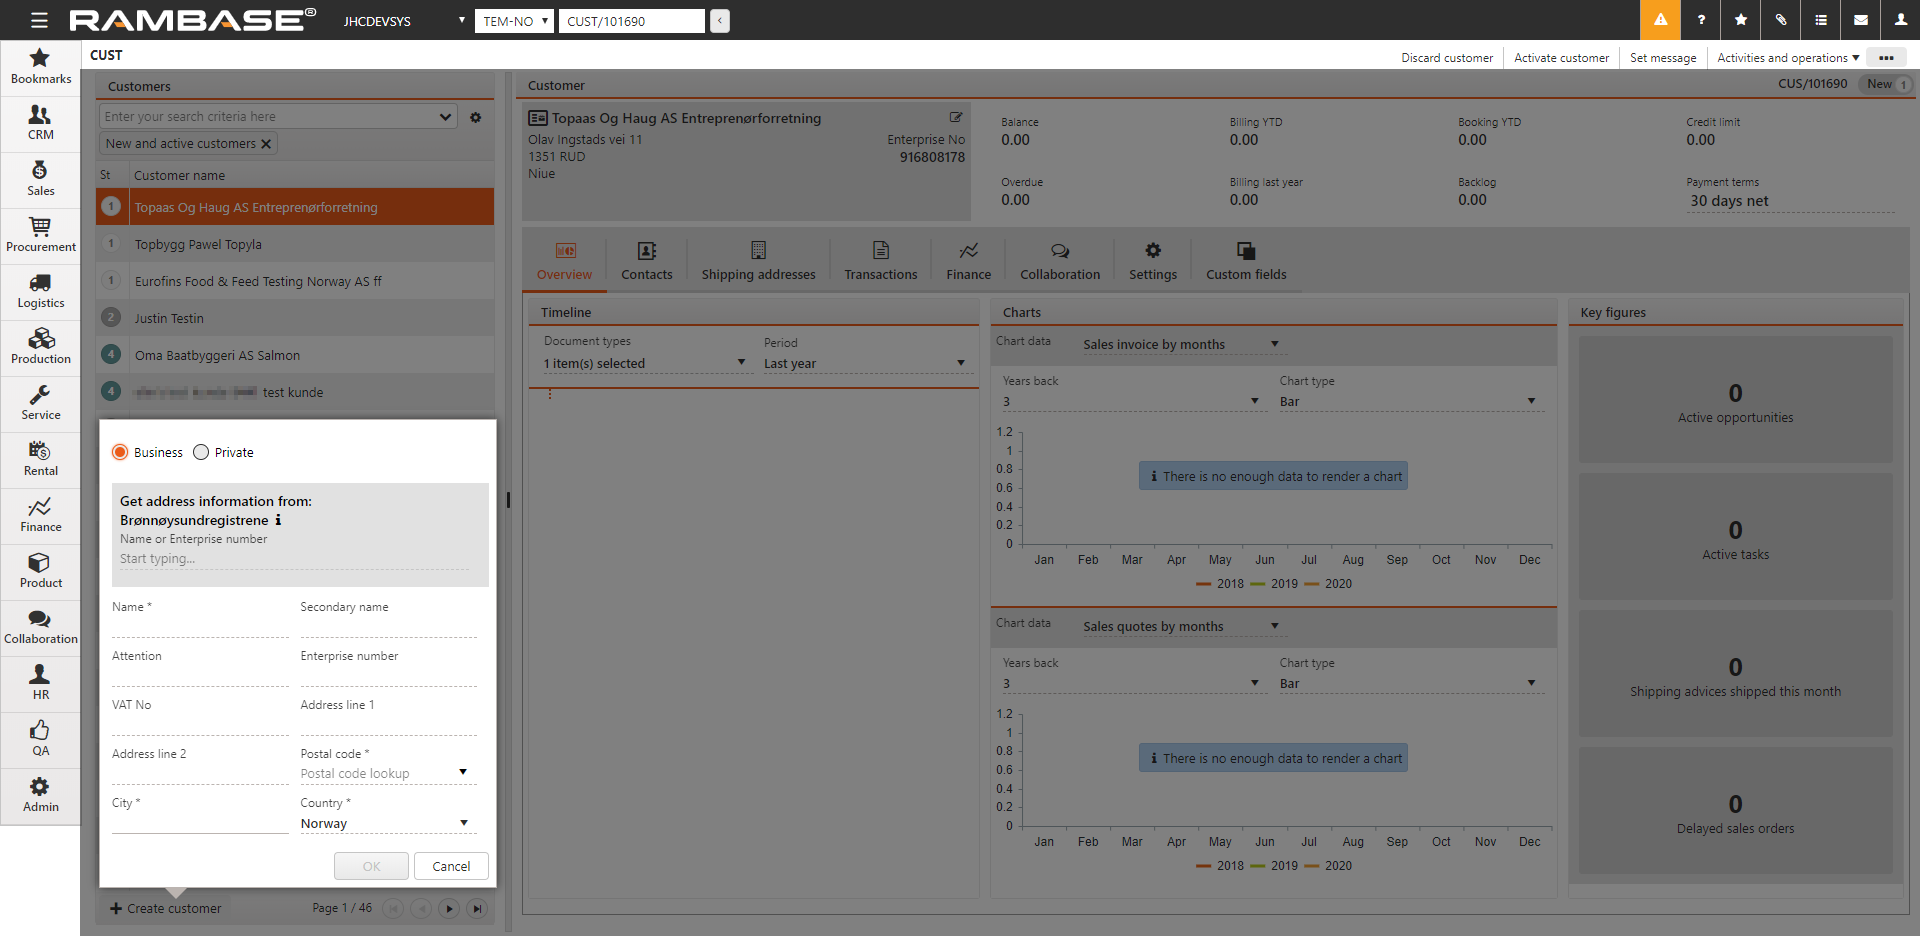
A new window appears where you can add customer main data. This can also be collected via the Brønnøysund integration. Search company name or enterprise number.
Due to the validation process, the Postal code and City field can not remain empty. If there is no postal code or city, enter a placeholder character ("0" or ".") to continue.
As soon as all mandatory data (fields marked with *) have been entered, click the OK button to create the Customer (CUS) in Status 1 - New.
It is still possible to add additional data on the Customer (CUS).
In the Settings tab, enter relevant settings. Settings can be updated at all time. These settings will be used as default values and will be copied to documents, such as Sales Orders (COA).
In the Output control sub-tab, enter how documents are to be handled and where they are to be sent by e-mail, print etc.
You can add several Shipping and Invoice addresses in the Addresses tab. The Set as default column to the far right controls which of these addresses will be used as the default address for this user during document creation.
Note
It is possible to deactivate a shipping or invoice address if there are no active transaction documents, linked. And the addresses can be deleted if they have never been used.
In the Contacts tab, add data about employees that work for the Customer (CUS). Click the Select contact button to add a contact to the Customer (CUS). Click the Create contact button to create a new Contact (CNT) and add it to the customer.
To activate the customer, click the Activate customer option in the context menu. This action will activate the customer and set the Customer (CU) in Status 4 - Active.
Header - Right side


Balance - Displays the current Customer balance (CUSBAL) in the selected currency. To open the Customer balance (CUSBAL), click the field.
Billing YTD - Displays the Customer billing by YTD in the selected currency. To open the Customer Billing by Period/YTD report (NGREP/100120), click the field.
Booking YTD - Displays the Customer bookings withing the current fiscal year. To open the Customer Booking - By Customer report (NGREP/100324), click the field.
Credit limit - Displays the current credit limt. To edit the credit limit, click and type in the field.
Overdue -Displays the due amounts for the customer. To open the Customer DueAmounts (CUSDUE) application, click the field.
Billing last year - DIsplays the Customer billing for the previous year. To open the Customer Booking and Billing - By Year report (NGREP/100621), click the field.
Backlog - Displays the backlog amount in system currency, for the customer. To open the Customer Backlog (COA) - By Confirmed Date report (NGREP/100299), click the field.
Payment terms - Displays the current payment terms. To change payment terms, click the drop-down menu and select a new one.
Tabs - Right side
Tip
The information on each tab is collapsed due to size.
Click the arrows to expand the information per tab.
The Overview tab includes various tools to compile and highlight information about the Customer (CUS).
Timeline
The Timeline area allows the user to define a timeline by selecting Item types and Period.
CIN - Sales invoices
COA - Sales orders
CPO - Sales order requests
CQU - Sales quotes
CRQ - Sales quote requests
CSA - Shipping advices
NOTE - Notes
TASK - Tasks
OPPD - Opportunities
EMAIL - Email
Last year
1 year ago
2 years ago
3 years ago
Charts
The Charts area can display up to two charts. Most chart data can be displayed historically by current year or years back, in addition to selecting a specific chart type; Bar, Bar stacked, Fluctuating line and Accumulated line.
Sales invoices by periods
Sales quotes by months
Sales quote requests by months
Shipping advices by months
Billing 5 years
Key information
The Key information displays exactly that, key information in the form of:
Active opportunities - Click to open the Opportunities (OPPD) application.
Active tasks - Click to open the Task (TASK) application.
Shipping advices shipped this month - Click to open the Shipping advices (CSA) application.
Delayed sales orders - Click to open the Sales orders (COA) application.
In the Contacts tab, add data about employees that work for the Customer (CUS). Click the Select contact button to add a contact to the Customer (CUS). Click the Create contact button to create a new Contact (CNT) and add it to the customer.
Active contacts - Filters the list on Contacts (CNT) in Status 4 - Active
Inactive contacts - Filters the list on Contacts (CNT) in Status 9 - Inactive
Search field, filter builder and column settings
The header contains multiple options to filter the list:
Column | Icon | Description |
|---|---|---|
St |
| Displays the status of Contact (CNT). Potential statuses:
|
First name | First name/Given name of the Contact (CNT). | |
Last name | Last name/Surname/Family name of the Contact (CNT). | |
Category | Displays the categorization of the Customer (CUS). Can be set up in the Domain values (DOV) application by selecting the Department field on contacts line in the Description column. | |
Job title |
| Professional title. To edit, click the Edit icon. |
Default phone |
| The default phone number of the Contact (CNT). To edit, click the Edit icon. |
Default email |
| The default email of the Contact (CNT). To edit, click the Edit icon. |
Set as default |
| If enabled, the Contact (CNT) is the default contact at the Customer (CUS). |
| To remove the Contact (CUS) from the Customer (CUS), click the Remove icon. | |
| To open the Contacts (CNT) application, to edit or inspect details, click the Right arrow icon. |


Create contact button
Creating a Contact (CNT), in the context of the Customer (CUS) application, will add the Contact (CNT) as a point of contact with the Customer (CUS). Contact (CNT) details can be viewed and edited in the Contact (CNT) application, which is easily available by clicking the Right arrow icon in the Contacts tab.
| Create contact button |
To create a new Contact (CNT) in Status 4 - Active, click the Create contact button.
In the following popup, fill in the contact's information:
Last name - Required
First name
Job title
Email
Phone
To set the potential contact as the default point of contact for the Customer (CUS), enable the Set as default checkbox.
To create another contact, without closing the popup, enable the Create another checkbox.
To finish creating the new Contact (CNT) and adding it to the Customer (CUS), click the Create button.
Select contact button
The Select contact button is used to select any previously created Contact (CNT) and add it as a point of contact with the Customer (CUS).
| Select contact button |

To add a any previously created Contact (CNT) to the Customer (CUS), click the Select contact button.
In the following popup, click the Contact drop-down menu and select a potential contact from the list.
Tip
Filter the selection by clicking the Filter icon.

Filter icon
Standard filters for Contacts (CNT):Active contacts
Inactive contacts
Customer's contacts
Personnel contacts
Supplier's contacts
To set the selected contact as the default point of contact with the Customer (CUS), enable the Set as default checkbox.
To finish selecting a Contact (CNT) and adding it to the Customer (CUS), click the Create button.
Sales order items
The Sales order items (COAITEM) are listed to allow quick navigation to detailed information, as well as quick links to the Stock assignments (SAR) and Sales order item (COAITEM) applications.
Search field, filter builder and column settings
The header contains multiple options to filter the list:
Active items
Items with approval notification
Items confirmed this week
Confirmed later than requested
Delayed items
Items with information notifications
My items
My open items
Open items
Items with possible delivery problems
Column | Icon | Description |
|---|---|---|
St |
| Status of the Sales order item (COAITEM). Potential statuses are:
|
Id | Displays the Sales order item (COAITEM) identifier. | |
Created at | Date and time of creation in system settings format. | |
Remaining | Remaining number of units to be forwarded. | |
Product |
| Displays the Product (ART) name of the Sales order item (COAITEM). |
Manufacturer | Displays the shortname/code of the manufacturer. | |
Requested | Displays the Requested delivery date as requested by the customer, and set on the Sales order item (COAITEM). | |
Conf. date | Displays the confirmed date of delivery. Date of which the customer can expect the arriving goods. | |
Customers ref. no | Displays the customer's item reference number. Typically to the customer's internal system. | |
Customers product name | Displays the customer's product name which is defined in the Product (ART) application → Relations tab → Customers products sub-tab. | |
Gross margin (%) | Displays the gross margin of the Sales order item (COAITEM), based on the selected GmModel - as set up in the Company settings (COM). | |
Net price | Displays the final price per unit after deducting all discounts. | |
Net amount | Displays the net amount in company currency. | |
Assignments |
| To view Stock assignments (SARC) for the Product (ART), click the SAR icon. |
| To open the Sales order (COA) application in the context of the Sales order item (COAITEM), click the Right arrow icon. |


Billing items
All Sales invoice items (CINITEM) and Sales credit note items (CCNITEM) for the Customer (CUS) are listed here, with quick navigation to relevant applications for further inspection and handling.
Search field, filter builder and column settings
The header contains multiple options to filter the list:
Define a specific period to further filter the list by adding YYYYmm values to the From and To fields in the tab header.

From and To fields
Sales credit note items
Sales invoice items
Column | Icon | Description |
|---|---|---|
St |
| Displays an icon indicating the status of the listed Sales order item (CINITEM) or Sales credit note item (CCNITEM). Potential statuses for Sales invoice items (CINITEM):
Potential statuses for Sales credit note items (CCNITEM):
|
Doc type | Displays the document type of the billing item. Potential document types:
| |
Type | Displays the details of the document type: Potential billing item types:
| |
Id | Displays the identifier of the billing item. The identifier can be applied to the document type for quick access via the Program field. Example "CINITEM/123456-1" | |
Quantity | Quantity of billing item | |
Product |
| Displays the name of the Product (ART) on the billing item. To open the Product (ART) application, to view and edit details, click the View icon. |
Manufacturer | Displays the shortname/code of the manufacturer. | |
Created at | Displays the date and time of creation in a format set up in the system settings. | |
Period | Displays the accounting period. | |
Customers ref. no | Displays the customers reference number. E.g. the internal sales order identifier the customer use in their own system. | |
Gross margin (%) | Displays the profit percentage of the sales amount. | |
Net price | Displays the sales transaction items net price in sales currency. | |
Net amount | Displays the total net amount in company currency. | |
Registration date | Displays the date of registration in the format defined in the system settings. | |
| To open the billing item in the relevant application, to inspect and edit details, click the Right arrow icon. Non exhaustive list of examples:
|

Quote request items
All Sales quote request items (CRQITEM) for the Customer (CUS) are listed here, with quick navigation to relevant applications for further inspection and handling.
Search field, filter builder and column settings
The header contains multiple options to filter the list:
Items with information notifications
My items
Pending purchase quote
Pending registration
Pending sales quote
Pending purchase quote request
Column | Icon | Description |
|---|---|---|
St |
| Displays the status of the Sales quote request item (CRQITEM). Potential statuses are:
|
Id | Displays the Sales quote request item (CRQITEM) identifier. | |
Quantity | Displays the number of units for the Sales quote request item (CRQ) | |
Remaining | Displays the remaining number of units to be forwarded. | |
Product | Displays the name of the Product (ART) of the Sales quote request item (CRQITEM). | |
Manufacturer | Displays the shortname/code of the manufacturer. | |
Created at | Displays the date and time of creation in a format set up in the system settings. | |
Customers ref. no | Displays the customers reference number. E.g. the internal sales order identifier the customer use in their own system. | |
Requested | Displays the Requested delivery date as requested by the customer, and set on the Sales quote request item (CRQITEM). | |
Valid to | Displays the due date of the customer's response. | |
Gross margin (%) | Displays the gross margin of the Sales quote request item (CRQITEM), based on the selected GmModel - as set up in the Company settings (COM). Read more about gross margin and the different calculation models. | |
Target price | Displays the net price as requested by the customer. | |
Net amount | Displays the total item amount. Calculated by multiplying target price with quantity. | |
| To open the Sales quote request item (CRQITEM) application, to view and edit details, click the Right arrow icon. |
Quote items
All Sales quote items (CQU) for the Customer (CUS) are listed here, with quick navigation to relevant applications for further inspection and handling.
Search field, filter builder and column settings
The header contains multiple options to filter the list:
Active items
Agreements
Items close to expiration date
Items with information notifications
My items
Sales quote items without agreements
Column | Icon | Description |
|---|---|---|
St |
| Displays the status of the Sales quote item (CQUITEM). Potential statuses:
|
Id | Displays the Sales quote item (CQUITEM) identifier. | |
Quantity | Displays the number of sales quote items included in the quote. | |
Remaining | Displays the remaining number of units to be forwarded. | |
Product | Displays the Product (ART) name of the Sales quote item (CQUITEM). | |
Manufacturer | Displays the shortname/code of the manufacturer. | |
Created at | Date and time of creation in system settings format. | |
Customers ref. no | Displays the customer's item reference number. Typically to the customer's internal system. | |
Valid to | Displays the due date of the customer's response. | |
Gross margin (%) | Displays the gross margin of the Sales quote item (CQUITEM), based on the selected GmModel - as set up in the Company settings (COM). Read more about gross margin and the different calculation models. | |
Net price | Displays the final price per unit after deducting all discounts. | |
Net amount | Displays the net amount in company currency. | |
| To open the Sales quote item (CQUITEM) application, to view and edit details, click the Right arrow icon. |
Shipping advice items
All Shipping advice items (CSAITEM) for the Customer (CUS) are listed here, with quick navigation to relevant applications for further inspection and handling.
Items with approval notifications
Items with information notifications
My Items
Columns | Icon | Description |
|---|---|---|
St |
| Displays the status of the Shipping advice item (CSA). Potential statuses:
|
Id | Displays the identifier of the Shipping advice item (CSAITEM). | |
Quantity | Displays the quantity of the Shipping advice item (CSAITEM). | |
Product |
| Displays the Product (ART) name of the Shipping advice item (CSA). |
Manufacturer | Displays the shortname/code of the manufacturer. | |
Created at | Date and time of creation in system settings format. | |
Customers ref. no | Displays the customer's item reference number. Typically to the customer's internal system. | |
Gross margin (%) | Displays the gross margin of the Shipping advice item (CSA), based on the selected GmModel - as set up in the Company settings (COM). | |
Net price | Displays the final price per unit after deducting all discounts. | |
Net amount | Displays the net amount in company currency. | |
| To open the Shipping advice item (CSAITEM) application, click the Right arrow icon. |
Rentals
Note
Uses functionality from the rental 2013 release.
| View icon |
Recurring sales quotes - To open the Recurring sales quote menu (CQP) application, click the View icon.
Sales quotes - To open the Rental sales quotes (CQR) application, click the View icon.
Rental orders - To open the Rental orders menu (CRO) application, click the View icon.
Recurring invoice plans - To open Customer plan management (CPM) application, click the View icon.
Rental and subscription items
Columns | Icon | Description |
|---|---|---|
| Displays the status of the Rental contract items (RCTITEM) in the list. Available statuses:
To select single or multiple contract items, click the Status icon(s). To select all, click the Checkbox in the Column header. Context menu optionsThe available options change depending on the selection of contract items. | |
Rental contract id |
| Displays the contract item identifier. To open the Rental contract (RCT) application in the context of the Rental contract item (RCTITEM), click the View icon. |
Line no. | Displays the line- or sequence number of the item. Items can be rearranged in the list by drag and drop, resulting in a new order line- and sequence number. | |
Version | Displays the rental contract item version. Note the Version log tab where new versions of the rental contract can be created. The version number represents in which version the item was added. | |
Revision | Displays the rental contract item revision. A new revision of the Rental contract item (RCTITEM) will be created when terms are updated. Examples are Effective date, Expiration date, Discount. | |
Internal note | ||
Stage |
| Displays the current stage of the Rental contract item (RCTITEM). To view all details in the Rental contract item (RCTITEM) application, click the Right arrow icon or click to highlight the item and press ENTER. |
Quote no. | Displays the rental contract quote identifier. | |
Quote name | Displays the name set when creating the Rental contract (RCT) quote. | |
Product |
| Displays the name and description of the Rental contract item (RCTITEM). To view and edit details on the Product (ART), click the View icon. |
Customers ref. no | Displays the Customers reference no. for the Rental contract item (RCTITEM). E.g. the internal sales order identifier the customer use in their own system. To edit, click the Right arrow icon to open the Rental contract item (RCTITEM) application and locate the Customers reference no field in header. | |
Type | Displays the product type of the Rental contract item (RCTITEM). Expected values can be Subscription or Rental. | |
Quantity | Displays the contract item quantity of the product. | |
Effective date | Start date of the Rental contract item (RCTITEM). Displayed in yyyy.MM.dd format. | |
Expiration date | End date of the Rental contract item (RCTITEM). Displayed in yyyy.MM.dd format. | |
Current rate step | Displays currency / piece or batch / interval. Details the current rate step in: Price/Piece or batch/Duration. Example: 700.00 USD/pcs/month. The example used will have an estimated monthly revenue of 700 USD per piece. | |
Discount | Displays the current discount in percent. | |
Number of rates |
| Details the number of Recurring rates (RRT) utilized by the Rental contract item (RCTITEM). To open the Rental contract item (RCTITEM) application and inspect and edit the details in the Rental rates sub-tab, click the View icon. |
Avg. rate per day | Displays the average rate per day. | |
Total amount | Displays the total amount excl. VAT of the Rental contract (RCT). | |
Discount amount | Displays the total discount amount excl. VAT. | |
Total net amount | Displays the total amount excl. VAT, after discount. | |
| To open the Rental contract item (RCTITEM) application, click the Right arrow icon. |


You can add several Shipping and Invoice addresses in the Addresses tab. The Set as default column to the far right controls which of these addresses will be used as the default address for this user during document creation.
Note
It is possible to deactivate a shipping or invoice address if there are no active transaction documents, linked. And the addresses can be deleted if they have never been used.
Use the Active on/off button to activate and deactivate addresses. Deactivated addresses can be reactivated.
Note that the Active on/off button can be used to activate and deactivate addresses. Deactivated addresses can be reactivated.
Invoice sub-tab
The Invoice sub-tab allows for creating and storing addresses for billing items, in example Sales invoice (CIN).
Search field, filter builder and column settings
The header contains multiple options to filter the list:
Active addresses - Filters the list on addresses in Status 4 - Active
Column | Icon | Description |
|---|---|---|
St | Displays the status of the address. Potential statuses:
| |
Id | Displays the internal address identifier for the Customer (CUS). The creation sequence is common for both Invoice and Shipping addresses. | |
Name | Name of receiver (Name of company or last of a person). The default suggestion when creating the address is the customer's name. NoteThe default invoice address, set with the Set as default button, must have the same Name as the Customer (CUS). | |
First name | First-name, if the receiver is a person. NoteThe default invoice address, set with the Set as default button, must have the same Firstname as the Customer (CUS). | |
Attention | Displays the attention which will be set on potential invoices or shipments. The Attention field and column is used to a direct the invoice or shipment to particular individual or department | |
Address | Displays the address line, city and country of the recipient. | |
Displays the email address to be set on the shipment or invoice. | ||
Phone | Displays the phone number to be set on the shipment or invoice. | |
Set as default |
| If the Set as default button is enabled, the default address will be pre-selected for all Sales invoices (CIN). |
Active on/off | Added addresses can be activated and deactivated by using the Active on/off button. Activated addresses will be set in Status 4 - Active. Deactivated addresses will be set in Status 9 - Deactivated. NoteIf address is used on transaction documents it cannot be deactivated. | |
| To edit the address, click the Edit icon to open the Edit address popup. |

Create address button
To create an address in Status 4 - Active, click the Create address button.
| Create address button |
To open the Customer (CUS) application, find Sales in the RamBase menu and then Customer management. Click Customers to enter the Customer (CUS) application.
Click the Create address button in the lower left corner of the Shipping sub-tab, found in the Addresses tab.
In the popup, add the customer shipping address data.
When all the mandatory data (fields marked with an asterisk *) have been provided, click the Create button to create the shipping address.
Shipping sub-tab
Search field, filter builder and column settings
The header contains multiple options to filter the list:
Active addresses - Filters the list on addresses in Status 4 - Active
Column | Icon | Description |
|---|---|---|
St | Displays the status of the address. Potential statuses:
| |
Id | Displays the internal address identifier for the Customer (CUS). The creation sequence is common for both Invoice and Shipping addresses. | |
Name | Name of receiver (Name of company or last of a person). The default suggestion when creating the address is the customer's name. NoteThe default shipping address, set with the Set as default button, must have the same Name as the Customer (CUS). | |
First name | First-name, if the receiver is a person. NoteThe default shipping address, set with the Set as default button, must have the same Firstname as the Customer (CUS). | |
Attention | Displays the attention which will be set on potential invoices or shipments. The Attention field and column is used to a direct the invoice or shipment to particular individual or department | |
Address | Displays the address line, city and country of the recipient. | |
Displays the email address to be set on the shipment or invoice. | ||
Phone | Displays the phone number to be set on the shipment or invoice. | |
Set as default |
| If the Set as default button is enabled, the default address will be pre-selected for all shipments. |
Active on/off | Added addresses can be activated and deactivated by using the Active on/off button. Activated addresses will be set in Status 4 - Active. Deactivated addresses will be set in Status 9 - Deactivated. NoteIf address is used on transaction documents it cannot be deactivated. | |
| To edit the address, click the Edit icon to open the Edit address popup. |
Create address button
To create an address in Status 4 - Active, click the Create address button.
| Create address button |
To open the Customer (CUS) application, find Sales in the RamBase menu and then Customer management. Click Customers to enter the Customer (CUS) application.
Click the Create address button in the lower left corner of the Shipping sub-tab, found in the Addresses tab.
In the popup, add the customer shipping address data.
When all the mandatory data (fields marked with an asterisk *) have been provided, click the Create button to create the shipping address.
The Finance tab includes key information along with helpful links to relevant applications.
Transactions
The Transactions area includes the following links, which will forward the user to the relevant popup or application by clicking the View icon:
| View icon |
All transactions - To open the All transactions popup, where Sales invoices (CIN), Sales credit notes (CCN), and Payments (PAY) are listed, click the View icon.
Reminders - To open the Reminder menu (RMR) application, click the View icon.
Due amounts - To open the Due amounts popup, and inspect the customer's due amount, specified in dates and currencies, click the View icon.
Interests - To open the Interest menu (INT) application, to inspect current interests, click the View icon.
To open the Pay statistics popup, click the View icon.
Financial key figures
Due 0-30 - Displays the amount due in Sales invoices (CIN) for the next 30 days.
Total due - Displays the total amount due.
Due 30-60 - Displays the amount due in the next 30-60 days span.
Not due - Displays the amount due with a future due date.
Due > 60 - Displays the amount due in Sales invoices (CIN) with due dates further out than 60 days.
Balance - Displays the total amount of receivables that the customer has not yet settled.
Notes sub-tab
The Notes sub-tab is a useful tool which is used to create and follow up notes related to the Customer (CUS). The sub-tab supports the creation of multiple notes, and these can be searched and filtered efficiently.
This is in addition to the persistent Note functionality located in all RamBase applications.
Navigate to Notes (NOTE) application
When a note has been created, selecting it and clicking the View icon in the top right corner of the note, will open the Notes (NOTE) application where all notes can be viewed and handled.
Search field - The search field can be used to search on a specific note subject. By clicking the field and pressing SPACEBAR all available parameters are listed.
Filter builder - To filter the notes on the standard filters listed below or to create a custom filter, click the Filter builder icon.
Standard filters
Last edited by me
My notes
My private notes
Notes I created
Add new button - To add a new note, click the Add new button. Provide a Title and optionally, a Description.
Title field - Required, add a title to the note.
Description - Optional, add a description.
Tasks sub-tab
The Tasks sub-tab is a useful tool which is used to add and follow up tasks related to the Customer (CUS). The sub-tab supports the creation of multiple tasks, and these can be searched and filtered efficiently. This is in addition to the persistent Tasks functionality located in all RamBase applications.
Navigate to Tasks (TASK) application
When a task has been created, selecting it and clicking the View icon in the top right corner of the task, will open the Task (TASK) application where all tasks can be viewed and handled.
Notable functionality in the Tasks sub-tab
Search field - To quickly search on the contents of a title, click the Search field and type, then press ENTER. To list all available search variables, click the Search field and press SPACEBAR.
Filter builder - To filter the tasks on the standard filters listed below, or to create a custom filter, click the Filter builder icon.
Standard filters
Standard filtersActive tasks
Archived tasks
Tasks assigned to me
Tasks created by me
Finished tasks
Tasks in progress
My active tasks
My tasks
My unfinished tasks
My private tasks
Tasks in my company
Unfinished tasks
Add new icon - To add a task, click the Add new button.
Button
Icon
Description
Add new task
 Add a new task in the Customer (CUS) application
In the Customer (CUS) application select the Collaboration tab and then the Tasks sub-tab.
To add a new tasks, click the Add new button.
In the expanded box, categorize the task by clicking one of the buttons; New task, Phone-call, Meeting or Email.
Add a title by clicking the Title field and type.
Assign the task by clicking the Assigned to drop-down menu and selecting the assignee.
When the task is done, click the Mark as done checkbox.
To finish creating the task, click the Save button.
Assigned tasks in the Tasks (Task) application
Once a task is assigned, the person assigned the task can handle the task in the Tasks (Task) application.
Fields and buttons | Icon | Description |
|---|---|---|
New task |
| To categorize the task as standard, click the New task button. |
Phone-call |
| To categorize the task as a phone-call, click the Phone-call icon. |
Meeting |
| To categorize the task as a meeting, click the Meeting icon. |
| To categorize the task as an email, click the Email icon. | |
Title field | To add a title, click the Title field and type. | |
Description field | The Description field is optional, and is used to further describe the task. | |
Assigned to drop-down |
| To view details on the person assigned to the task, click the View icon to open the Personnel (PER) application. |
Create by field |
| To view details on the person who created the task, click the View icon to open the Personnel (PER) application. |
Mark as done checkbox | To mark the task as done, enable the Mark as done checkbox. | |
Save button |
| To create the task, or save edits, click the Save button. |
Cancel button |
| To cancel the creation of the task, or potential edits, click the Cancel button. |
Delete button |
| To delete a task, click the Delete button. |


Emails
Opportunities
The Opportunities tab is used to view business opportunities and follow them through the different stages, from lead to deal. These stages are created in the Opportunity Stages (OPPD) application.
Column | Icon | Description |
|---|---|---|
Stage | Displays the name of the stage. Potential stages are:
| |
Title | Displays the title of the Opportunity (OPPD). | |
Value | The unweighted value of the Opportunity (OPP). | |
Assigned to | The Employee identifier of person assigned to the Opportunity (OPP). | |
Probability (%) | The probability of winning this opportunity in percentage. | |
Expected closing date | The date when the deal is expected to be closed. | |
| To open the Opportunities (OPPD) application in list view, click the Right arrow icon. |
The Settings tab is used to maintain critical customer settings which are categorized in sub-tabs, which are detailed in the tables below.
Main data
General area
Field/Drop-down menu | Icon | Required | Description |
|---|---|---|---|
Name | Name of customer (name of company or surname/familyname/lastname of a person). | ||
Secondary name | Secondary name of a company or firstname of a person. | ||
Enterprise number | Yes | The customers unique enterprise/organization number. | |
VAT number | Unique number assigned by the relevant tax authority to identify a party for use in relation to value added tax (VAT). | ||
EORI number | An EORI (Economic Operator Registration and Identification number) number is required of any party intending to import into the EU or export from the EU. | ||
Created by |
| The employee (might be RamBase-server) that created the customer. To open the Personnel (PER) application, to view and edit details, click the View icon. | |
Created date | Date and time of creation. | ||
Account manager |
| Reference to the employee who is responsible for the management of sales, and relationship with the customer. To open the Personnel (PER) application, to view and edit details, click the View icon. | |
Sales assistant |
| Reference to the employee who is sales assistant for the customer. To open the Personnel (PER) application, to view and edit details, click the View icon. | |
Website | Customers website/homepage/webpage. |
Classification area
Field/Drop-down menu | Description |
|---|---|
Preferred language | Preferred language for the Customer (CUS). Is used in prints etc. |
Customer classification | Classification of the Customer (CUS) |
Sales district | A geographic district for which an individual sales person or sales team holds responsibility. |
Sector | The sector the customer belongs to. |
Market segment | Market segment of the Customer (CUS). |
Blockings area
Checkbox | Description |
|---|---|
Block sales order | True if Sales orders (COA) for this Customer (CUS) should be blocked/denied/rejected registration. A notification of type "Stop" will also be added to Sales orders (COA) for this Customer (CUS). |
Block sales quote | True if Sales quotes (CQU) for this Customer (CUS) should be blocked/denied/rejected registration. A notification of type "Stop" will also be added to Sales quotes (CQU) for this Customer (CUS). |
Block shipping | True if Shipping advices (CSA) for this Customer should be blocked/denied/rejected registration. A notification of type "Stop" will also be added to Shipping advices (CSA) for this Customer (CUS). |
Output control
Read more about the possibilities in the RamBase output.
Column | Icons | Description |
|---|---|---|
Document to send | Name of the output object. Available objects are listed in the Add document to send button - section, below. | |
Send by | Details the send by type. Expected options are EMAIL or PRINT. | |
Send to | Details of the recipient. An example can be the recipients email if the send by type is EMAIL. | |
Output design | Displays the name of the output design. | |
Mandatory | If yes, the output object must always be sent. | |
Number of prints | Number of copies to output. | |
| To edit, click the Edit icon. | |
| To remove the output for the object type, for the customer, click the Remove icon. |

Add document to send button
The Add document to send button is used to send a document on certain, user-defined, events.
| Add document to send button |

To add a document on a certain event, click the Add document to send button.
In the following popup, select how to send the document; Email, Print or File transfer protocol (FTP/SFTP).
Note
FTP applies to sending EHF invoices (EDI).
There is an integration with the ELMA registry that checks if the Enterprise number is registered in ELMA.
An error message will appear if the Enterprise number is missing from the Customer (CUS) or is not registered in ELMA.
In the Documents to send drop-down menu select which documents to send. Multi-select is supported.
The following options are available:Certificate of Conformity from CSA upon registration (CoC)
Changed order confirmation by night (COA)
Corrective invoice upon registration
Deviation: goods received (CDV)
Deviation: ready for account action (CDV)
Deviation: registered (CDV)
Entry certificate upon registration (CSA)
Order overview (RCT)
Proforma invoice rental upon registration (CIN)
Proforma invoice service upon registration (CIN)
Proforma invoice upon registration (CIN)
Proforma invoice upon registration (COA)
QIS - Corrective action report
QIS - NCR concession request
QIS - NCR deviation request
QIS - Technical clarification
Recurring invoice plan triggered from a COA upon registration (COP)
Recurring sales quote triggered from a CQU upon registration (CQP)
Recurring sales quote upon registration (CQP)
Reminder (RMR)
Sales credit note rental upon registration (CCN)
Sales credit note subscription upon registration (CCN)
Sales credit note upon registration (CCN)
Sales invoice as CSV file upon registration (CIN)
Sales invoice rental upon registration (CIN)
Sales invoice service compact upon registration (CIN)
Sales invoice subscription upon registration (CIN)
Sales invoice upon registration (CIN)
Sales invoice upon registration with factoring bank text (CIN)
Sales invoice with serial numbers copy (CIN)
Sales invoice with serial numbers upon registration (CIN)
Sales order upon registration (COA)
Sales quote upon registration (CQU)
Serial number list upon registration (SNO)
Service order upon registration (CSO)
Shipment information (SPN)
Shipping advice rental upon registration (CSA)
Shipping advice upon registration (CSA)
Subscription quote (RCT)
Decide if the document is mandatory to send, by clicking the Mandatory to always send checkbox.
Note
If enabled, the recipient can not be deleted on a specific document.
Lastly, decide who to send the document to by choosing between; Recipient from a source document, Contact email address or New contact email address.
Note
The available Send to options are dependent selected Documents to send.
If New contact email address is selected, and the required details are provided; Last name and Email, a new Contact (CNT) will be created in Status 4 - Active.
If Contact email address is selected, choose the contact from the Contact email dropdown menu.
Finalize by clicking the Create button.
Tip on editing
If you want to change the output for any of the documents, choose the item line you want to change and click the Edit icon. This will open a popup similar to the one where you defined the rule, but this popup is specific for one document and contains a field where you choose the output for this specific document.
Finance
Before trading with a new Customer (CUS), some financial settings are required. These settings are critical to the accountancy. Other settings are recommended to add more details about each Customer (CUS). The financial settings can be found in the Settings tab → Finance sub-tab, in the Customer (CUS) application.
Tip
If an element is not described as Required in the following tables, only apply changes to settings which are to overrule the setup in the Company settings (CSV).
Finance data area
Field/Drop-down menu/Checkbox | Required | Recommended | Description |
|---|---|---|---|
Currencies | Yes | Select which Currencies (CUR) are to be used for the Customer (CUS). Multi-select is supported. NoteIf you have agreed to invoice your Customer (CUS) in local currency, this is the one you must choose. | |
Intercompany code | Use this field to identify internal customers/suppliers. | ||
VAT registration number | Yes | Unique number assigned by the relevant tax authority to identify a party for use in relation to Value added tax (VAT). | |
VAT handling | Specifies how value added tax (VAT) should be calculated. Either always include VAT, always exclude VAT or use standard/default VAT rules. NoteThe Company settings (CSV) and the Sales order(s) (COA) usually settle the VAT handling. Only use this field if you want to overrule the system's VAT calculation. Select the Set Always include VAT option if the Customer (CUS) always has to pay VAT on Sales orders (COA) and Sales invoices (CIN). Set Never include VAT if the Customer (CUS) never has to pay VAT on Sales orders (COA) and Sales invoices (CIN). Set Use default VAT if the Customer (CUS) should use the Company settings (CSV). | ||
Send to factoring checkbox | Identify which customer, invoices and credit notes, will be send to factoring | ||
Is related business entity checkbox | Identify if a Customer (CUS) is related business entity to the company. Businesses are obligated to tag business related entities. I.e if you own a company, and your spouse is owning a separate company, these companies are business related. For Polish users, read more the JPK_V7M and JPK_V7K file and related functionality. |
Invoice area
Field/Drop-down menu/Checkbox | Description |
|---|---|
Sales invoice consolidation | Specifies whether or how often shipping advices that origins from this sales order will be consolidated when creating sales invoices. Available options are:
|
Sales invoice consolidation field | Field name to group by when consolidating shipping advice items into sales invoices. Available options are:
|
Sales invoice item sort by | Field name to sort by when creating sales invoice items. Available options are:
|
Terms area
Field/Drop-down menu/Checkbox | Required | Recommended | Description |
|---|---|---|---|
Payment method | Default payment method for the Customer (CUS). | ||
Payment terms | Yes | Default payment terms to use in new documents. The payment terms are usually agreed upon before trading with a new Customer (CUS). Due date on Sales invoices (CIN) are calculated based on Payment terms. | |
Interest rate | Set a special interest rate for this Customer (CUS). Otherwise, the Company settings (CSV) will be used. The interest rate is used for Sales invoices (CIN) past due date. | ||
Interest fee amount | Set a special fee for interest notes for this Customer (CUS). Otherwise, the Company settings (CSV) will be used. Fixed interest fee used for the customer. | ||
Send reminders | Set to true, to send automatic reminders on outstanding amounts to this Customer (CUS). Set to false if reminder is not be sent to this Customer (CUS). Default value is retireved from the Company setting (CSV): DefaultCreateValueCUSFieldREMINDER | ||
Require approval if overdue | Yes | True if shipments need approval if there are Sales invoices (CIN) with overdue amount. Default value is retireved from the Company setting (CSV): DefaultCreateValueCUSFieldDUEAPPROVE |
Credit area
Fields | Required | Recommended | Description |
|---|---|---|---|
Credit insurance company | Insurance company used by the customer for credit insurance | ||
Credit insurance currency | Three character code following the ISO 4217 standard | ||
Credit insurance amount | Credit amount insured for the customer | ||
Credit limit | The maximum amount that the customer may charge on a credit card or borrow from a financial institution. Credit limitations for the customer. Approval is required if the invoice amount exceeds the credit limit. |
Bank accounts list
The Bank accounts list has all the Customer's (CUS) bank accounts.
Search field, filter builder and column settings
The header contains multiple options to filter the list:
Column | Description | |
|---|---|---|
Currency | Displays the Currency (CUR) used for the bank account | |
C code | Displays the two-character code (ISO 3166) identifying the country of the bank. | |
Account | Displays the account number used to identify the bank account. | |
Account type | Displays the type of the bank account, in example BBAN, Bankgiro, Plusgiro. | |
IBAN | Displays the International Bank Account Number (IBAN) which is an internationally agreed means of identifying bank accounts across national borders with a reduced risk of transcription errors. | |
Swift | Displays the SWIFT (Society for Worldwide Interbank Financial Telecommunication) Code, which is a standard format for Business Identifier Codes (BIC) and it is used to uniquely identify banks and financial institutions globally. These codes are used when transferring money between banks, in particular for international wire transfers or SEPA payments. | |
Bank name | Displays the name of the bank account. | |
Bank code | Displays the bank code. The code is assigned by a central bank, a bank supervisory body or a Bankers Association in a county, to all its licensed member banks or financial institutions. | |
Clearing code | Displays the clearing code of the bank account. | |
Clearing bank identifier | Displays the clearing bank identifier of the bank account. | |
| To edit the details of the bank account, click the Edit icon. | |
| To delete the bank account, click the Delete icon |
Add bank account button
A Customer's (CUS) bank account(s) can be added via the Customer (CUS) application.
| Add bank account button |
To add a bank account to the Customer (CUS), click the Add bank account button.
At a minimum provide Currency, Account, Account type and Country.
Note
Only currencies added in the Finance data area can be selected.
To finalize adding the bank account, click the Create button.
Sales and shipping
Sales terms area
Field / Drop-down menu | Icon | Description |
|---|---|---|
Delivery terms |
| To edit the delivery terms and delivery place, click the Edit icon. The delivery terms control how and where the product is delivered, in addition to who pays for the shipping and insurance. The delivery terms is based on the Incoterms rules from ICC (International Chamber of Commerce). |
Shipping services | Displays the name of the selected Shipping service (SHP). Click to select or replace the current Shipping service (SHP). | |
Fee amount | This is an amount, in the companies local currency, that by default will be added as fee when a Sales order (COA) is created for this Customer (CUS). | |
Minimum gross margin | The minimum gross margin in percent for the customer |
Auction only | Description |
|---|---|
Fee percent | The commission paid by the Customer (CUS) when purchasing LOTs. |
Sales agreements area
Field/Drop-down menu | Icon | Description |
|---|---|---|
Volume price agreement | Special price agreement related to the quantity being ordered. Example If this is set to for instance "100 agreement", it means the customer will get the price that is set for 100 pieces - if such an agreement exists - even if the Customer (CUS) has only ordered 1 piece. | |
Price list | To select a Price list (PLI) for the customer, click the Price list drop-down menu. | |
Exchange rate fluctuation agreement | When a Sales order (COA) is issued, RamBase stores the current exchange rate and the currency the product normally is purchased in. The exchange rate might have changed when the Sales invoice (CIN) is issued. The exchange rate fluctuation agreement specifies how to handle these differences. The agreement has the format AAA/BBB, where AAA is a percentage of the total invoice, and BBB is the exchange rate fluctuation percentage. E.g. 100/3.0 means that if the rate of exchange on the date a Sales order (COA) is forwarded to an invoice has changed more than +/- 3% from the rate of exchange, 100% of the invoice amount will be adjusted. | |
Fixed currency rates |
| To edit the Fixed currency rates, click the edit icon to open the Customer BRates popup. |

Warranty area
Field | Description |
|---|---|
Warranty period (months) | Agreement of default warranty period in months |
Warehouse area
Drop-down menu | Icon | Description |
|---|---|---|
Shipping and handling codes |
| The special handling code used for this customer. To open the Shipping and handling codes (SHC) application, click the View icon. |
Service shipping and handling codes |
| The special handling code used for service. To open the Shipping and handling codes (SHC) application, click the View icon. |
Shipping claims area
Field/Drop-down menu/Checkbox | Description |
|---|---|
Shipping day | Specifies when the goods should be shipped. This is used to calculate the scheduled shipping date for each item. |
Only ship entire orders | True if all items of a Sales order (COA) should be shipped together. The items of a Sales order (COAITEM) should never be split into several shipments. If Sales order (COA) is forwarded to shipping advice by bulk handling, this will be controlled by RamBase. Manually forward requires that the users controls this themselves. |
Ship based on confirmed delivery date | If true, scheduled shipping date on each item will be calculated based on confirmed date rather than requested date. |
Only ship entire order items | True if the total quantity of a Sales order item (COAITEM) always should be shipped together. The quantity should never be split into several shipments. If Sales order (COA) is forwarded to Shipping advice (CSA) by bulk handling, this will be controlled by RamBase. Manually forward requires that the users controls this themselves. |
Ship items with equal scheduled shipping date together | True if all items of a Sales order (COAITEM) with the same scheduled delivery date should be shipped together. If Sales order (COA) is forwarded to Shipping advice (CSA) by bulk handling, this will be controlled by RamBase. Manually forward requires that the users controls this themselves. |
Freight for each shipment | If unchecked there will only be calculated freight on one shipping advice if the particular sales order has serveral shipments. |
Consolidate shipping advices | If true, Sales orders (COA) will be consolidated when creating Shipping advices (CSA) via the "Prepare for picking" process. If false, each Sales order (COA) will result in a separate Shipping advice (CSA). The field to use when consolidating is specified in the Consolidation field drop-down menu. |
Consolidation field | Field to use when consolidating Sales order items (COAITEM) into Shipping advices (CSA) in the "Prepare for picking" process. |
Ship sort by | Items in consolidated Shipping advices (CSA) will be sorted by this fields when they are created in the "Prepare for picking" process. |
Rental
The Rental tab contains options to specify Rental contract (RCT) settings for the Customer (CUS).
Rental contract agreements area
Field | Description |
|---|---|
Discount percentage | Provide the discount percentage that should be used when the Customer (CUS) creates a new rental or subscription item - Rental contract item (RCTITEM) - in a Rental contract (RCT). |
Context menu options
| Context menu options icon |

Context menu option | Description |
|---|---|
Customer deviation menu | To create new or view all Customer deviations (CDV) for the customer, select the Customer deviation menu option found in the Context menu options. |
Activate customer | If a customer is in Status 1 - New or Status 9 - Deactivated, it can be activated by selecting the Activate option from the Context menu options. |
Close customer | To set a Customer (CUS) in Status 4 - Active to Status 9 - Deactivated, select the Close customer option. NoteCustomers (CUS) with open transaction documents can not be closed/deactivated. |
Set message | It is possible to set a message on customers which are displayed in blue at top of the customer. The message will be visible on the customer's sales documents as a banner, such as a Sales order (COA). Select the Customer (CUS), then click the Set message option in the context menu. Type the desired message and click the Save button. |
Show related supplier | |
View subscriptions | To view the Customers (CUS) subscriptions, select the View subscriptions option. NoteUses functionality from the Subscription 2022 release. |
Discard customer | To discard a Customer (CUS) in Status 1 - New, select the Discard customer option in the Context menu. The Customer (CUS) will be deleted, along with all its information in the Customer (CUS) application. For customers in Status 4 - Active, use the Close customer option, which will set the customer in Status 9 - Inactive. |
Set bidder number | |
Send customer account statements | To open the Send customer account statements popup, select the Send customer account statements option found in the Context menu options. Click the Statement drop-down menu to select Open transactions or All transactions. Decide which customer should be included in the statement, and which currency. Clicking the Next button will allow the selection of PRINT or EMAIL. |
Import customer from file | To load customer data, select the Import customer from file option to open the Import/export Wizard popup. Read more about Load procedure - Input menu (INP) and Import/export Wizard (IOQWIZ). |
Create interest | |
Configure Peppol address | To configure the Peppol address, click the Configure Peppol address in the Context menu options. NoteConfiguring requires selecting a Party endpoint scheme identifier as well as providing a Party endpoint identifier. |
Update open sales orders with default invoice address | To update open Sales orders (COA) for the Customer (CUS) with the invoice address set as default in the Customer (CUS) application → Addresses tab → Invoices sub-tab, select the Update open sales orders with default invoice address option found in the Context menu options. |
Customer & supplier - All transactions | To view the report, Customer & supplier account movements (REPORT/100228), which lists all transactions, select the Customer and supplier - All transactions option found in the Context menu options. |
Print bidder number | |
Outgoing print / email | To view the progress on all outgoing prints or emails to the Customer (CUS), select the Outgoing print / email option found in the Context menu options. |
Print / send documents | Available documents can be sent to the Customer (CUS) by selecting the Print / send documents option found in the Context menu options. Potential documents can be edited and previewed before sending. |
View contracts | To view and potentially edit the contracts for the Customer (CUS), select the View contracts option found in the Context menu options. The option will open the Customer sales contracts (CSC) application. |
Show customer legal entities (CGR) | |
Show customer groups (CUG) | Customers can be grouped. A customer group is used in situations where several customers need to be processed similarly. Uses in RamBase: When a Purchase quote (SQU) is exclusive to a group of customers. This function is found in the Resale tab in the Purchase quote item (SQUITEM) application. An Item Price Agreement (IPA) can be restricted to be used by a single customer, all customers or customer groups. To view all members of the customer's group, select the Show customer groups (CUG) option. This will open the Customer group membership (CUSTOMERGROUPMEMBER) application. |
Show total balance | To open the Total Balance popup, to inspect customer's balance and due amounts for coming periods, select the Show total balance option. |
Delivery performance | To view delivery performance statistics for the customer, select the Delivery performance option. |
Quality assurance events | To view quality issues for the customer, select the Quality assurance events option which will open the Quality report achive menu (QAR) application. |