Product unit picking popup
The Product Unit Picking popup is designed to enhance material tracking and traceability during production. This interface allows operators to efficiently pick materials per Product unit (LCM) by entering or scanning Goods receptions (SSA). This also includes automatic reassignment for traceable material, saving clicks and without having to use applications like the Stock assignment production order kit-item (SARK).
The key functionalities include:
Material Picking: Enables users to pick quantities from different Good receptions (SSA) without having to manually change assignments, ideal for dynamic production environments.
Traceability: Builds comprehensive traceability records for materials used in production.
User Navigation: Accessible via the Work Order Operation (WOO) application, with multiple navigation options for ease of use.
Pick for a single, or multiple Product units (LCM)
Only applies for traceable material and Production work orders (PWO) in Status 5 - In production
This functionality applies to Products (ART) used as parts in a Product structure (KITART) / Production structure (KITDOC), defined as Is traceable material of product unit in the Product (ART) application.
Picking can only be done on Production work orders (PWO) in Status 5 - In production.
Required Permissions
Read more about "How to find duty and roles that include a specific permission".
ViewPicking - PRM/100597
UndoPickSingleProductionWorkOrder - PRM/103466
PickSingleProductionWorkOrder - PRM/103464
Required Role
Picking Operator - ROL/100054
Procedure 1 - Pick to single Product unit (LCM)
When it is time to pick, navigate to the popup by selecting one of the options below.
Navigate to the popup via the Work order operation (WOO) application.
Option 1:
To open the Production work order (PWO) application, find Production in the RamBase menu and then Production.
Click Production work orders to open the Production work orders (PWOMENU) application.
From the listed Production work orders (PWOMENU), click the intended Production work order (PWO) and press ENTER.
This opens the Production work order (PWO) application for the selected Production work order (PWO). Click on the View icon next to the Work order operations field to open the Work order operations (WOO) application.
The Work order operations field is found in the lower right corner in the Product units and current work order operation area.
To open the Product units picking popup, in the Work order operation (WOO) application, click the Product units tab, and then click the Pick icon in the Pick column.

Pick icon
Option 2:
Click the Program field and type "WOO/ + Identifier" and press ENTER. Then continue from step f. in the list above.
Example "WOO/123456"
Click here to read more about the user interface.
If Serial number template (SNT) is set up for any of the materials
When opening the popup in the context of a Production work order (PWO), as an operator performing a Work order operation (WOO), the fields in the header are already filled out.
There are multiple ways to pick for production. You may choose the picking route by selecting Material and then which Goods reception to pick from, or selecting or scanning a Goods reception item (SSAITEM), which will automatically select the material of the Goods reception item (SSAITEM).
Tip
When working with pallets that are set up with Goods reception (SSA), starting with the Goods reception field can the be the most efficient as it will detect the material of the scanned Goods reception item (SSAITEM).
Select Material → Select Goods reception → Decide Quantity → Click Pick button
Scan or type Goods reception → Decide Quantity → Click Pick button
Select Material serial number → Click Pick button → Decide Quantity → Click Pick button
Once the material(s) has been picked, it will populate the grid below.
Procedure 2 - Pick for multiple Product units (LCM)
When it is time to pick, navigate to the popup by selecting one of the options below.
Navigate to the popup via the Work order operation (WOO) application.
Option 1:
To open the Production work order (PWO) application, find Production in the RamBase menu and then Production.
Click Production work orders to open the Production work orders (PWOMENU) application.
From the listed Production work orders (PWOMENU), click the intended Production work order (PWO) and press ENTER.
This opens the Production work order (PWO) application for the selected Production work order (PWO). Click on the View icon next to the Work order operations field to open the Work order operations (WOO) application.
The Work order operations field is found in the lower right corner in the Product units and current work order operation area.
To open the Product units picking popup, in the Work order operation (WOO) application, click the Product units tab, and then click the Pick icon in the Pick column.
Pick icon
Option 2:
Click the Program field and type "WOO/ + Identifier" and press ENTER. Then continue from step f. in the list above.
Example "WOO/123456"
Click here to read more about the user interface.
If Serial number template (SNT) is set up for any of the materials
When opening the popup in the context of a Production work order (PWO), as an operator performing a Work order operation (WOO), the fields in the header are already filled out.
When the popup opens, you can pick for all selected product units.
To do so, click the Produced product unit id drop-down to expand the list of Product units (LCM). With the list expanded, clicking an element in the list will populate the area to the right with identifiers of the now selected Product units (LCM).
Picking will then apply to all Product units (LCM) which populates the area to the right of the Produced product unit id drop-down menu.
Note
Pick quantity is distributed across the selected units. The progress bar and traceability indicators update accordingly.
The column, Traceable material quantity, shows how much was picked per Product unit (LCM).
There are multiple ways to pick for production. You may choose the picking route by selecting Material and then which Goods reception to pick from, or selecting or scanning a Goods reception item (SSAITEM), which will automatically select the material of the Goods reception item (SSAITEM).
Tip
When working with pallets that are set up with Goods reception (SSA), starting with the Goods reception field can the be the most efficient as it will detect the material of the scanned Goods reception item (SSAITEM).
Select Material → Select Goods reception → Decide Quantity → Click Pick button
Scan or type Goods reception → Decide Quantity → Click Pick button
Select Material serial number → Click Pick button → Decide Quantity → Click Pick button
Once the material(s) have been picked, the grid below will show the picked quantity for each selected product unit.
Tip
The filter, Show only picks for traceable materials, allows you sort out the possibility to view picks for non-traceable materials. If not, these will appear with traceable quantity = 0, as well with a icon for easy identification.
| Non-traceable material icon |

Important
If you need to undo a pick that was performed for multiple units, the entire batch will be undone. A confirmation message will warn you before proceeding.
About the interface layout
The interface is divided into five sections:
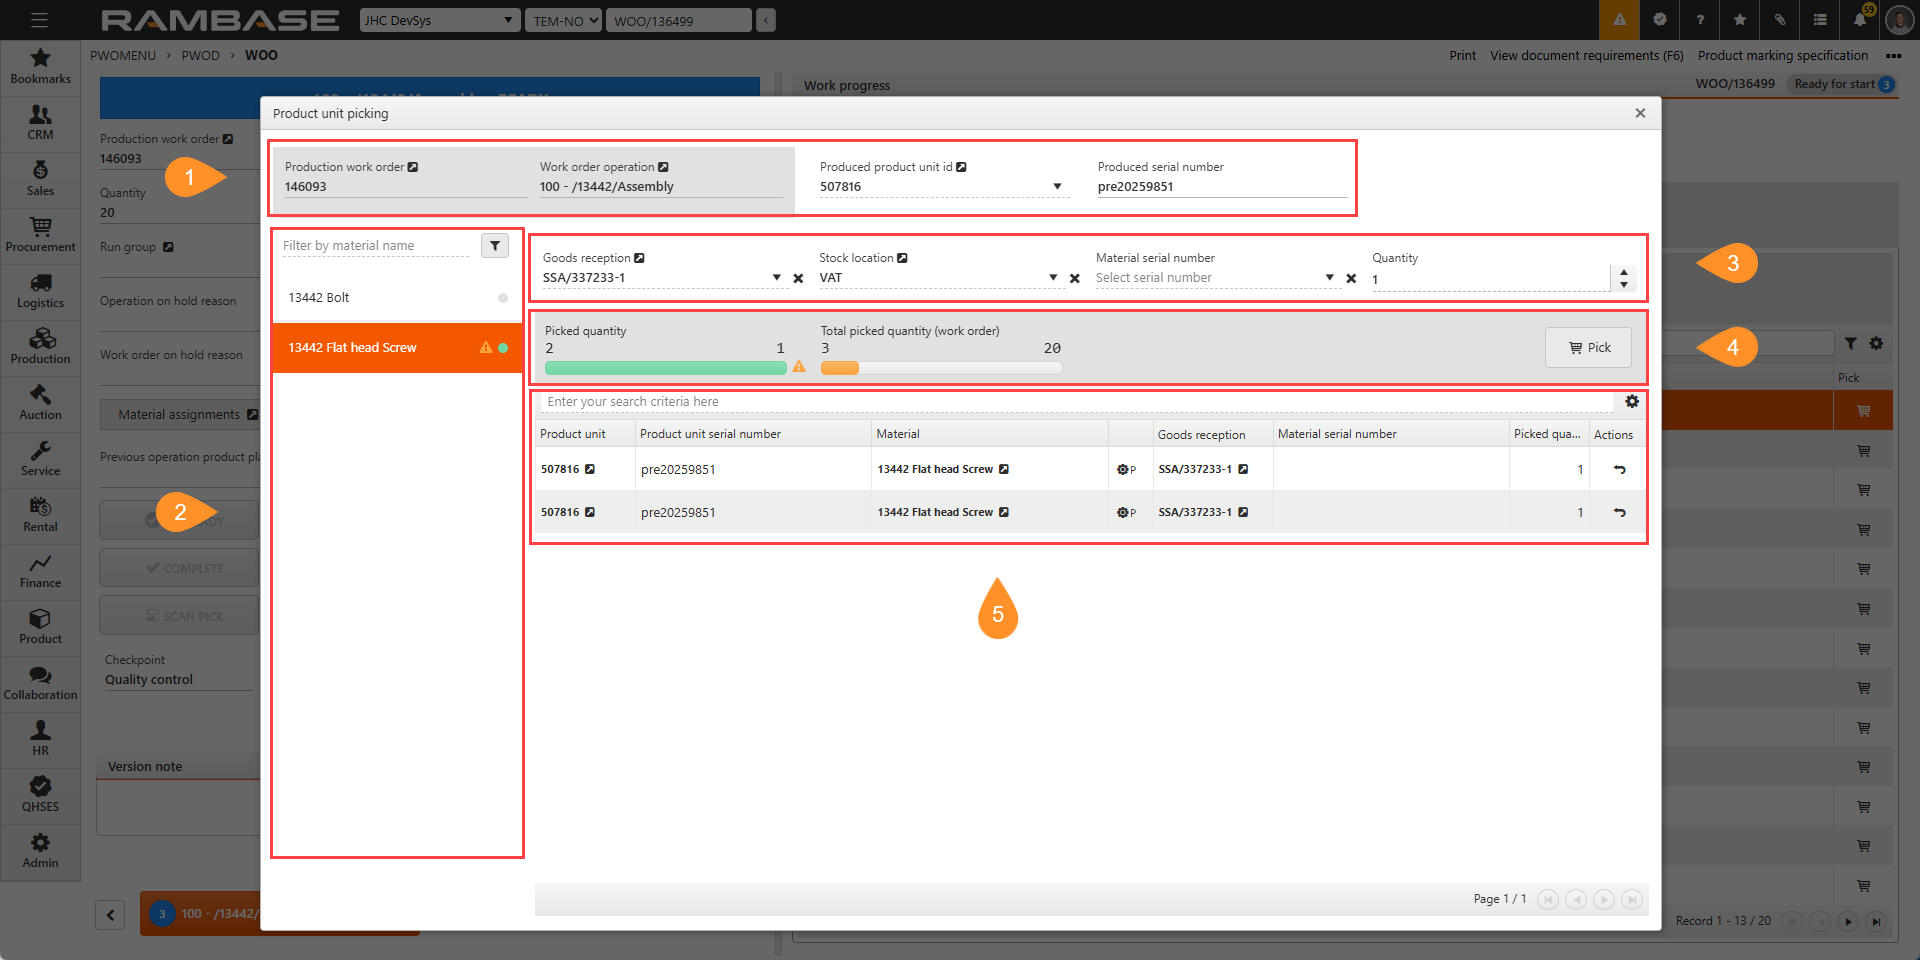
Area 1 - Header - Information on Production work order (PWO), Work order operation (WOO) and current Product unit (LCM)
The header section provides information on the Production work order (PWO), Work order operation (WOO), and the current Product unit (LCM). It includes fields for viewing and editing details of the PWO, WOO, and LCM, with options to switch between different Product units (LCM). The serial number for the Product Unit is displayed, typically sourced by automation and set up in the Serial Number Templates (SNT) application.
Field | Icon | Description |
|---|---|---|
Production work order |
| An informational field displaying the identifier of the source Production work order (PWO). The Production work order (PWO) includes the Work order operation (WOO) where the picking can potentially be completed. To view and edit details, click the View icon to open the Production work order details (PWOD) application. |
Work order operation |
| An informational field display in the sequence number and name for the Operation (OPR) being worked on, as a Work order operation (WOO). To close the popup, and return to the Work order operation (WOO), click the View icon. |
Produced product unit id |
| Displays the identifier of the currently selected Product unit (LCM). To switch to another, click the Produced product unit id drop-down menu. Note that only Product units (LCM) included in the source Production work order (PWO) can be selected. To view and edit details on the Product unit (LCM) by opening the Life cycle management (LCM) application, click the View icon. |
Produced serial number | Displays the serial number for the Product unit (LCM). This is can typically be sourced by automation, set up in the Serial number templates (SNT) application. |

Area 2 - Material selection list
The List of materials allows the user to select a material to be picked. When a material has been clicked, highlighted by the color orange, the fields Goods reception and Stock location - will only list matches which include the selected part/material.
Note
The user can pick more than the planned quantity. If so, a Warning icon will be displayed next to the Material name.
| Warning icon |

Note
It is allowed to pick non-traceable materials. These will appear with traceable quantity = 0, as well as an icon for easy identification.
| Non-traceable material icon |
Tip
Icon/Button | Description |
|---|---|
| To apply a filter, click the Filter icon to select one of the available options. TipThe optional filters can be combined with the Filter by material name field. Optional filters
|

Area 3 - Select Goods reception (SSA), Stock location (STL), search by serial number and decide quantity
In this section, you can select or search for Goods reception (SSA) and Stock location (STL). If the material is chosen first, the Goods receptions (SSA) will be filtered accordingly, and selecting a Goods reception (SSA) will auto-fill the Stock location field. You can also search by serial number and decide the quantity to pick using the Arrow icons or by typing the numerical quantity.
Field/Drop-down | Icon | Description |
|---|---|---|
Goods reception |
| To select which Goods reception (SSA) to pick from, click to select or search. Note that if the material is selected first, the Goods receptions (SSA) will be filtered on those which contain the material. |
Stock location |
| To select which Stock location (STL) to pick from, click to select or search. Note that if Goods reception (SSA) is selected first, the Stock location (STL) of the Goods reception (SSA) will automatically fill in the Stock location field. To open the Stock location (STL) application, to view and edit details, click the View icon. Read more about Stock locations (STL). |
Material serial number filter | Search for a serial number for the potential serial number for the picked material. | |
Quantity |
| Decide the quantity to pick of the selected material, by clicking the Arrow icons or click the field and type the numerical quantity. |

Area 4 - Pick and information on picked and total picked quantity
This section provides details on the progress of picking materials for the current Product Unit (LCM). It includes an informational progress bar for the picked quantity and displays the total picked quantity for the whole Production Work Order (PWO).
The section also explains how to pick materials and the criteria required for picking.
Field/Button | Icon | Description |
|---|---|---|
Picked quantity |
| Informational progress bar indicating the progress of the potential picking quantity, for the current Product unit (LCM). The user can pick more than the planned quantity. If so, a Warning icon will be displayed next to the progress bar. ImportantIf the material is non-traceable, the progress bar will be grayed out to indicate that the selected material is non-traceable. |
Total picked quantity (work order) |
| Displays the total picked quantity of the selected material, for the whole Production work order (PWO). The user can pick more than the planned quantity. If so, a Warning icon will be displayed next to the progress bar. Examples Simple example: There is a total of 3 Product units (LCM) being produced by the Production work order (PWO). For each Product unit (LCM) there are 4 materials to be picked, with various required quantity. Below, the operator has selected Product unit 1 in the Produced product unit id drop-down menu.
Result: When material 2 is selected the Total picked quantity will display a green progress bar with 3 out of 3 picked for all the Product units (LCM) in the Production work order (PWO). A green dot will also mark the material in the Material list, indicating that the required material quantity has been picked for the current Product unit (LCM). When any other material is selected the Total picked quantity will display a gray progress bar with 0 out of 3 or 12 picked for the Product units (LCM) in the Production work order (PWO). A gray dot will also mark those materials in the Material list, indicating that the required material quantity has not been picked for the current Product unit (LCM). Common example: There is a total of 3 Product units (LCM) being produced by the Production work order (PWO). For each Product unit (LCM) there are 4 materials to be picked, with various required quantity. Below, the operator has selected Product unit 1 in the Produced product unit id drop-down menu.
Result: When material 1 is selected, the Total picked quantity will display an orange progress bar with 8 out of 12 picked, as it describes the progress for all the Product units (LCM) in the Production work order (PWO). A gray will also mark the material in the Material list, indicating that the required material quantity has not been picked for the current Product unit (LCM). When material 2 is selected the Total picked quantity will display a green progress bar with 3 out of 3 picked for all the Product units (LCM) in the Production work order (PWO). A green dot will also mark the material in the Material list, indicating that the required material quantity has been picked for the current Product unit (LCM). When material 3 is selected the Total picked quantity will display a gray progress bar with 0 out of 3 picked for all the Product units (LCM) in the Production work order (PWO). A gray dot will also mark the material in the Material list, indicating that the required material quantity has been picked for the current Product unit (LCM). When material 4 is selected the Total picked quantity will display an orange progress bar with 1 out of 3 picked, as it describes the progress for all the Product units (LCM) in the Production work order (PWO). An gray will also mark the material in the Material list, indicating that the required material quantity has been partially picked for the current Product unit (LCM). |
| To pick the material, click the Pick button. Criteria to pick
Criteria to pick:
If pick is performed, the grid below will populate with the material details. |

Area 5 - List of picked materials
This section provides a detailed list of the selected materials that have been picked for the current Product unit (LCM). It includes information such as the operation sequence, product unit identifier, material name, serial numbers, and quantities picked. Additionally, it offers options to view and edit details for each item and undo picks if necessary.
Column | Icon | Description |
|---|---|---|
Operation |
| Displays the sequence number and Operation name (OPR). To view and edit details, click the View icon |
Product unit |
| Displays the Product unit identifier (LCM). To open the Life cycle management (LCM) application, to view and edit details, click the View icon. |
Product unit serial number | Displays the potential Serial number (SNO) of the Product unit (LCM). This is can typically be sourced by automation, set up in the Serial number templates (SNT). | |
Material |
| Displays the name of the material, which is maintained in the Product (ART) application. To view and edit details in the Product (ART) application, click the View icon. |
| Displays an icon indicating which type of material the Product (ART), is. An example is: M - Material. | |
Material serial number | Potential serial number for the picked material. | |
Picked quantity | Displays the quantity picked. | |
Picked by | Displays the user who initiated the picking. | |
Traceable material quantity | Traceable Material Quantity refers to the amount of a picked material that is specifically linked to one or more traceable Product Units (LCMs) during a production operation. This value represents how much of the picked quantity is assigned and recorded in the traceability structure of each product unit.
| |
Actions |
| To undo the pick, click the Pick icon. |

