Production work order (PWOD) application
The Production work order (PWOD) application is a hands-on planner tool for Production work orders (PWO).
The Production work order (PWOD) application was created for the planner to streamline and centralize all the required information to manage production from a single screen.
Navigate to the application
Option 1: RamBase menu→Production→Production→Production work orders, click the Production work order (PWO) and press ENTER.
Option 2: Click the Program field and type "PWO/ + Identifier" and press ENTER.
Example "PWO/123456
Option 3: From the Production planning (PRODPLAN) application→Productions tab, click link in Docid column.
Click here to read more about the user interface.
Overview
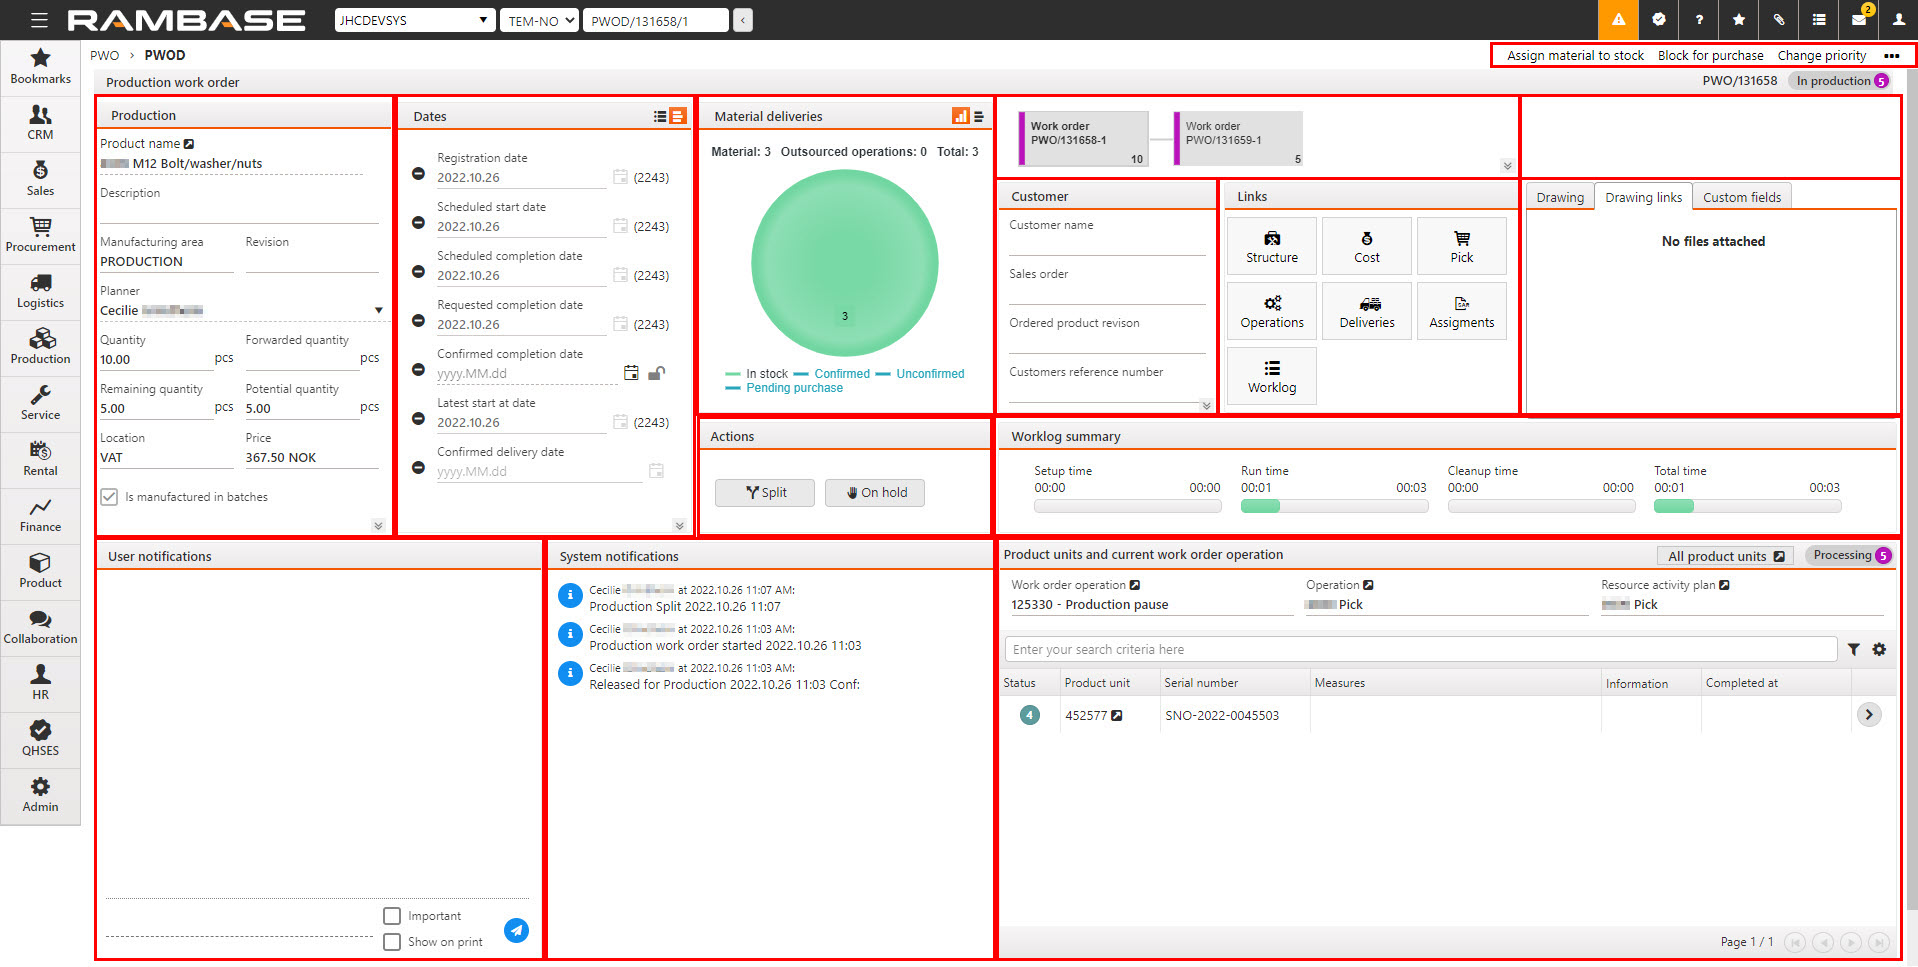
The Production work order (PWOD) application is divided into several areas. All areas, and their functions, are described in the sections below. Use the table of contents in the upper right corner to quickly navigate to the intended area or search for an intended phrase or word by pressing CTRL + F and then ENTER.
The Production area
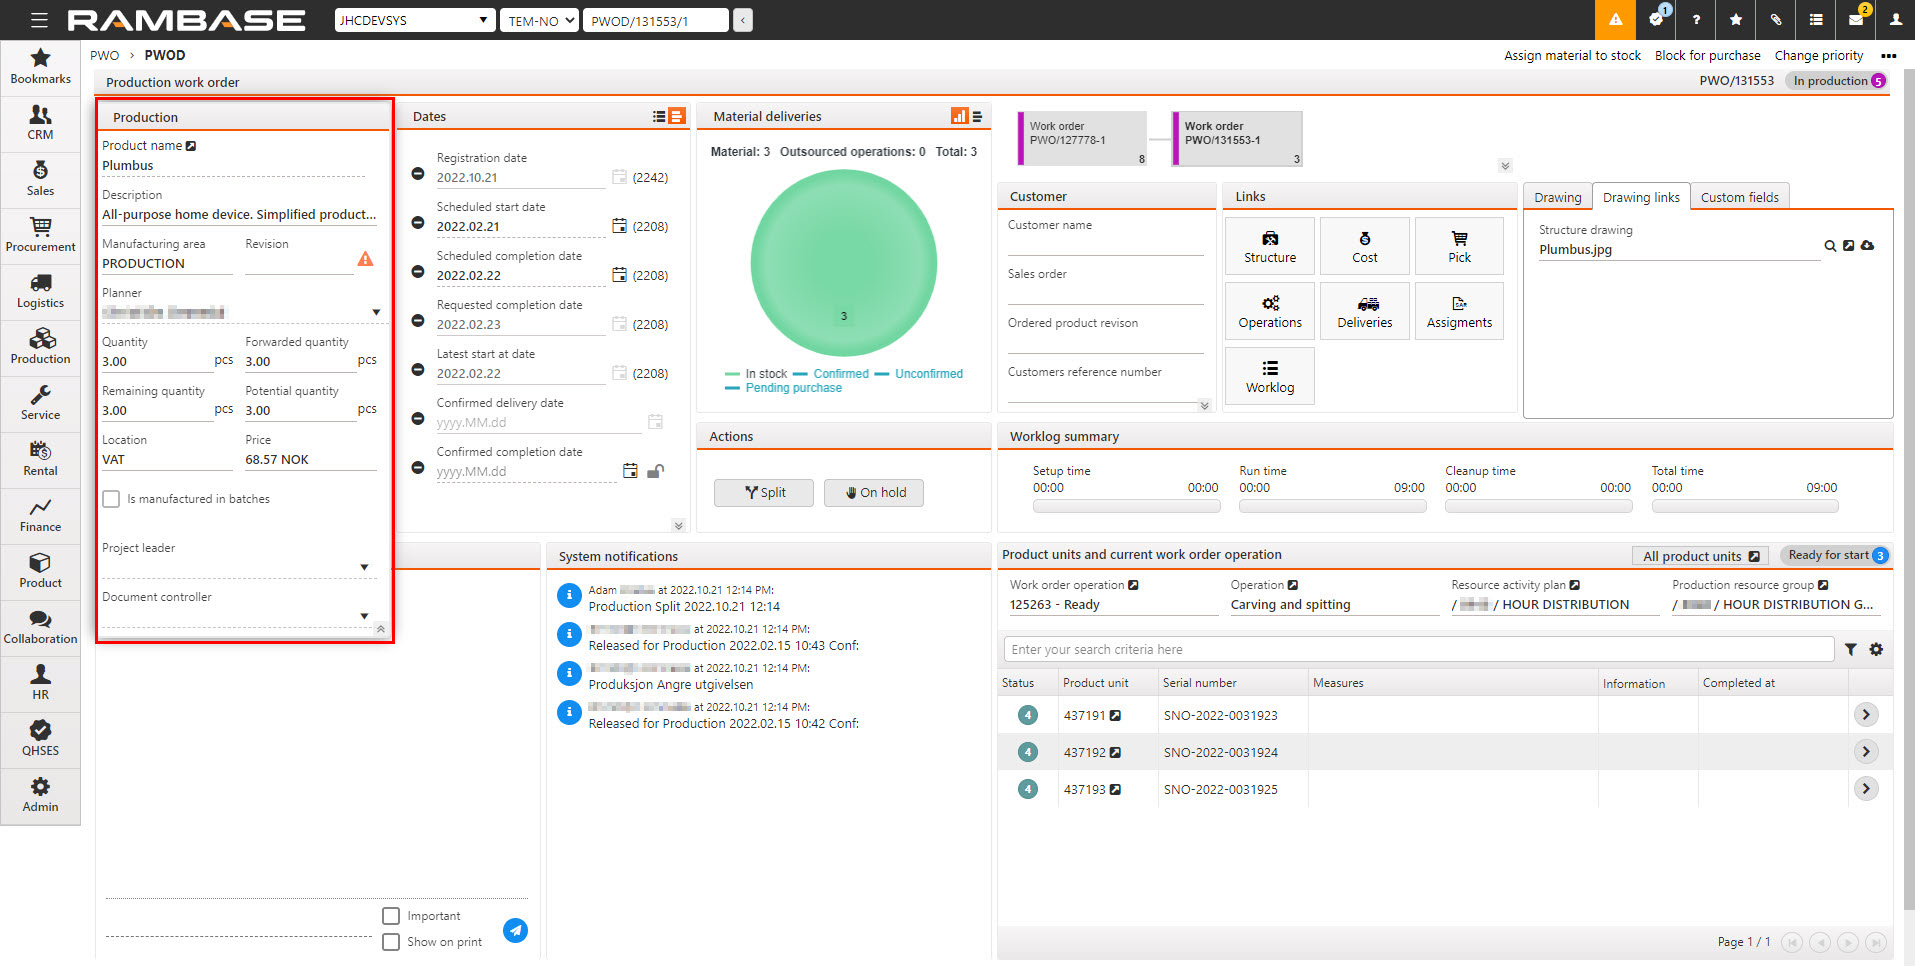
The Production area displays the base production information.
Field and checkboxes | Description |
|---|---|
Product name | The name of the product being produced which is derived from the Product (ART) application. Click the View icon to open the Product (ART) application. |
Description | The description of the product derived from the Product (ART) application. |
Manufacturing area | The Manufacturing area that the product is assigned to. The assigning is done in the Product (ART) application. From the Click on the Properties and then the Production sub-tab. Locate the Manufacturing area drop-down list. Read more about the Manufacturing areas here. |
Revision | Gives information about the current revision of the product. The revision number is derived from the Product (ART) application. If the produced Product (ART) revision differs from the ordered revision on Sales order (COA), a Warning icon will be displayed next to this field. |
Planner | The name of the production planner. The planner can be changed by clicking on Planner drop-down menu and selecting the intended planner from the list. The planner is the one to oversee, release and split productions. The planner will also be notified on important actions taken by operators on Work order operations (WOO). Read more about Work order operations here. |
Quantity | The initial product quantity of the Production work order (PWO). This is usually derived from a production need based on a Sales order (COA) or the Reorder point set in the Product (ART) application. |
Forwarded quantity | If the Production work order (PWO) was released from another Production work order (PWO), then the quantity of products released to the new Production work order (PWO) is displayed here. In example, a Production work order (PWO) with quantity 10 is created. The planner decides to release 5 Product units (LCM) for production. A new Production work order (PWO) is generated and will display the quantity of 5 in the Forwarded quantity field. |
Remaining quantity | If a quantity lower than the total quantity of the initial Production work order (PWO) was released, the remaining quantity of the products to produce is displayed here. Note that this only applies to the initial Production work order (PWO). Released sub Production work orders (PWO) will display the quantity released to that sub Production work order (PWO), until production is completed. |
Potential quantity | Number of Product units (LCM) possible to produce with the current stock. |
Location | Gives information about the location where the product is being produced. |
Price | The Production work order (PWO) price per produced Product unit (LCM). |
Is manufactured in batches | If selected, the production is in batches. If not selected, the production is in units. Batch production is a method whereby a group of identical products are produced simultaneously (rather than one at a time). |
Project leader | The name of the project leader. This value is inherited from the linked Sales order (COA) when creating a new Production work order (PWO). |
Document controller | The name of the document controller. This value is inherited from the linked Sales order (COA) which triggered the creation of the Production work order (PWO). |
The Dates area
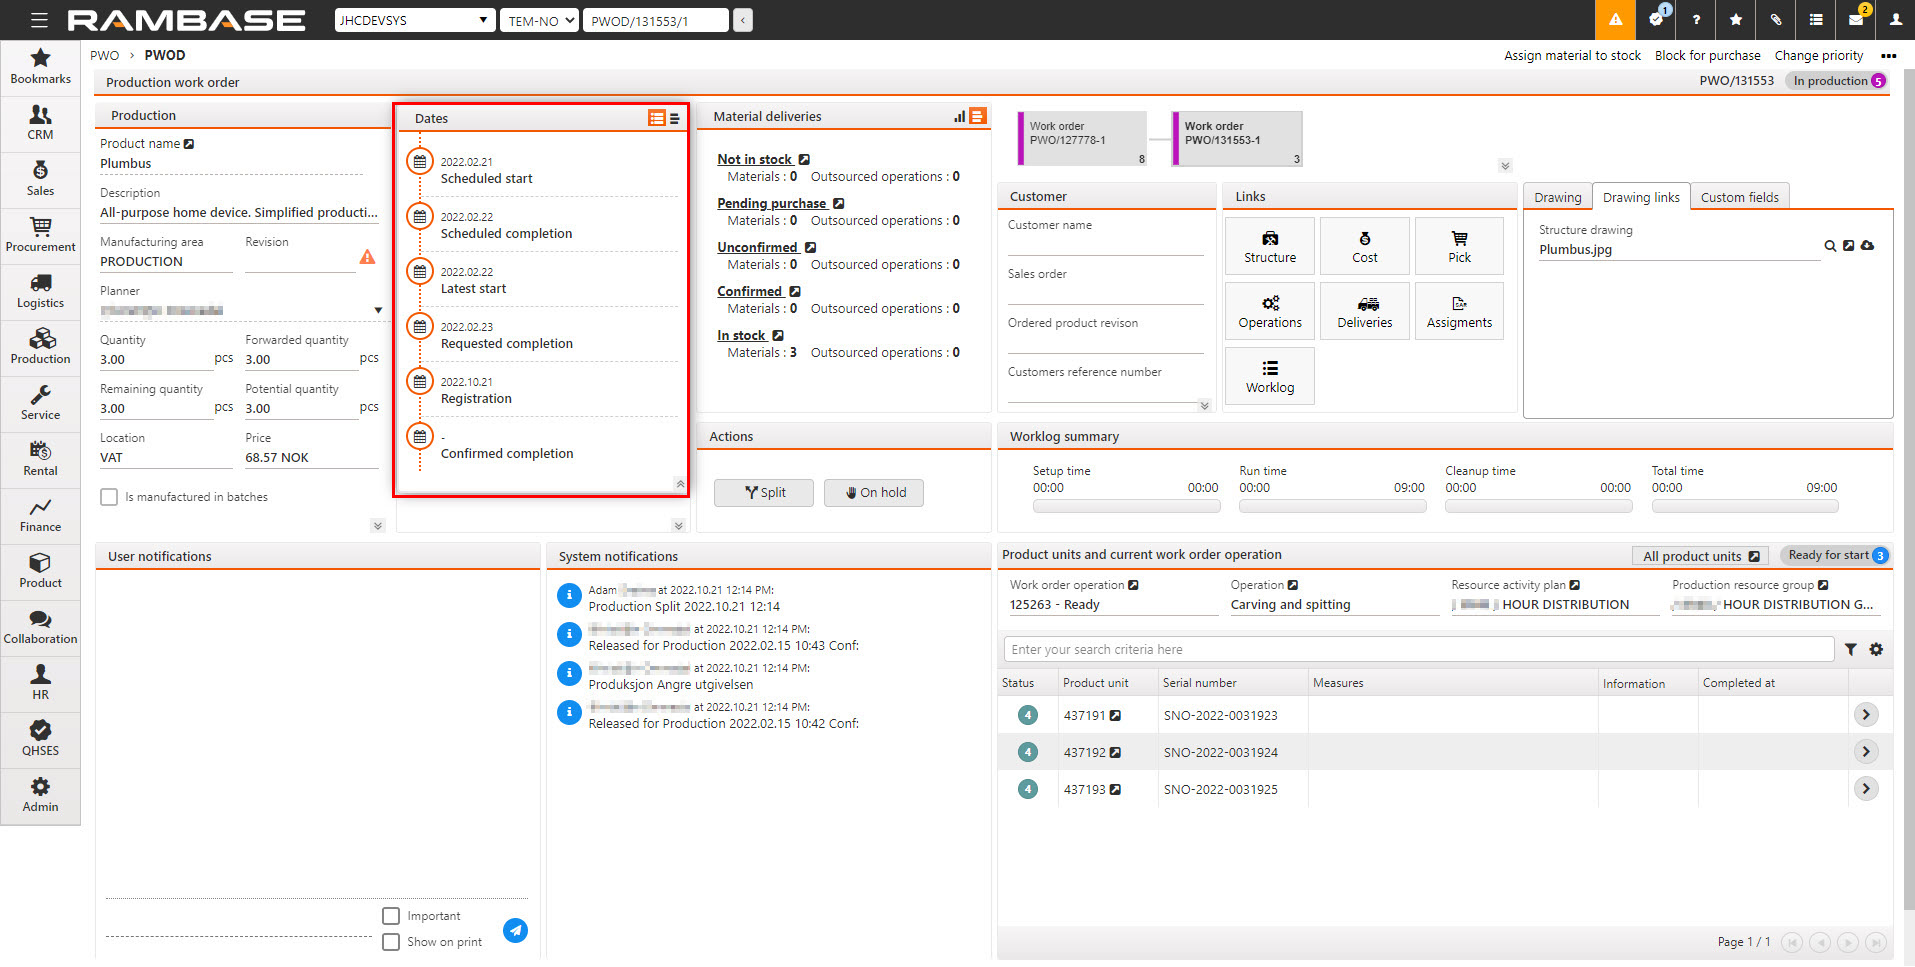
The Dates area can be viewed in either Timeline view or Form view by selecting the corresponding icon in the top right corner of the Dates area.
Icon | Description |
|---|---|
| Timeline view - Lists the production timeline dates chronologically. Includes warning icons. |
| Form view - Lists the production timeline. The dates can be dragged and dropped, and also hidden by clicking the Hide date icon. |
The table below describes the functions and fields in the Timeline view.
Field | Description |
|---|---|
Registration | The date the Production work order (PWO) was created. |
Scheduled start date | The date on which the production is scheduled to start. If this date is after the Latest start date, a warning icon is displayed instead of the calendar icon. The warning icon is displayed only in the timeline view. For Production work orders in Status 4 (Pending scheduled production start), this field can be changed to a future date by clicking on the field and then clicking on the Calendar icon. |
Scheduled completion | The date on which the production is scheduled to complete. If this date is after the Requested completion date, a warning icon is given on the left. The warning icon is displayed only in the timeline view. For Production work orders in Status 4 (Pending scheduled production start) this field can be changed to a future date by clicking on the field and then clicking on the Calendar icon. |
Requested completion | The requested date of completion for the Production work order (PWO) derived from the initial Service order (CSO) or Sales order (COA). |
Latest start | The latest date by which production must start, to be able to complete by the Scheduled completion date. |
Confirmed completion date | The date on which completion of the production is confirmed. Clicking the Calendar icon will open a popup to set the Confirmed completion date. Clicking the Lock icon can either lock or unlock the Confirmed completion date. |
The table below describes the functions and fields in the Form view. These fields can be dragged and dropped, or even hidden by clicking the Hide date icon to the left of the intended field. To the right of the fields, in parenthesis, the year and week number is displayed (YYWN).
Field | Description |
|---|---|
Registration date | The date the Production work order (PWO) was created. |
Scheduled start state | Scheduled/planned date of Production work order (PWO) start. |
Scheduled completion date | Scheduled/planned date of Production work order (PWO) completion. |
Requested completion date | The requested date of completion for the Production work order (PWO) derived from the initial Service order (CSO) or Sales order (COA). |
Latest start at date | The latest date by which production must start, to be able to meet the Scheduled completion date. |
Confirmed delivery date | The confirmation date from the linked Sales order (COA) or Service order (CSO). |
Confirmed completion date | The date on which completion of the Production work order (PWO) is confirmed. Clicking the Calendar icon will open a popup to set the Confirmed completion date. Clicking the Lock icon can either lock or unlock the Confirmed completion date. |
Restore default fields | The Restore default fields button is displayed when hiding a field by clicking the Hide date icon. Clicking the Restore default fields button will show all hidden fields. |
The Material deliveries area
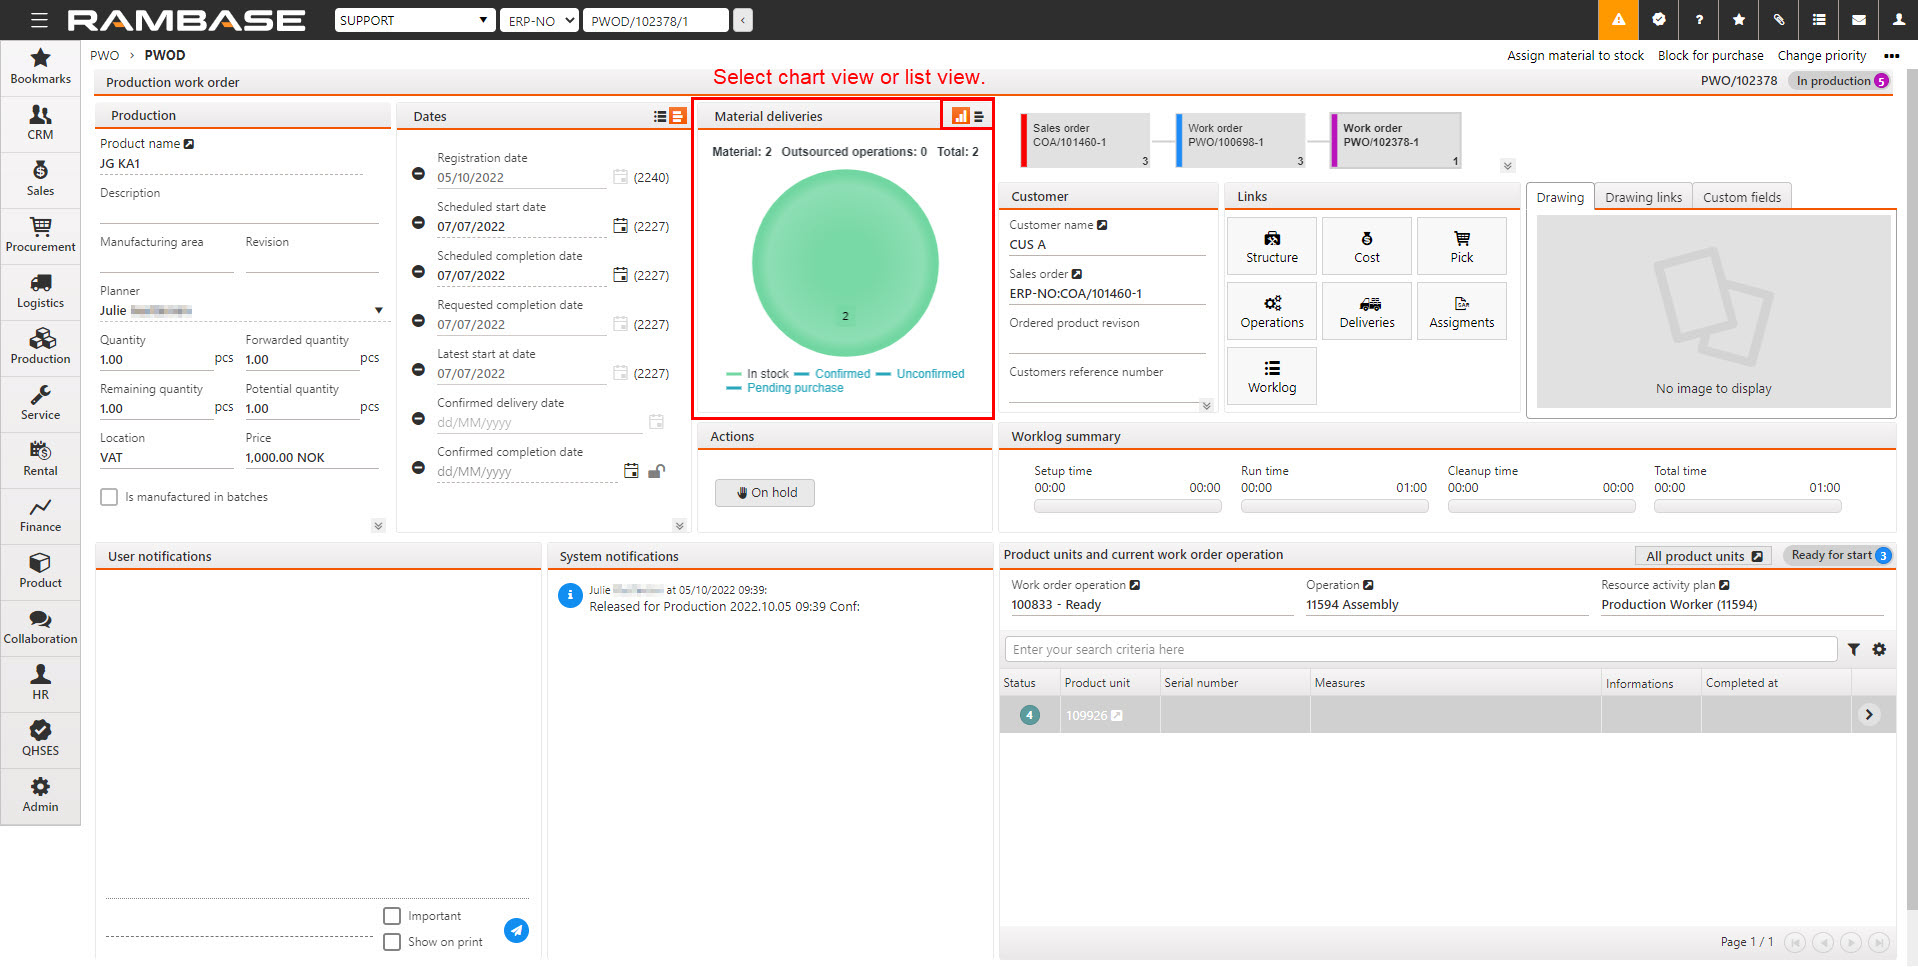
The Material deliveries area displays information about the materials used in the Production work order (PWO) in a chart or list view. The chart view is shown as a pie chart, where green portion represents the material in stock. Unconfirmed material is given in red, material that is pending purchase is given in orange, and confirmed material is given in yellow.
Click a particular portion of the pie chart to open the Production work order assignments (PWOSARLINKS) application, where you can see the materials and their quantity. A warning label is displayed if the production has material shortage.
Rework can be done from the Production work order assignments (PWOSARLINKS) application
From the Production work order assignments (PWOSARLINKS) application, In the Actions column, the user can click the Rework icon to open the Rework popup.
An overview is displayed above the pie chart, detailing the number of materials and the outsourced operations in the production. The information displayed underneath the pie chart can be hidden by clicking the intended label. The displayed information is In stock, Confirmed, Unconfirmed and Pending purchase.
The list view displays all of this information in text form. There are separate sections for materials that are unconfirmed, confirmed, pending purchase, in stock or not in stock. Click on a label to open the Production work order assignments (PWOSARLINKS) application and view the links for that portion.
If there is a negative material trend, this will be noted by a blue flag at the lower part of the Material deliveries area.
A negative material trend implies that the required materials for the Production work order (PWO) are either Unconfirmed or Pending purchase.
Icon | Description |
|---|---|
| Will display the Material deliveries in the chart view. |
| Will display the Material deliveries in the list view. |
The Chart view fields are described in the table below:
Chart view | Description |
|---|---|
Material | The quantity of internal assigned to the Production work order (PWO) in the Production work order assignments (PWOSARLINKS). Includes materials in stock, confirmed and unconfirmed materials. |
Outsourced operations | The quantity of materials of type = WX (External work). |
Total | The total quantity of materials assigned to the Production work order (PWO) in the Production work order assignments (PWOSARLINKS), includes all types of materials. |
In stock | The quantity of materials in stock, also displayed in the pie chart with the color green. |
Confirmed | The quantity of materials with confirmed delivery dates, also displayed in the pie chart with the color yellow. |
Unconfirmed | The quantity of materials with unconfirmed delivery dates, displayed in the pie chart with red color. |
Pending purchase | The quantity of materials pending purchase, also displayed in the pie chart with the color orange. |
The List view field are described in the table below:
List view | Description |
|---|---|
Not in stock | Lists the quantity of materials that are not in stock. Also lists the quantity of outsourced operations, in example Products (ART) with type=WX (External work). Click the View icon to open the Production work order assignments (PWOSARLINKS). |
Pending purchase | Lists the quantity of materials pending purchase. Also lists the quantity of outsourced operations, in example Products (ART) with type = WX (External work). Click the View icon to open the Production work order assignments (PWOSARLINKS). |
Unconfirmed | Lists the quantity of materials that are linked to Purchase orders (SPO) with unconfirmed delivery dates or Production work orders (PWO) with unconfirmed completion dates. Click the View icon to open the Production work order assignments (PWOSARLINKS). |
Confirmed | Lists the quantity of materials that are linked to Production work orders (PWO) with confirmed completion dates or Purchase orders (SPO) with confirmed delivery dates. Click the View icon to open the Production work order assignments (PWOSARLINKS). |
In stock | Lists the quantity of materials in stock. Click the View icon to open the Production work order assignments (PWOSARLINKS) and view the linked Goods receptions (SSA). |
The Actions area
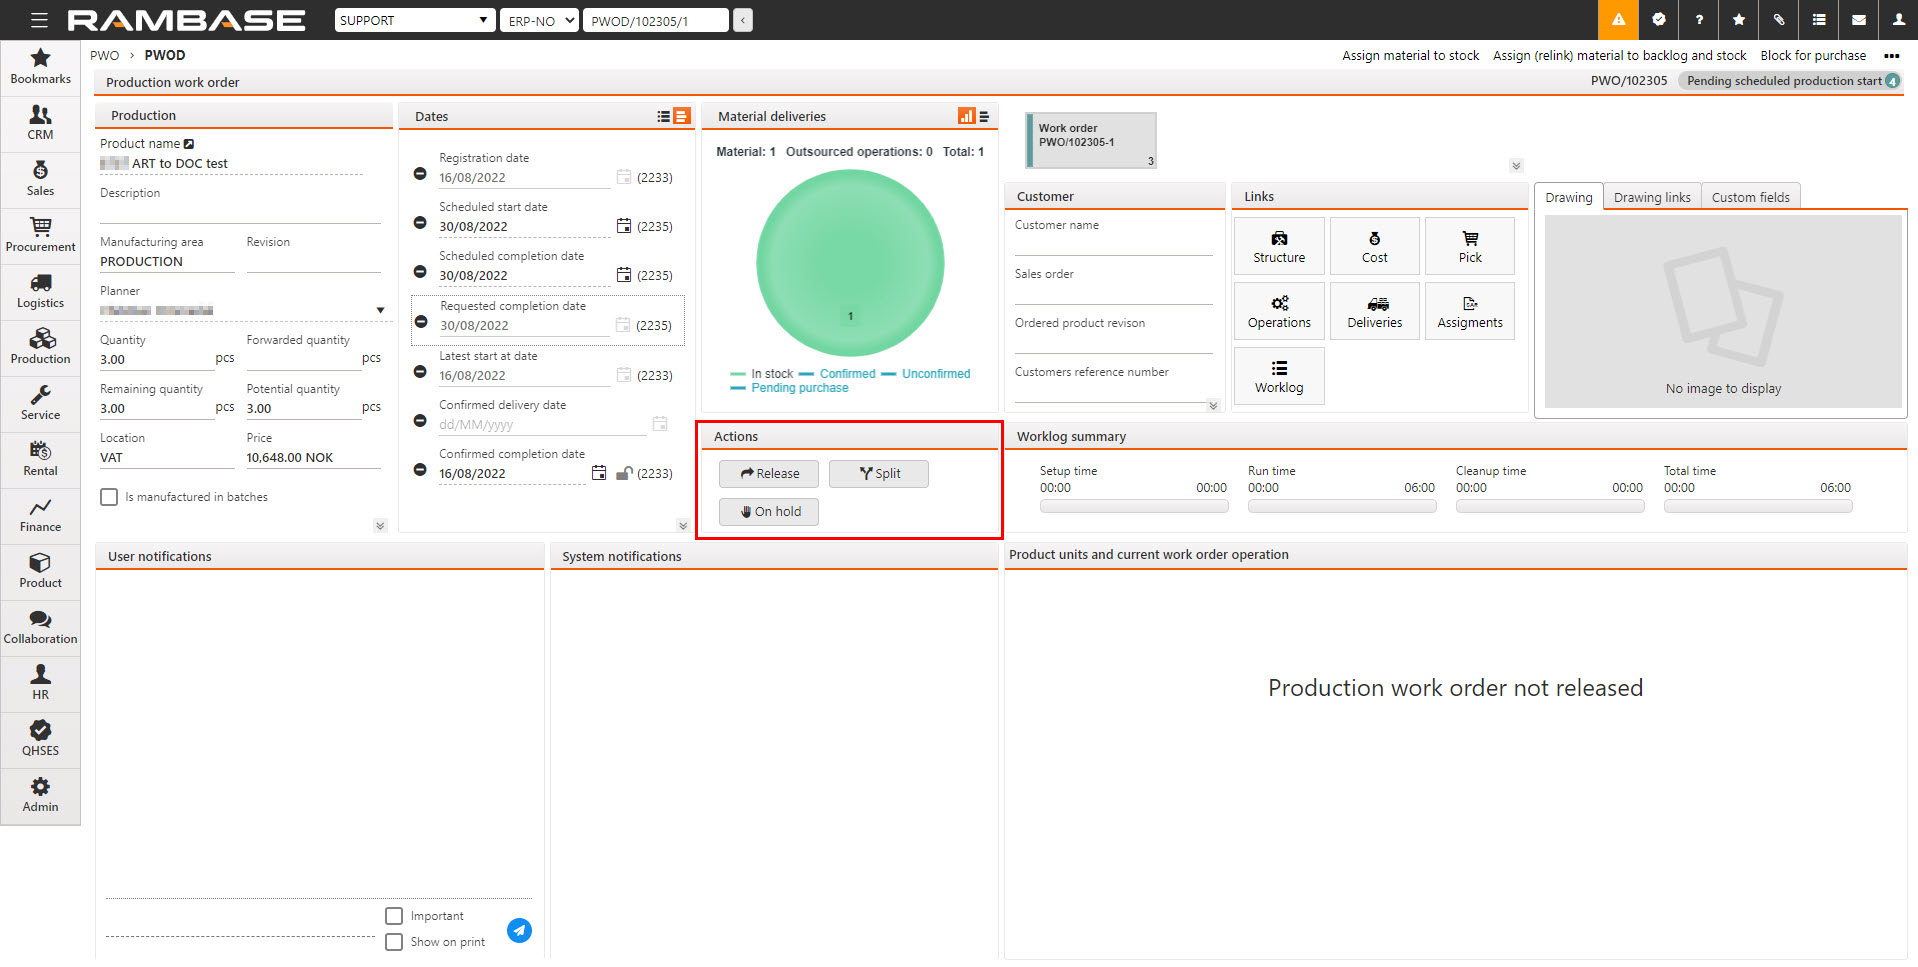
The actions area allows quick handling of the Production work order (PWO). The available actions are described in detail in the table below. The available actions are dependent on the status of the Production work order (PWO).
Button | Description. |
|---|---|
Confirm | Clicking the Confirm button will forward the Production work order (PWO) to Status 4 (Pending scheduled production start) if all materials are available. If all materials are not available, the Production work order (PWO) will be forwarded to Status 2 (Pending purchase or production). Or forwarded to Status 3 (Pending goods reception). As noted in the Material deliveries area. The action is available in:
|
Complete service | This action is available for Production work orders (PWO) which are forwarded from Service orders (CSO). Clicking the Complete service button will forward the Production work order (PWO) to Status 9 (Processed) The action is available in:
|
(On) Hold on/off | A Production work order (PWO), or selected Work order operations can be put on hold. Read more about putting a Production work order (PWO) on hold here. The action is available in:
|
Release | Clicking the Release button will open the Release production work order popup with the following fields and options:
The released Production work order (PWO) will be set to Status 5 (In production) and available for the operator in the Operators list of production work order operations (RWOO) application. Read more about the Operators list of production work order operations (RWOO) application here. The action is available in:
|
Split | Clicking the Split button will open the Split production work order popup with the following fields and options: There are two headers, one listing relevant dates and quantity for the source Production work order (PWO), and one listing relevant split dates and quantity for the potential new Production work order (PWO). PWO/######
Split to new production work order
Tabs
A split Production work order (PWO), will generate a new Production work order (PWO) with the selected quantity and will be set to Status 4 (Pending scheduled production start), if the required materials are in stock. The action is available in:
|
To goods reception | Click the To goods reception button to forward the Product units (LCM) to stock. Click the drop-down menu to select which Stock location (STL) to forward the goods to. The action is available in:
|
The Customer area
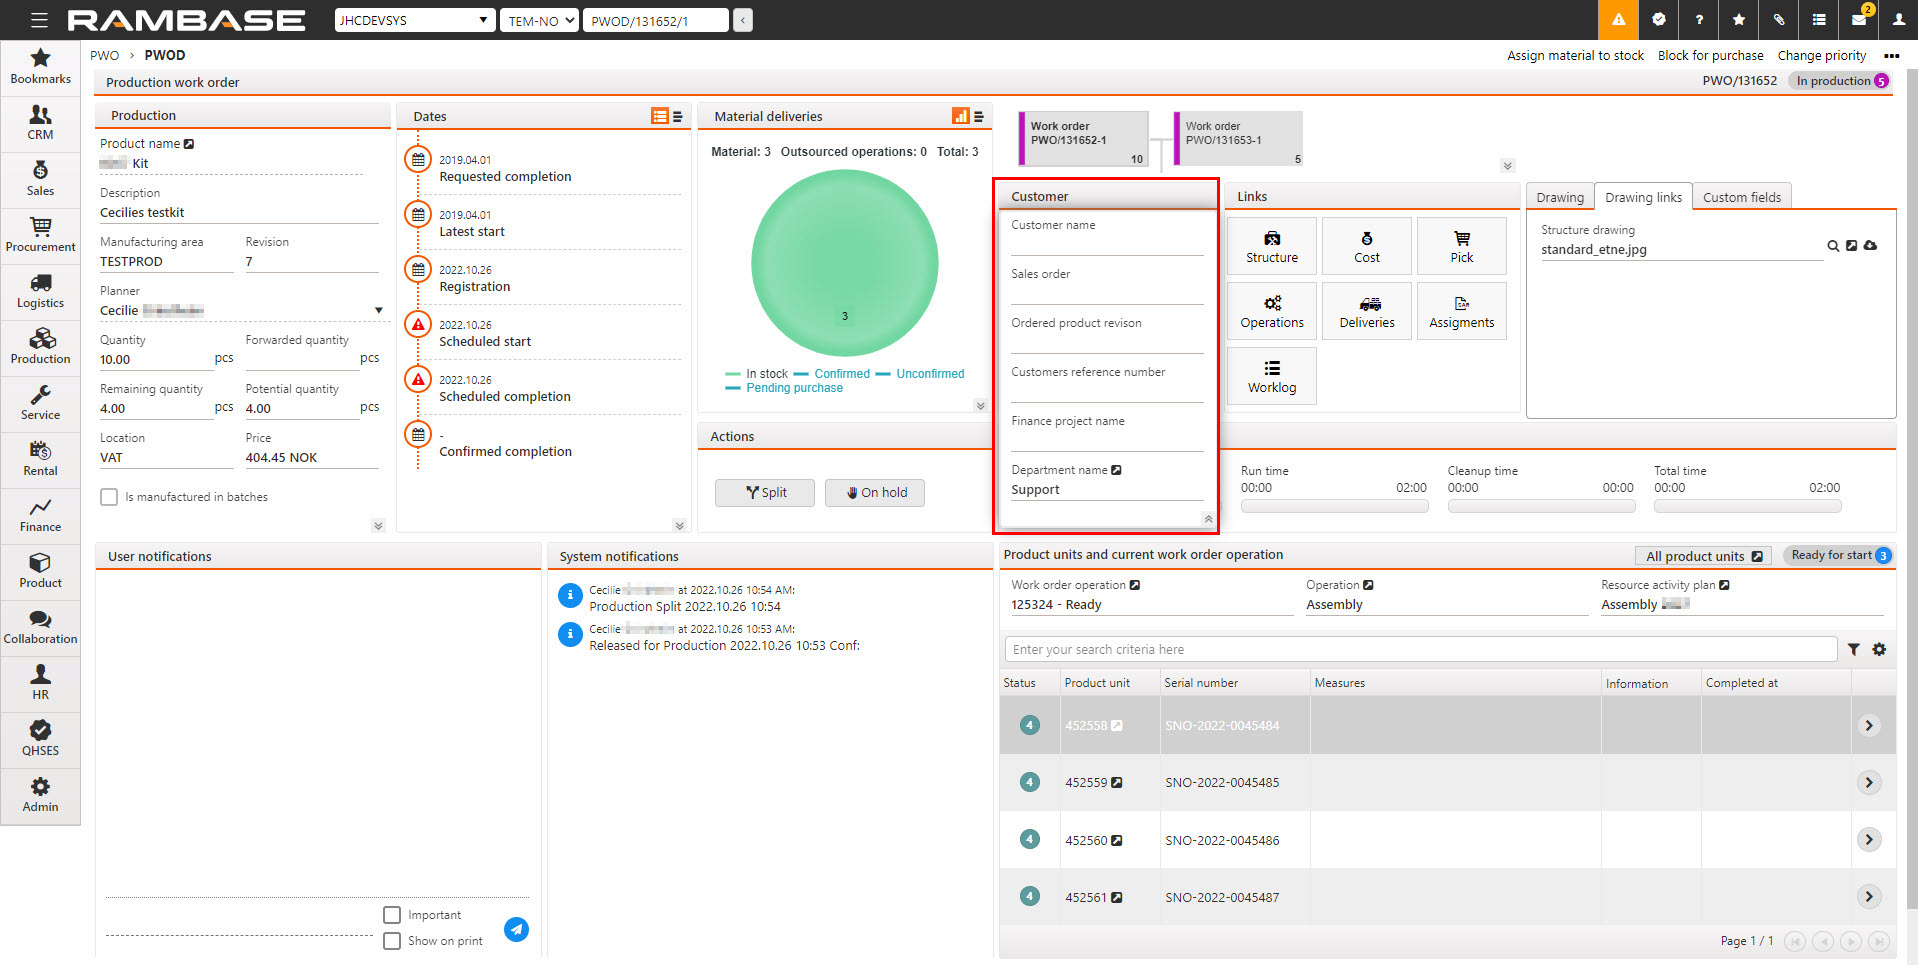
The Customer area displays general information regarding the customer and the Sales order (COA) that triggered the Production work order (PWO).
Fields | Description |
|---|---|
Customer name | Displays the name of the customer (name of company or surname/familyname/lastname of a person). To view the customer details, click the View icon to open the Customer (CUS) application. |
Sales order | Internal RamBase identifier of the Sales order (COA). Click the View icon to open the Sales order (COA) application. Click the Risk icon to open the Risk list (RISK) application. |
Ordered product revision | Displays the revision information of the Product (ART), which was ordered by the Customer (CUS). A warning symbol will be displayed next to the Ordered product revision field if the ordered Product (ART) revision is different than the revision produced in the Production work order (PWO). A revision will typically be a major change, as opposed to minor changes stored in the version of the Product (ART) structure. |
Customers reference number | Displays the Customer's (CUS) order reference. If the Production work order (PWO) is derived from a Sales order (COA), the customers order reference will be the same as in the Sales order COA). Usually used as a reference to an external system. |
Finance project name | If the Sales order (COA) is is linked to a Finance project (PRJ), this field will display the Finance project (PRJ) identifier. To link the Production work order (PWO) to a Finance project (PRJ), click the Finance project lookup dropdown, and select one from the list. Click the View icon to open the Finance project (PRJ) application. Read more about the Finance project (PRJ) application. |
Sales delivery project name | If the Production work order (PWO) is linked to a Delivery project (PRO), the name will be listed in this field. Click the View icon to open the Delivery project (PRO) application. The Delivery project (PRO) application is a useful application that binds together information from various sources to enhance cost and progress control. Read more about the Delivery project (PRO) application here. |
Department name | If the Production work order (PWO) is linked to a Department (DEP), this field will display the Department (DEP) identifier. To view the Department (DEP) details, click the View icon to open the Department (DEP) application. To link the Production work order (PWO) to a Department (DEP), click the Department lookup dropdown menu and select one from the list. Read more about the Department (DEP) application. |
The Links area
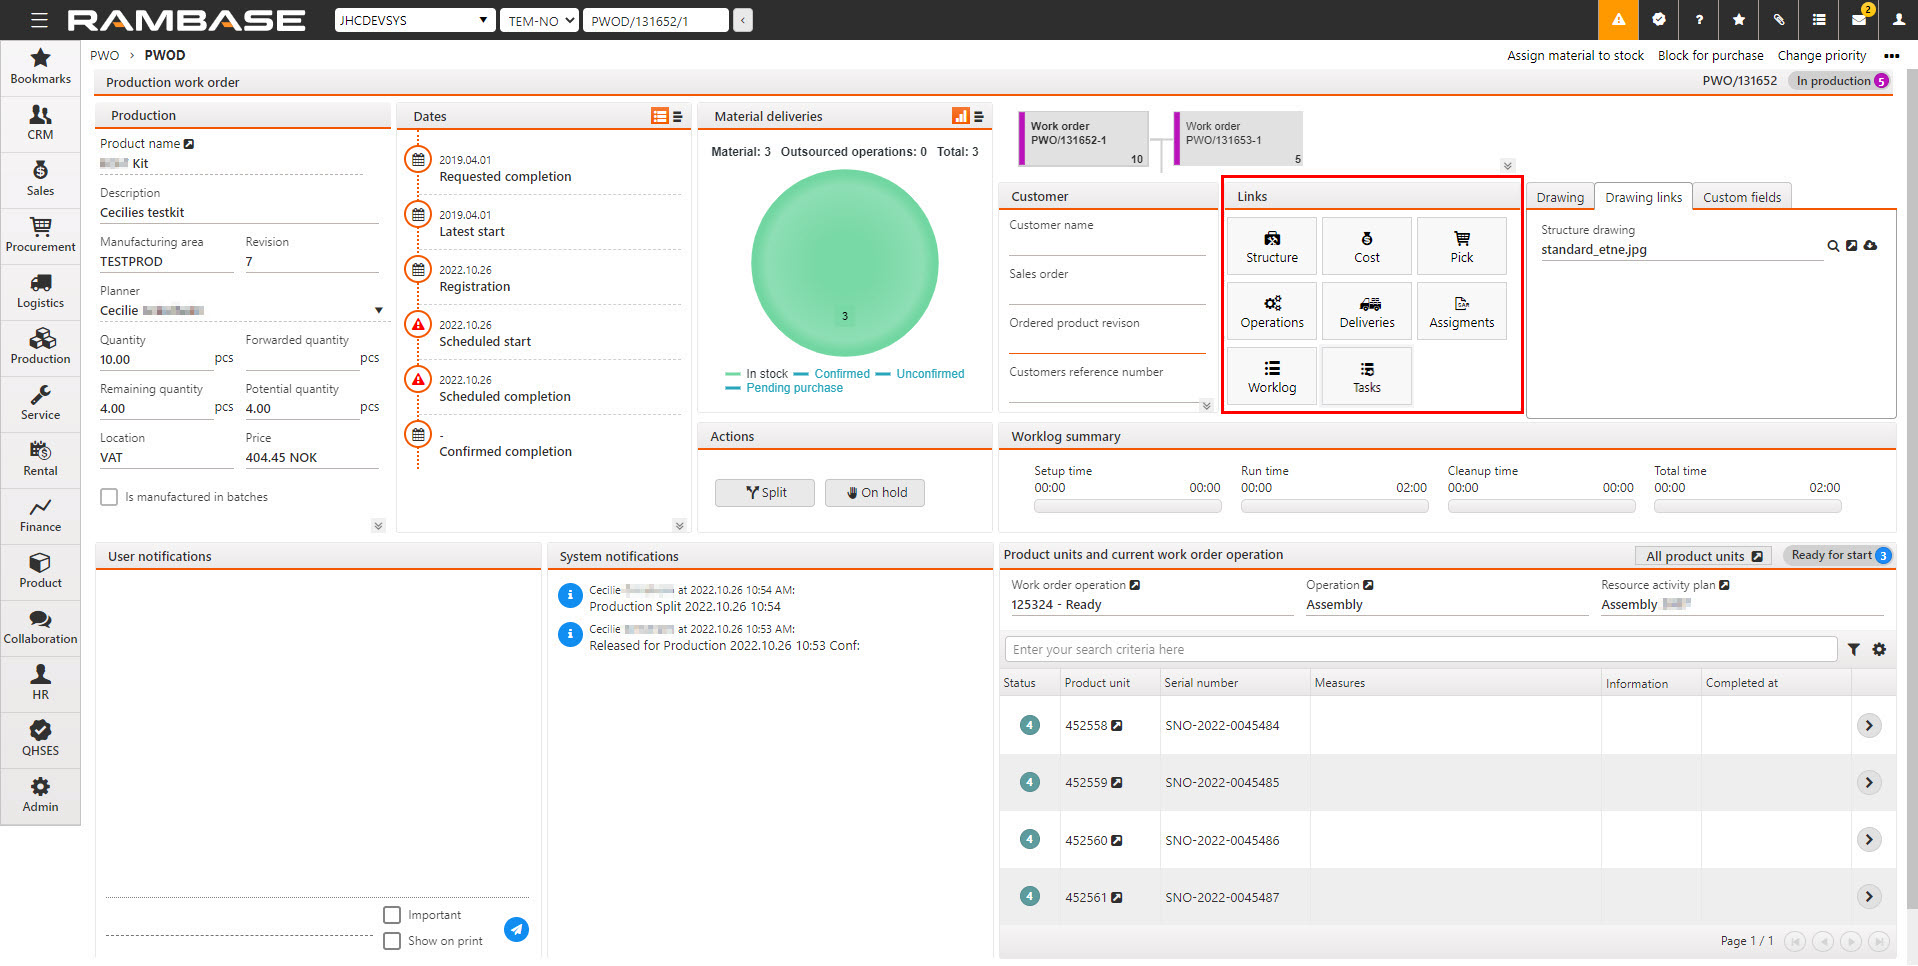
The Links area allows quick navigation to various related applications from the Production work order (PWO) application. The available links are listed in the table below.
Links | Description |
|---|---|
Structure | Click the Structure button to open the Production structure (KITDOC) application to view details about the specific structure being produced. Read more about kits and structures here. |
Cost | Click the Cost button to open a popup detailing the production cost. |
Pick | Click the Pick button to open the Pick (PICK) application. From the Pick list details (PICK) application the following options are available from the header:
|
Operations | Click the Operations button to open the Planned operations for production work order (PWOPLO) application where the planner can inspect and change planned operations for the Production work orders (PWO). Read more about the Planned operations for production work orders (PWOPLO) application here. |
Deliveries | Clicking the Deliveries button will open the report Deliveries to stock where the user can select different views including:
|
Assignments | Clicking the Assignments button will open the Stock assignment (SAR) for the Production work order (PWO). |
Worklog | Clicking the Worklog button will open the Production work order worklog (PWOWL) application. Which is used to log time on operations for a Production work order (PWO). Read more about the Production work order worklog (PWOWL) here. |
Tasks | Clicking the Tasks button will open the Tasks popup. Three tabs are available:
|
The Drawing, Drawing links and Custom fields area
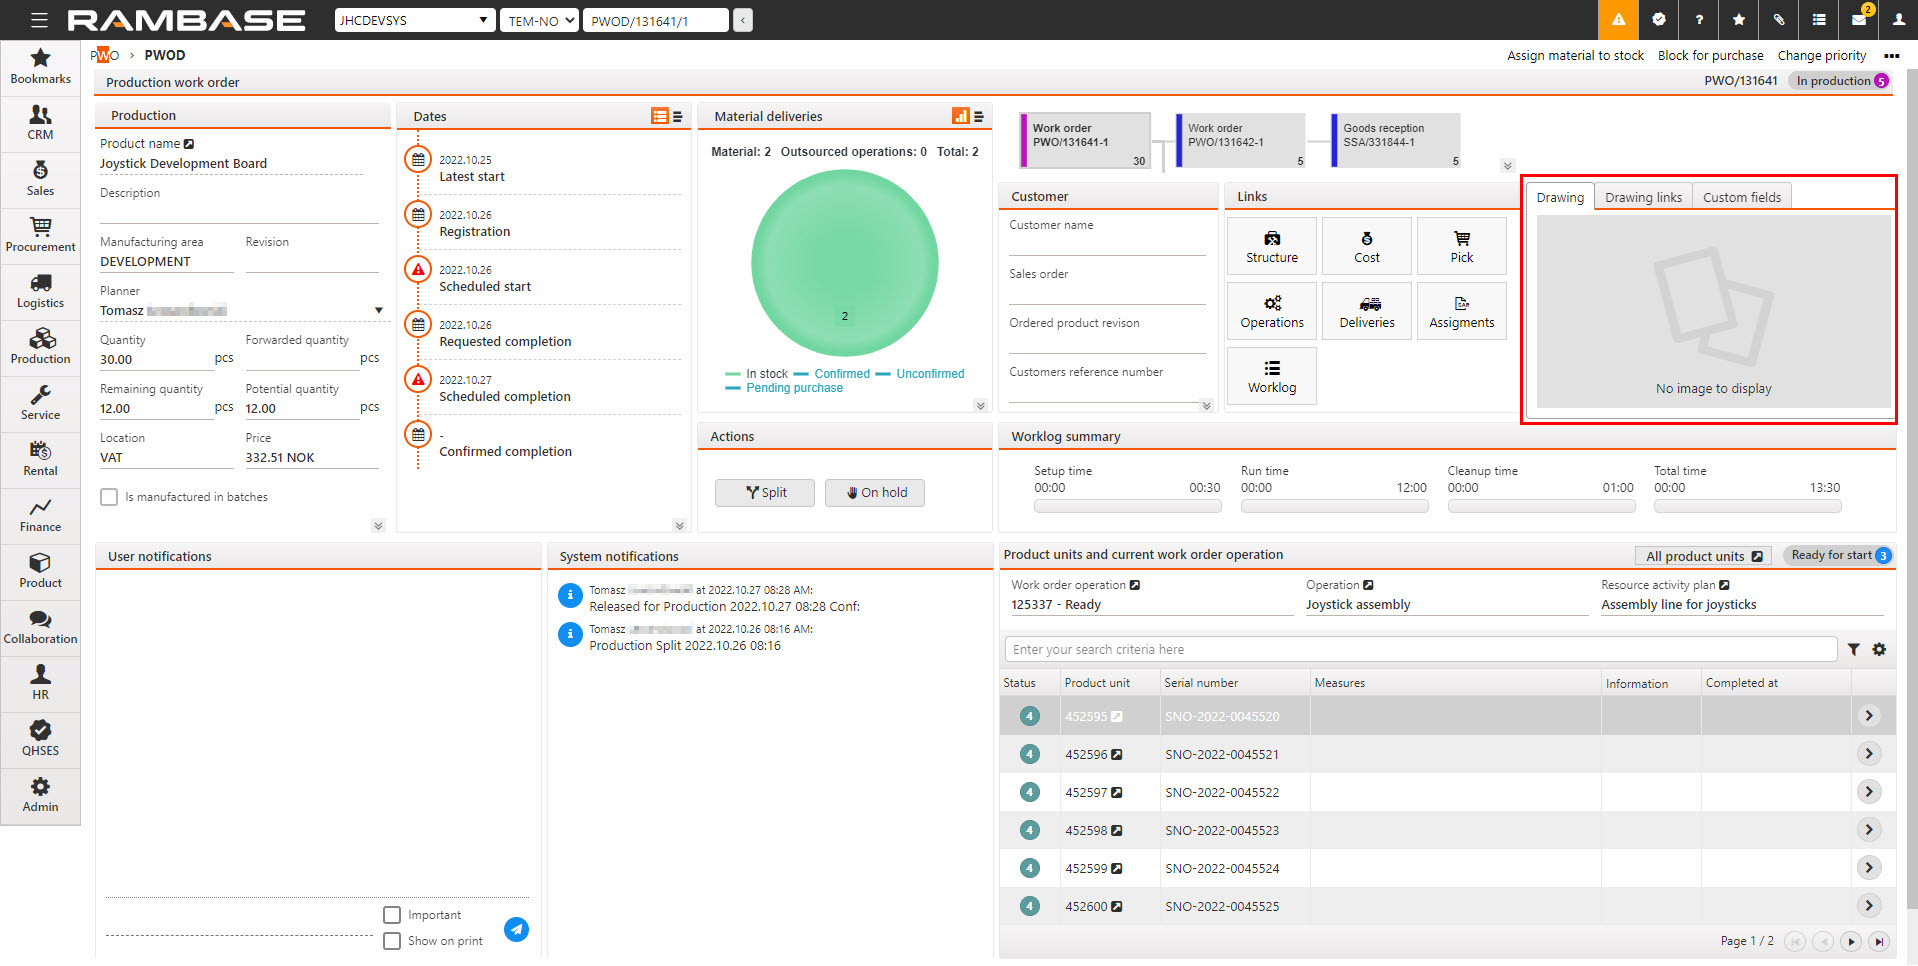
The Drawing, Drawing links and Custom fields area is used to display drawings and if added, Custom fields.
Tabs | Description |
|---|---|
Drawing | Displays Drawings added to the Product (ART) being produced by the Production work order (PWO). To quickly access the Product (ART) application, where the drawing is added, click the Structure button in the Links area. |
Drawing links | Displays the links to all added drawings from the Product (ART) structure. |
Custom fields | Enabled Custom fields will be available here. Read more here to learn how to add Custom fields (CUSTOMFIELDS). |
The Worklog summary area
The Worklog summary area gives a summary of the time spent on various tasks in the production. The planned and actual times are given in the progress bars. The progress bars are colored green if the actual work time is less than the planned operation time, and it turns red if it exceeds the planned operation time.
The counted time is derived from work log elements from the Work order operations (WOO) application. Detailed information can be found by clicking the Worklog button in the Links area.
Read more here about how hourly rates are added to Resources (RESCONFIG).
Worklog summary fields | Description |
|---|---|
Setup time | Displays the counted setup time. |
Run time | Runtime of the operations. |
Cleanup time | Displays the changeover post/cleanup time. |
Total time | Displays the total time of all worklog elements started by operators in the Work order operation (WOO) application. |
The User notifications area
User notifications gives various notifications to the users. You can add new messages by entering the message and pressing the ENTER key. You can also set a message as a priority. Select any message to edit or delete it.
Field/Icon name/Checkbox | Icon | Description |
|---|---|---|
Dotted line free-text field | Click on the line to input the intended message. Click on the Send icon to display the message in the User notifications area. | |
Information |
| Information icons. Click on the icon to open the Edit notification popup. The Edit notification popup
|
Important checkbox | Check the checkbox to mark the notification as important. A user notification with the Important checkbox checked will be marked with a red information icon. | |
Show on print checkbox | Checking the Show on print checkbox will add the added notification to all print documents related to the Production work order (PWO). | |
Send |
| Click on the Send icon to add the typed message to the User notification area. |
The System notifications area
The System notifications area displays messages from the system to the users, such as the actions performed on the Production work order (PWO) by various users.
| All notable actions performed on the Production work order (PWO) will be time stamped with the user information and time, and displayed in the System notifications area. |
| Messages set on the in Product (ART) application, from the context menu, will be displayed with a warning icon. The message will be generated in the System notifications area when the Production work order (PWO) is created. |
The Product units and current work order operation area
The Product units and current work order operation area displays information on the related Work order operations (WOO) for triggered by the Production work order (PWO). The Product units (LCM) being produced in the Work order operation (WOO) are also detailed and listed.
Work order operation field - Displays the Work order operation (WOO) identifier. If the Production work order (PWO) or a Work order operation (WOO) is put on hold, the field will be colored red. Click on the View icon to access the Work order operation (WOO) application.
Operation - Displays the name of Production operation (OPR). Click the View icon to open the Production operation (OPR) application.
Resource activity plan - Displays the name of the production resource. Click on the View icon to open the Operators list of production work order operations (RWOO) application.
Production resource group - This field will be available if the operation is linked to a Production resource group (REGCONFIG). The field displays the name of the Production resource group (REGCONFIG). Click on the View icon to open the Distribute work order operations from resource group to member resources (DWOO) application to view the assigned Work order operations (WOO) to the member resources.
Column | Description |
|---|---|
Status | Displays the status of the Product unit (LCM). |
Product unit | Displays the identifier for the Product unit (LCM). Click on the View icon to open the Life cycle management (LCM) application. |
Serial number | Displays the unique serial number of the Product unit (LCM) being produced. |
Quantity | An informational field that displays the number of units being produced in that Product unit (LCM). For unit Production work orders (PWO) the quantity will always be 1, for each Product unit (LCM). For batch productions, if the Is manufactured in batches option is checked in the Production work order (PWO) application, the quantity column will be relevant as each line displays the quantity in the batch. |
Measures | Displays the various measurements being performed on the Product unit (LCM). Click on the items in the Measures column to inspect the intended Measurement (MSR) document. |
Information | Displays information if the Product unit (LCM) contains replaced traceable materials. |
Completed at | Displays the date and time the Product unit (LCM) was completed. |
| Click the radio button to open the Life cycle management (LCM) application where details of the Product unit (LCM) can be viewed and edited. |
Context menu options
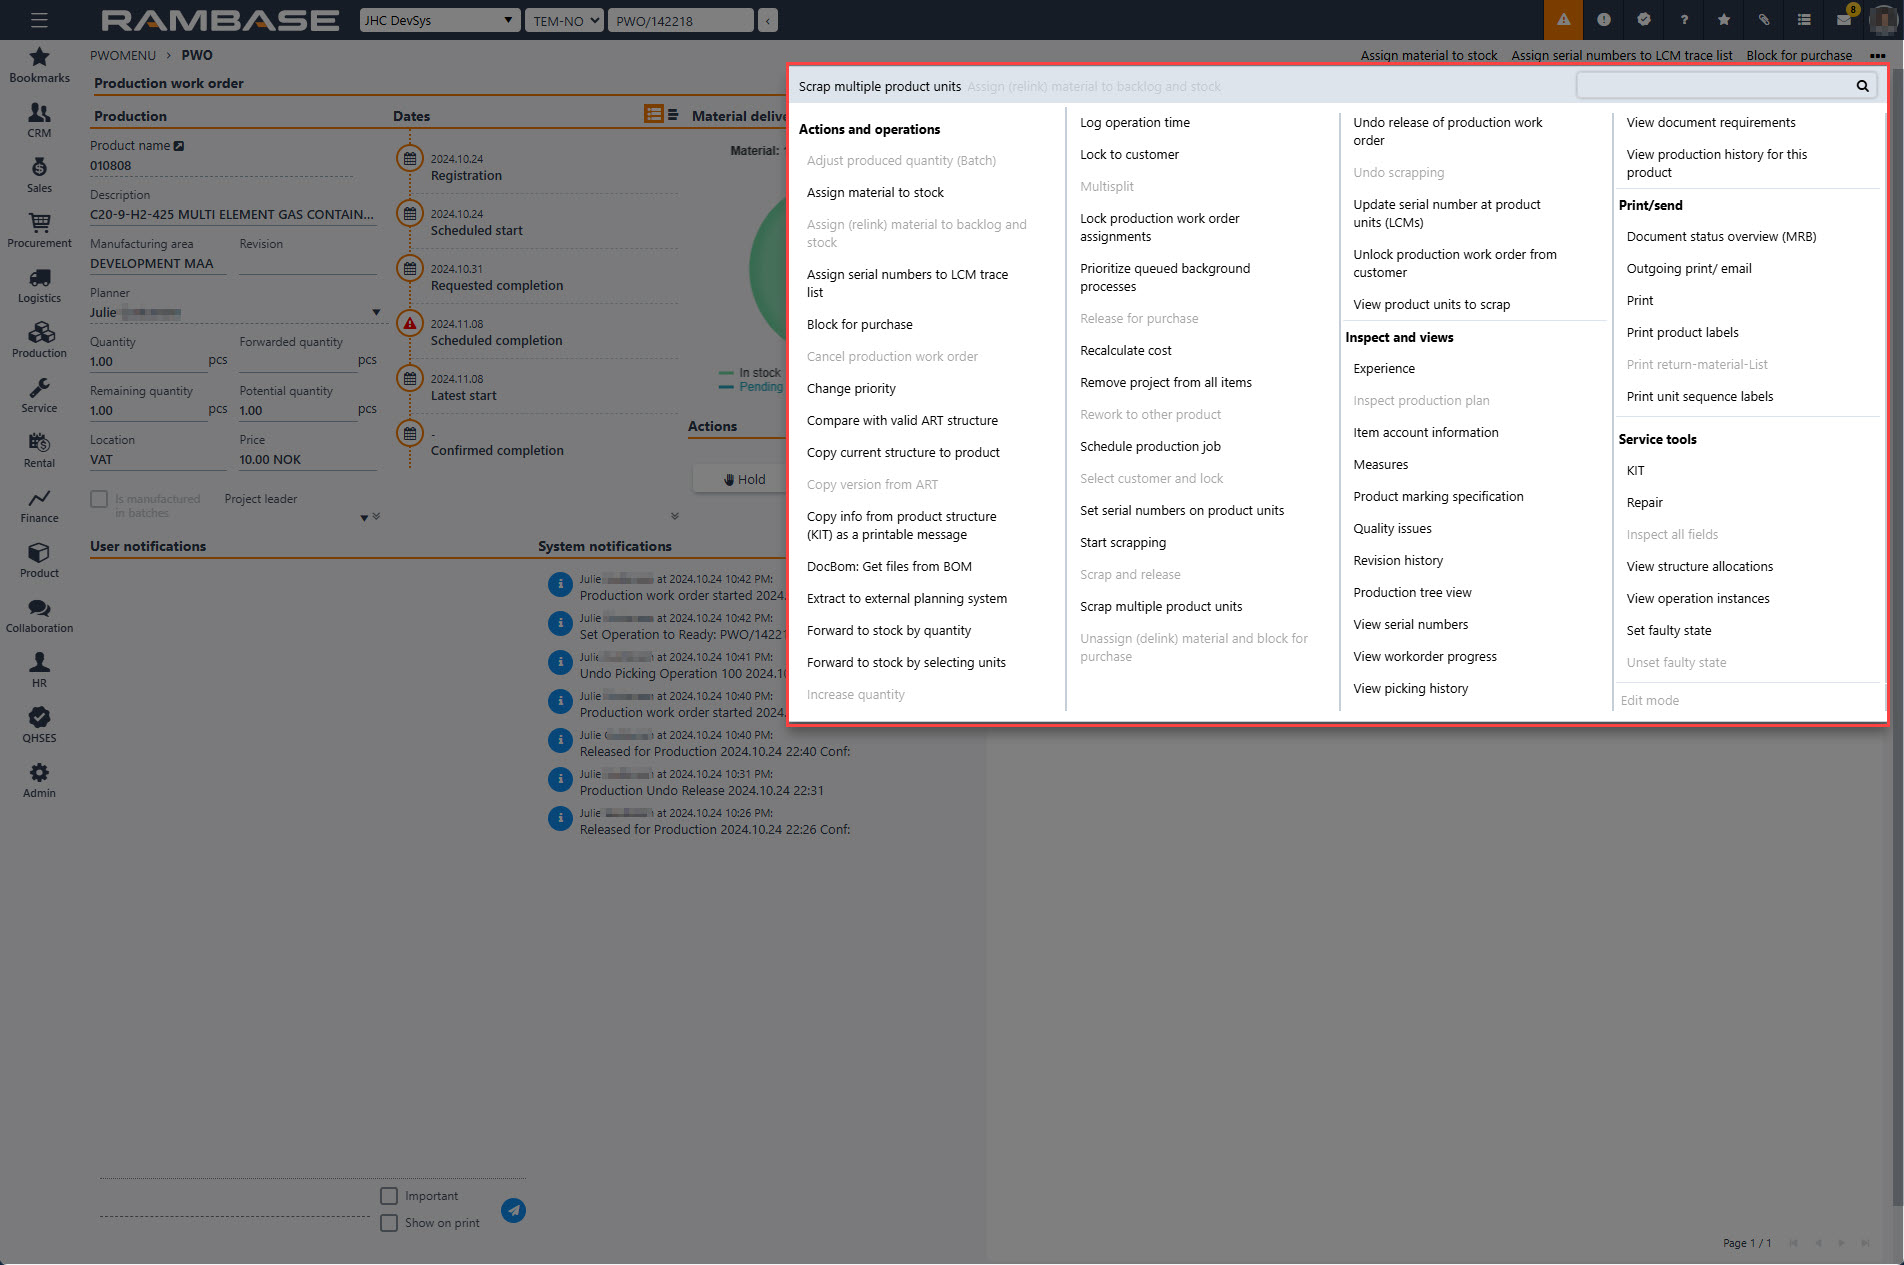
The context menu is found in the upper right corner by clicking the Context menu icon. The tables below describes the different options categorized by sections. The available options in the context menu are dependent on the status the of Production work order (PWO), In other words, by the context of Production work order (PWO).
Actions and operations | Description | |||||||||||||||||||||||||||||||||||||||||||||||||||||
|---|---|---|---|---|---|---|---|---|---|---|---|---|---|---|---|---|---|---|---|---|---|---|---|---|---|---|---|---|---|---|---|---|---|---|---|---|---|---|---|---|---|---|---|---|---|---|---|---|---|---|---|---|---|---|
Adjust produced quantity (Batch) | Clicking the Adjust produced quantity (Batch) will open the corresponding popup where NetQty can be adjusted. Quantity can only be adjusted for completed batch Production work orders (PWO) in Status 8 (Completed). | |||||||||||||||||||||||||||||||||||||||||||||||||||||
Assign material to stock | Updates the Stock assignments (SAR) on the Production work order (PWO). Clicking this option will start the process of trying to link all required parts in the Production work order (PWO) to materials which are in stock. Available for Production work orders (PWO) in:
Optional usage of customer owned materialIf the settings, listed below, are set to 'ON', using the Assign material to stock option will also take into consideration material which are customer owned, if customer ownership matches the Production work order (PWO). Company and child settings Goods recepetions (SSA) which are customer owned will be prioritized when assigning to stock, over those which are not customer owned. | |||||||||||||||||||||||||||||||||||||||||||||||||||||
Assign (relink) material to backlog and stock | Updates the Stock assignments (SAR) on the Production work order (PWO). Clicking this option will start the process of trying to link all required parts in the Production work order (PWO) to materials which are in stock. If there are no free stock, RamBase will try to swap links with other documents. Available for Production work orders (PWO) in:
Optional usage of customer owned materialIf the settings, listed below, are set to 'ON', using the Assign (relink) material to backlog and stock option will also take into consideration material which are customer owned, if customer ownership matches the Production work order (PWO). Company and child settings Purchase orders (SPO) and Purchase order responses (SOA) which are customer owned will be prioritized for assigning to backlog and stock, over those which are not customer owned. | |||||||||||||||||||||||||||||||||||||||||||||||||||||
Block for purchase | If Production work order (PWO) is blocked for purchase, no purchase quotes (SQU) or Purchase orders (SPO), with the Production work order (PWO) needs, can be registered as the needs will not be sent to Purchase (PUR). To revert, click the Release for purchase option in the context menu. Available for Production work orders (PWO) in:
| |||||||||||||||||||||||||||||||||||||||||||||||||||||
Cancel production work order | Selecting this option will cancel the Production work order (PWO) and set it in Status 9 (Processed). Available for Production work orders (PWO) in:
| |||||||||||||||||||||||||||||||||||||||||||||||||||||
Change priority | Click the Change priority option to either flag or unflag the Production work order (PWO) as high priority. The flag will be displayed in the upper right corner in the Production work order (PWO) application. The priority change will also be applied to related Work order operations (WOO) in the corresponding application. This is noted by a star icon in the Work order operation (WOO) application banner. Available for Production work orders (PWO) in:
| |||||||||||||||||||||||||||||||||||||||||||||||||||||
Compare with valid ART structure | When a Production work order (PWO) is created, the structure is copied from the Product (ART). Changes can be made to the copied structure and this option lets the planner compare the Product (ART) structure to the Production work order (PWO) structure. Available for Production work orders (PWO) in:
| |||||||||||||||||||||||||||||||||||||||||||||||||||||
Copy current structure to product | Clicking the Copy current structure to product will copy the current product structure, in the Production work order (PWO), to the Product (ART) structure. The new product structure will be available as a version in the KITART. To access the new structure, from the Product (ART) application, click on the Structure button. Click on the Kit details tab and then click on the Version drop-down menu. The new structure will be listed in Status 1 (Draft) and named Copied from active structure of PWO/####. | |||||||||||||||||||||||||||||||||||||||||||||||||||||
Copy version from ART | Selecting the Copy version from ART option will open a corresponding popup which will list all the versions of the Product (ART). Select the intended version and press ENTER. Available for Production work orders (PWO) in:
| |||||||||||||||||||||||||||||||||||||||||||||||||||||
Copy info from product structure (KIT) as a printable message | Selecting this option will allow for printable Product structure (KIT) notes. Available for Production work orders (PWO) in:
| |||||||||||||||||||||||||||||||||||||||||||||||||||||
Extract to external planning system | Extracts data to an external planning system. Available for Production work orders (PWO) in:
| |||||||||||||||||||||||||||||||||||||||||||||||||||||
Forward to stock by quantity | This function adds the option of forwarding the batch or units directly to stock, while production is ongoing. This can be useful if the units or batches are needed in the main production, especially for making large series of sub assemblies available in portions without having to split work orders manually. Read more about Continuous forward of Production work order (PWO) to stock here. Available for Production work orders (PWO) in:
| |||||||||||||||||||||||||||||||||||||||||||||||||||||
Forward to stock by selecting units | The Forward to stock by quantity function will select ascending LCMs equal to the number provided by the user. The LCMs will be moved to a new Production work order (PWO). This new Production work order (PWO) will be completed and forwarded to stock automatically. Read more about Continuous forward to Production work order (PWO) to stock here. Available for Production work orders (PWO) in:
| |||||||||||||||||||||||||||||||||||||||||||||||||||||
Increase quantity | Clicking the Increase quantity will open the corresponding popup with the following fields and buttons:
Available for Production work orders (PWO) in:
| |||||||||||||||||||||||||||||||||||||||||||||||||||||
Log operation time | Clicking the Log operation time option will open the Production work order details (PWOWL) application where the planner can get an overview over the worklog for the Work order operations (WOO). Read more about the Production work order details (PWOWL) application here. Available for Production work orders (PWO) in: Status 5 (In production)
| |||||||||||||||||||||||||||||||||||||||||||||||||||||
Lock production work order assignments | Select this option to lock all Stock assignments (SAR). Available for Production work orders (PWO) in:
| |||||||||||||||||||||||||||||||||||||||||||||||||||||
Multisplit | If there is more than one item to be produced, it is possible to use the Multisplit option to divide these Product units (LCM) into multiple, separate Production work orders (PWO). Clicking the Multisplit option will open the Split pwo (PSPLIT) application where the user can Create split by units and dates and Create split by work orders and units. Available for Production work orders (PWO) in:
| |||||||||||||||||||||||||||||||||||||||||||||||||||||
Lock to customer | If the Production work order (PWO) is forwarded from a Sales order (COA), in other words, a customer is set on the Production work order (COA), the Lock to customer option will lock the produced Product units (LCM) to the Customer (CUS), so only the specified Customer (CUS) has access to it. Available for Production work orders (PWO) in:
| |||||||||||||||||||||||||||||||||||||||||||||||||||||
Prioritize queued background processes | To set the priority for background processes related to the Production work order (PWO), select the Prioritize queued background processes option. The background process will then be executed as soon as possible. | |||||||||||||||||||||||||||||||||||||||||||||||||||||
Release for purchase | If Production work order (PWO) is blocked for purchase, no purchase quotes (SQU) or Purchase orders (SPO), with the Production work order (PWO) needs, can be registered as the needs will not be sent to Purchase (PUR). To revert, click the Release for purchase option in the context menu. Available for Production work orders (PWO) in:
| |||||||||||||||||||||||||||||||||||||||||||||||||||||
Recalculate cost | Recalculates the costs on the Production work order (PWO). Available for Production work orders (PWO) in:
| |||||||||||||||||||||||||||||||||||||||||||||||||||||
Remove project from all items | If the Production work order (PWO) is included in a project. This option will remove the project from all Production work order (PWO) Available for Production work orders (PWO) in:
| |||||||||||||||||||||||||||||||||||||||||||||||||||||
Scrap and release | Select this option to open the Scrap and release popup where split Production work orders (PWO) in Status 6 - In scrapping process can be handled. To start scrap and/or release of the Product unit's (LCM) parts, find the Context menu in the top right corner and click on the Scrap multiple product units option. From the Scrap multiple product units popup, select the Product unit (LCM) intended for scrapping and select the Scrap and release manually option. This will split the main Production work order (PWO) and create a new sub Production work orders (PWO) for the Product unit (LCM) with the parts intended for scrapping or releasing back to stock. The split Production work order (PWO) will be in Status 6 (In scrapping process) with the selected quantity. Available for Production work orders (PWO) in:
| |||||||||||||||||||||||||||||||||||||||||||||||||||||
Rework to other product | Click to a Product (ART) before performing rework. Only available for rework Production work orders (PWO) in Status 5 - In production. | |||||||||||||||||||||||||||||||||||||||||||||||||||||
Select customer and lock | If no Customer (CUS) is linked to the Production work order (PWO), clicking the Select customer and lock option will open a popup where the user can set a customer on the Production work order (PWO) by selecting from the list. The user can also lock the Production work order (PWO) to the Customer (CUS) by clicking the Lock to customer button. Locking the Customer (CUS) to the Production work order (PWO) will result in locking the linked Stock assignments to the Customer (CUS). Available for Production work orders (PWO) in:
| |||||||||||||||||||||||||||||||||||||||||||||||||||||
Set serial numbers on product units | Opens the Serial number scan (SNOSCAN) application where the user can set serial numbers on Product units (LCM). Available for Production work orders (PWO) in:
| |||||||||||||||||||||||||||||||||||||||||||||||||||||
Scrap multiple product units | This option is used to efficiently scrap multiple Product units (LCM) and/or release Production work orders (PWO) with quantity equal to, or higher than 1. Read more about scrapping multiple product units. Available for Production work orders (PWO) in:
Scrap multiple product units popup
| |||||||||||||||||||||||||||||||||||||||||||||||||||||
Synchronize planned operations | To start a manual recalculation of the Planned operations (PWOPLO) for the Production work order (PWO), select the Synchronize planned operations option. This is especially useful after modifying a Production resource's (RESCONFIG) capacity, by for example changing the Working time template (WTT). Available for Production work orders (PWO) in:
| |||||||||||||||||||||||||||||||||||||||||||||||||||||
Unassign (delink) material and block for purchase | To unassign (delink) material from the Production work order (PWO) and block for purchase, select this option. Consequences of using this option:
TipIf Production work order (PWO) is blocked for purchase, no purchase quotes (SQU) or Purchase orders (SPO), with the Production work order (PWO) needs, can be registered as the needs will not be sent to Purchase (PUR). To revert, click the Release for purchase option in the context menu. Available for Production work orders (PWO) in:
| |||||||||||||||||||||||||||||||||||||||||||||||||||||
Undo release of production work order | Available for Production work orders (PWO) in:
| |||||||||||||||||||||||||||||||||||||||||||||||||||||
Update department number on production work order | Available for Production work orders (PWO) in:
| |||||||||||||||||||||||||||||||||||||||||||||||||||||
Update project on all items | Available for Production work orders (PWO) in:
| |||||||||||||||||||||||||||||||||||||||||||||||||||||
Undo scrapping | Clicking the Undo scrapping option will set the Production work order (PWO) back to Status 5 (In production). Available for Production work orders (PWO) in:
Read more about the Scrap and release functionality here. LINK | |||||||||||||||||||||||||||||||||||||||||||||||||||||
Update serial number at product units (LCMs) | Clicking the Update serial number at product units (LCMs) option will open a corresponding popup with the following fields, checkboxes and buttons: Update serial number at product units (LCMs) popup
Available for Production work orders (PWO) in:
| |||||||||||||||||||||||||||||||||||||||||||||||||||||
Unlock production work order from customer | Clicking the Unlock production work order from customer option, removes the linking between the Production work order (PWO) and the Customer (CUS) and releases the lock on the product on the Stock assignment register (SAR) level. Available for Production work orders (PWO) in:
| |||||||||||||||||||||||||||||||||||||||||||||||||||||
View product units to scrap | From the Context menu, select the View product units to scrap to open the corresponding popup. From the View product units to scrap popup, left side list, select the Production work order (PWO) with the Product unit (LCM) containing parts intended for either scrap or release to stock. Available for Production work orders (PWO) in:
|
Inspect and views | Description |
|---|---|
Experience | Clicking the Experience option will open the Quality report archive menu - experience date report which displays previously added quality issues. Available for Production work orders (PWO) in:
|
Inspect production plan | Clicking the Inspect production plan option will open the Production planning (PRODPLANPART) application where the Production work orders (PWO) are displayed in a table with columns noting year and week numbers (YYWW) and rows for relevant statuses. |
Item account information | Clicking the Item account info option will open the Item account information popup where useful item account information can be viewed and edited, including Account, DepNo, VatCode. Available for Production work orders (PWO) in:
|
Measures | Clicking the Measures option will open the Measures menu (MSR) application where relevant measures are listed. Available for Production work orders (PWO) in:
|
Product marking specification | Clicking the Product marking specification will open a corresponding popup where the user can add product marking rules or templates for how Product units (LCM) should be marked. Roles that allow editing this input are usually Production managers and Production planners. The Roles with this permission can be viewed in the Permissions (PRM) application. Related Permissions (PRM):
Note that the Product marking specification input field is mirrored in the Production work order (PWO) and the Work order operations (WOO) applications. Meaning that changing one, will update the other. Available for Production work orders (PWO) in:
|
Production tree view | Clicking the Production tree view option will open the Production tree view (PWOTREE) application where the main Production work order (PWO) is listed with the subsequent Production work orders (PWO). Available for Production work orders (PWO) in:
|
Quality issues | Clicking the Quality issues option will open the corresponding popup where the user can view and create issues. Available for Production work orders (PWO) in:
|
Revision history | The Revision history popup will detail all changes done to the Production work order (PWO) and by whom. Available for Production work orders (PWO) in:
|
View document requirements | In the context menu, the View document requirements option is available. The Document requirements popup will display the current statuses of requirements that indicates if requirements have been met or not. If a requirement is met, it will have Status 8, meaning it has one or more documents connected to it. Connected documents will not be displayed in this popup, but they can be inspected in the Manufacturing record book (MRB) application. This Manufacturing record book (MRB) can be accessed via the Context menu by selecting the Document status overview (MRB) option. In the Document requirements popup footer there are three buttons:
|
View serial numbers | Clicking the View serial numbers option will open the corresponding popup where the user can view and edit serial numbers for the Product units (LCM) being produced. The user can update a single Product unit (LCM) or multiple. Setting a quantity and prefix can also be done. Available for Production work orders (PWO) in:
|
View workorder progress | Opens the Production workorder progress (PWOPROG) application where the user can view an overview detailing the all Work orders operations (WOO) including operation status, material status, quantity, time, material cost and total cost. Available for Production work orders (PWO) in:
|
View picking history | Opens a report detailing the Production work order (PWO) and the related Goods reception (SSA) item, Product (ART), the picked quantity and the Stock location (STL). Available for Production work orders (PWO) in:
|
Print/send | Description |
|---|---|
Document status overview (MRB) | This will open the Manufacturing record book (MRB) application. Where the user can view and document requirements and create the final Manufacturing record book (MRB). Read more about the Manufacturing record book (MRB) application here. |
Outgoing print/email | Opens the Output print/email popup containing the Correspondence tab and Advanced/technical tab. The user can view all correspondence and print jobs derived from the Production work order (PWO), including the technical jobs which have been triggered in the Production work order (PWO). Available for Production work orders (PWO) in:
|
Opens the Choose document to send/print popup allowing the user to choose which documents to print. The documents can be selected by pressing ENTER. Edit the intended document by clicking Pencil icon, or previewed by clicking the PDF icon. Available for Production work orders (PWO) in:
| |
Print product labels | Opens the Product labels popup where the user can decide where and what to print. To print, click the Print button. Available for Production work orders (PWO) in:
|
Print return-material-list | Selecting the Print return-material-list will print a list specifying which parts are to be returned to stock. Available for Production work orders (PWO) in:
|
Print unit sequence labels | Opens the Unit sequence labels popup where the user can decide where and what to print. Click the Print button when the intended choices have been made. Available for Production work orders (PWO) in:
|
Relevant Company settings (CSV) for the Production work order (PWO) application
The table below lists relevant Company settings (CSV) for Production work order (PWO) application. Note that the description mirrors the description used in the Company settings (CSV) application.
Setting | Child setting | Description |
|---|---|---|
Allow to pick from another goods reception (SSA) where pick is initialized | If setting is 'ON', -Allow to pick goods from another goods reception (SSA), even if this has assignments to other shipping advice (CSA), sales order (COA) or production work order (PWO) where picking is allready initialized. The assignments will anyway be swapped in the background. Will have no effect if the accordingly setting for ProductionWorkOrderAllowToPickFromAnotherGoodsReception or ShippingAdviceAllowToPickFromAnotherGoodsReception is not 'ON' | |
Allow picking customer goods from restricted Stock Locations | If setting is ON: allows to pick customer goods from SSA (CLASS: CUSOWNED) if related PWO is for same customer. | |
Allow to pick production work order (PWO) from another goods reception (SSA) | If setting is 'ON' - Allow to pick production work order (PWO) from another goods reception (SSA) than what it has assignments from. The assignments will then be swapped in the background. Note that this setting has child settings. | |
Allow to pick from another goods reception (SSA) located at a production resource's (RES) restricted stock locations | If setting is 'ON' - Allow to pick from another goods reception (SSA) than production work order (PWO) has assignments from, as long as the goods are located at a stock location which is set up as a restricted stock location for the current production resource (RES). Swapping of assignments will then take place in the background. Will have no effect unless the setting ProductionWorkOrderAllowToPickFromAnotherGoodsReception is 'ON' | |
Allow to scan product id at pick of production work order | If setting is 'ON' - Allow to scan product id (IT number of format #123456) at pick of production work orders (PWO) in the SCANPICK application. Will have no effect unless setting ProductionWorkOrderAllowToPickFromAnotherGoodsReception is 'ON' | |
Allow Update of USEDQTY in PWO KIT | Allow to add real used quantity in PWO KIT part lines, field USEDQTY. Will overrule planned used quantity. | |
Automatically split sub orders when splitting main Production Work Order (PWO) | If setting is 'On' - Sub orders are split according to the split done on the top level of the Production Work Order (PWO) | |
Block purchase on Production Work Orders (PWO) | If this setting is 'ON' -Default will be blocking on new Production Work Order (PWO) from purchase. Production Work Order item will contain value '1' in the field ISBLOCKEDFORPURCHASE. Text is also showing at Production Work Order. Use F12 - 'Release for purchase' to allow purchase to handle the Production Work Order. | |
Deactivate Info message - Production Work Order (PWO) has been delinked by | If this setting is "ON" - The document message is not activated. If the setting is "OFF" - The document message is activated for Production Work Order Item (PWO-ITM) | |
Deactivate Info message - Production Work Order (PWO) on hold off | If this setting is "ON" - The document message is not activated. If the setting is "OFF" - The document message is activated for Production Work Order Item (PWO-ITM) | |
Production Work Order (PWO) - Assign To Stock | If this setting is 'ON' - the users have the option to start a job that try to link all items in the production work order to stock. In case there is no free stock, the program will try to swap links with other documents. The job is started by the option Assign To Stock. | |
Reconfirm production work order (PWO) when sales order (COA) is reconfirmed | When confirmed date is updated in a sales order item (COA) with products of type "K" or "KA", the user will be asked to also update confirmed date in the assigned production work orders (PWO) | |
Related content for PWO | If this setting is On, LCMs are listed as related objects for production order PWO, and materials are listed under each LCM. If the setting is Off, materials will be listed directly under PWO. | |
Use Assignment Window for Production Work Order (PWO) | If both this setting and 'Margin for SalesLeadTime Assignment Window' is turned "ON", Production Work Orders will always get assignment from PENDING if LINKDELDATE in SAR is outside of the period given by SALESLEADTIME from ART plus the value from the setting 'Margin for SalesLeadTime Assignment Window'. The SAR optimize process will only re-assign production work orders inside of this window. In case several companies have common ART and SAR registers (Group Structure), 'Margin for SalesLeadTime Assignment Window' should only be set up for the company that is set up as OWNERDB, while 'Use Assignment Window for Production Order' should be set for each one of the sales databases. Read more about Goods assignments (SAR) and the standard and special rules. | |
Assignment Register (SAR) Optimization by standard rules | This setting needs to be "ON" to run the scheduled batchjob 'Logistics: SAR: Optimize' for the company to run using standard rules. The job is optimizing the Assignment Register (SAR) links. In addition must also database and time be set up in Local Filters in SCV/63983. The child setting CSV/LocationsForOptimizationByStandardRules must also be turned 'ON', and locations must be set up in this CSV. For new Customers the setting can be 'OFF', -but could be turned 'ON' in agreement with the Customer after they have been explained the consequences. Note that this setting has child settings. | |
Assignment Register (SAR) Optimization by special rules | If this setting is "ON", stock assignment optimization will be prioritized by special rules for the given locations. The child setting CSV/LocationsForOptimizationBySpecialRules must also be turned 'ON', and locations must be set up in this CSV. Note that this setting has child settings. |
Note
Some settings have child settings which can be viewed by clicking the Show all child settings in the Company settings (CSV) application.


