Follow up on Sales Quotes (CQU)
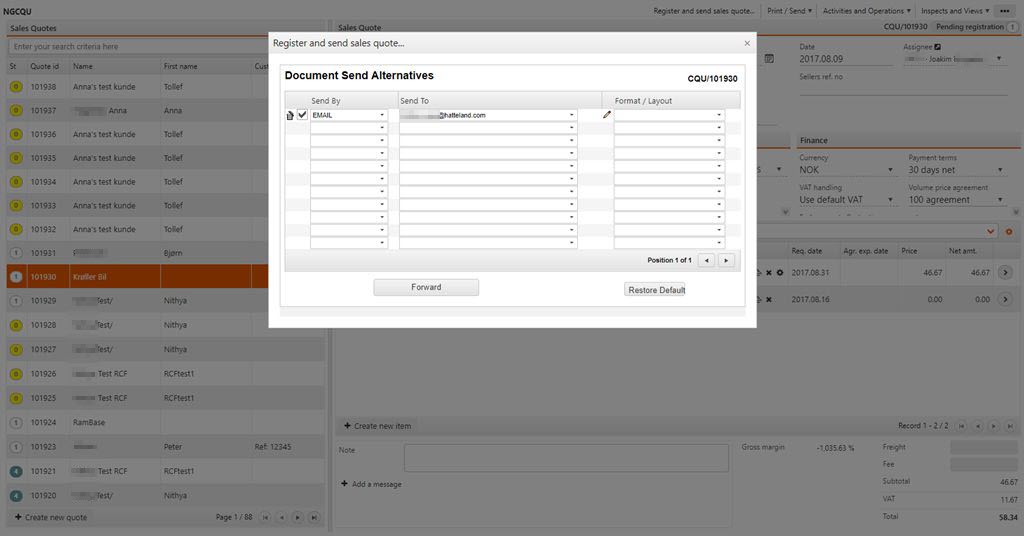
The Sales Quote (CQU) is normally sent using e-mail, to either one or several recipients on the Customer (CUS) side. This may also be controlled with admittance if approval is needed. The recipients are retrieved from the CUS information stored in the DocBy field.
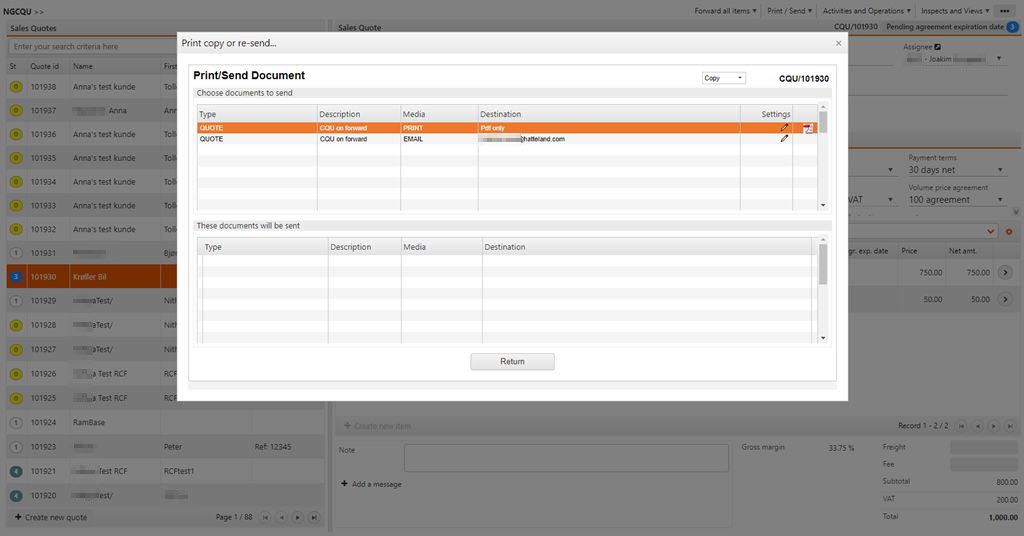
The CQU will normally be sent using the default settings at the time of registration, but may also be sent afterwards if desired. This is done by using the context menu in the top right corner and choose the option Print copy or re-send... Then you may choose if you want to send the original or a copy and what type of media you desire.
To register a CQU and send it to the desired recipients, use the context menu and choose the option Register and send sales quote. The CQU is now closed for editing. If the CUS wish to negotiate, the CQU must be transported to a new CQU. The CUS has now received the offer and depending on how this is followed up, you must wait for acceptance or decline.
A quote is expired when the acceptance term which is set in the Expiration date field has expired. Depending on the company settings a quote may automatically change to ST:6 a specified number of days before the Expiration date, -as a warning to seller that is has to be followed up. A CQU may also be automatically closed after a certain period after expiration, where it will go to ST:9. These settings can be adjusted in the Settings application under Sales.
To cancel parts of a quote, double-click on the desired item and click on the Cancel item option in the Context menu. This may be used in cases where the customer only wants parts of the goods for the same terms.
To manually cancel the whole quote before the expiration date has been reached, click on the option Cancel sales quote in the Context menu. The quote will be archived as loss.
If the customer wish to discuss the terms following the quote, and the selling part agrees, a new quote must be made. There are two methods of doing this, either to change the whole quote or parts.
To transport parts of a quote to a new quote, double-click on the desired item. In the Context menu, click on the option Forward to sales quote. Then choose the destination Forward to new quote if the item is to be added to a new quote. If not, you may choose an existing quote available in the Lookup list beneath the option Forward to Existing Quote and then click on the Forward button. If the item lines to be transported has a quantity higher than 1, you may choose the quantity transported.
To transport a whole quote to a new quote, choose the option Forward all items to sales quote. Then choose destination Forward to new quote if the item is to be transported to a new quote. If not, you may choose an existing quote available in the Lookup list beneath the option Forward to existing order.
NOTE: It is also possible to use the multi-select option, where you click on the status icon of the item to select. The options you have available when performing multi-select are as follows:
Forward selected items to sales order
Update agreement expiration date on selected items
Open / discard
Cancel selected items
Delete selected items
If the customer accepts the quote within the expire date, which is set in the Expiration date field, you may turn this in to a long time agreement by extend the validity by updating Agreement Expire date in item.
If the customer accepts the quote and place an order, you can easily transport this to a Sales Order (COA). There are two methods of doing this, either if it is the whole quote or just parts to be ordered.
To transport parts of a quote to an order, double-click on the desired item. In the Context menu, click on the option Forward to sales order. Then choose the destination Forward to new order if the item is to be added to a new order. If not, you may choose an existing order available in the Lookup list beneath the option Forward to Existing Order and then click on the Forward button. If the item lines to be transported has a quantity higher than 1, you may choose the quantity transported.
To transport a whole order to a new order, choose the option Forward all items to sales order. Then choose destination Forward to new order if the item is to be transported to a new order. If not, you may choose an existing order available in the Lookup list beneath the option Forward to existing order.
NOTE: It is also possible to use the multi-select option, where you click on the status icon of the item to select.