Work Arrangement Documents
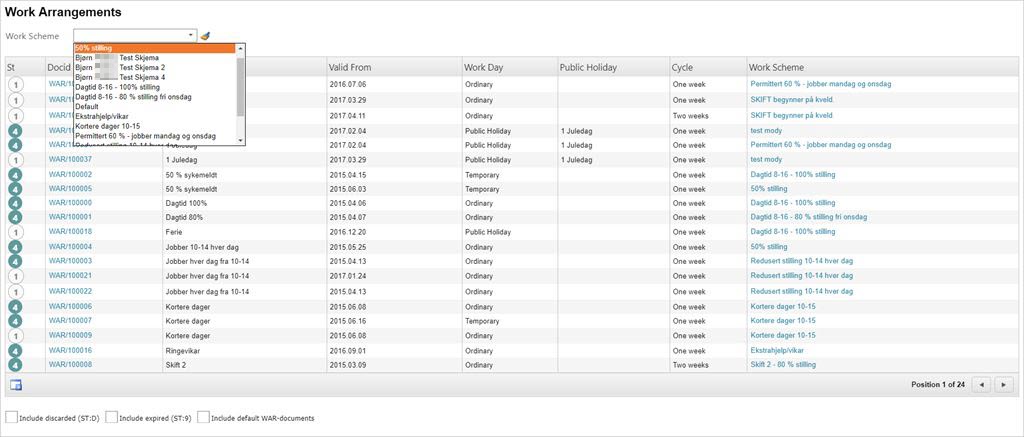
A Work Arrangement document, (WAR), is a document that describes the company's work regulations for a particular job type, such as operator, planner, purchaser, manager, secretary, etc. The document holds information that is used to compute the salary and any allowances that goes with the job. To list all WAR documents that belong to a certain group:
Enter WAR in the Program field and press ENTER.
In the Work Agreement Menu window, select a WAR to see the relevant documents.
To create a new WAR document:
Click the Create new icon.
In the Work Arrangements window, fill in the fields, section by section, top to bottom, from left to right as follows:
General section
Valid from: Enter the date when the document will be activated.
Valid to: A valid to field becomes visible on the document as soon as the document is replaced by a new one.
Group: Assign the WAR document to its WSR. Alternatively, you may click the Create new icon to create a new WSR.
Category: Select Ordinary or Shift work.
If you select shift work, an additional field becomes visible where you must select a shift cycle.
Type: Select Ordinary, Public holiday, or Temporary.
If you select Public holiday, an additional field becomes visible where you must select the name of the holiday.
Use Temporary whenever you need to handle temporary changes in the work arrangements, such as graded sick leave periods, or change of jobs.
Description: Enter a descriptive name for the WAR document. This is very important in order to recognize the document in menus and lists.
Shift Cycle: Select Every week, Every 2. week, Every 3. week, or Every 4. week.
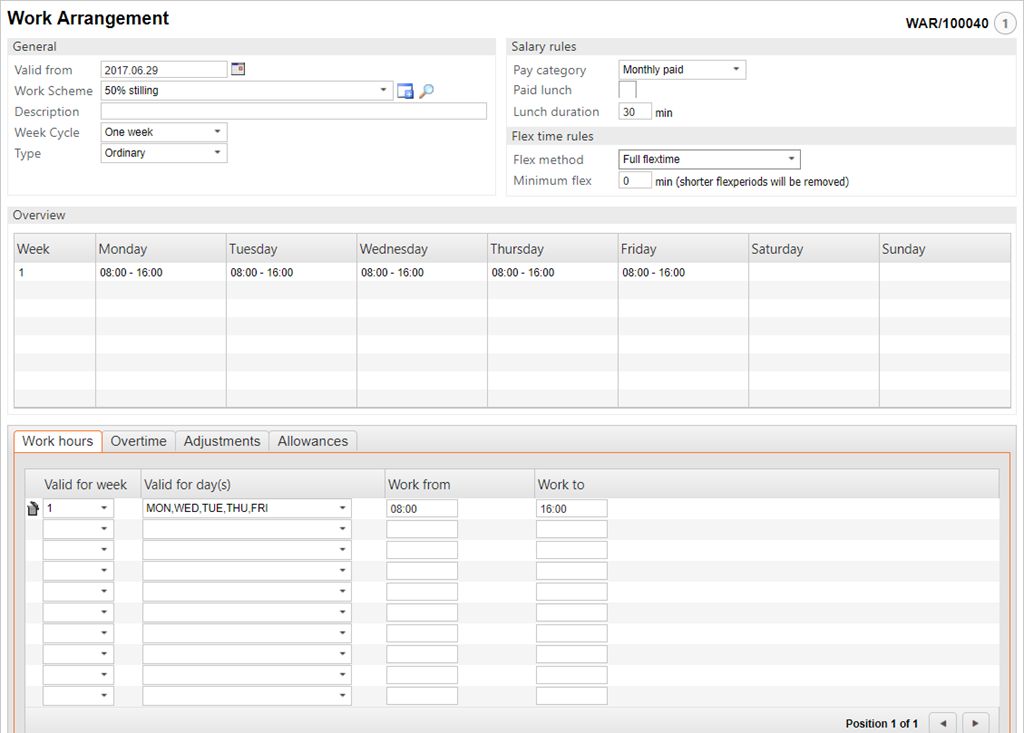
Salary rules section
Pay category: Select Monthly, Hourly, or No payment.
Paid lunch: Tick if lunch time is included in the work time.
Lunch duration: Tick if lunch time is included in the work time.
Flex time rules section
Flex method: Select No flex or Full flex. See description below:
NO FLEX means that any work time in excess of ordinary work time will be disregarded when the salary is computed.
FULL FLEX means that all time in excess of ordinary work time is to count as flex time.
NOTE! If Full flex is used together with Pay category ‘Hourly’, remember to add a salarycode in the Company setting (CSV) Hourly salary code for standard hours.
Overtime rates
This section describes the ordinary overtime rules. It is not unusual to find several set of rules for a single week, such as one set of rules for workdays, and another set of rules for weekends. Special overtime rules for public holidays for instance must be treated as allowances and described in the allowances section instead.
Valid for week: Select the week that the overtime rates are valid. Select ALL if the same rates are valid at all time.
Valid for days: Select the days of the week that the overtime rates are valid.
Hours in excess: Enter a time in the format hh:mm to indicate the amount of excess time that must pass before the overtime rate comes into effect. Normally one would get 50 % overtime from the very first second after ordinary work hours. If this is the case, enter 00:00 in the Hours in excess field. If one gets 100% after 4 hours in excess, a second line must be added with the Hours in excess field set to 04:00.
Overtime percent: Select a time type that corresponds to the relevant overtime percentage.
Type: Select BEFORE, AFTER or TOTAL to indicate how overtime is to be calculated.
BEFORE means that the overtime must be earned before ordinary work hours.
AFTER means that the overtime must be earned after ordinary work hours.
TOTAL means that overtime is the total time in excess, no matter when earned.
Allowances section
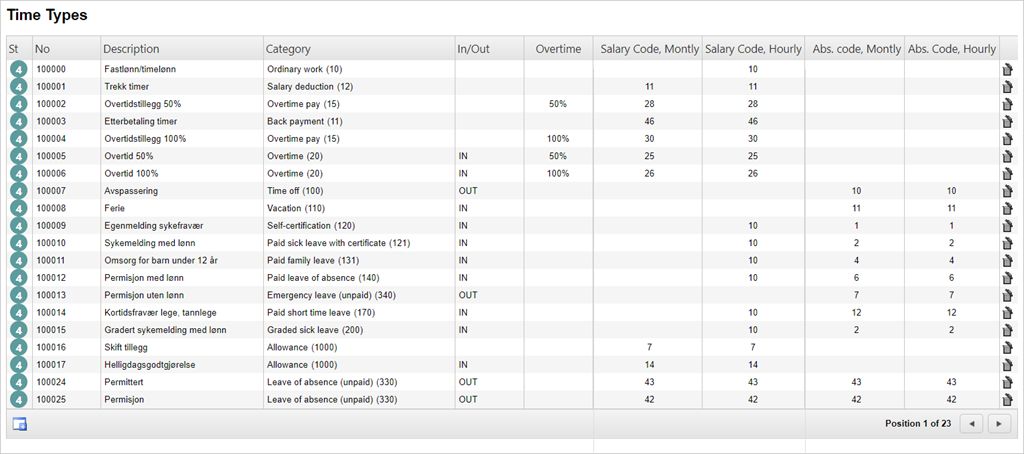
Allowances represent any remunerations that are paid to employees to compensate for specific inconveniences during work. Allowances can be added via a popup windows as explained below. However, any allowance must first be defined both in the external wage payment system, and as time types in the WHL-system.
To add an allowance to a WAR document, in the WAR document window,
Click the Add Allowance icon under the Allowances section.
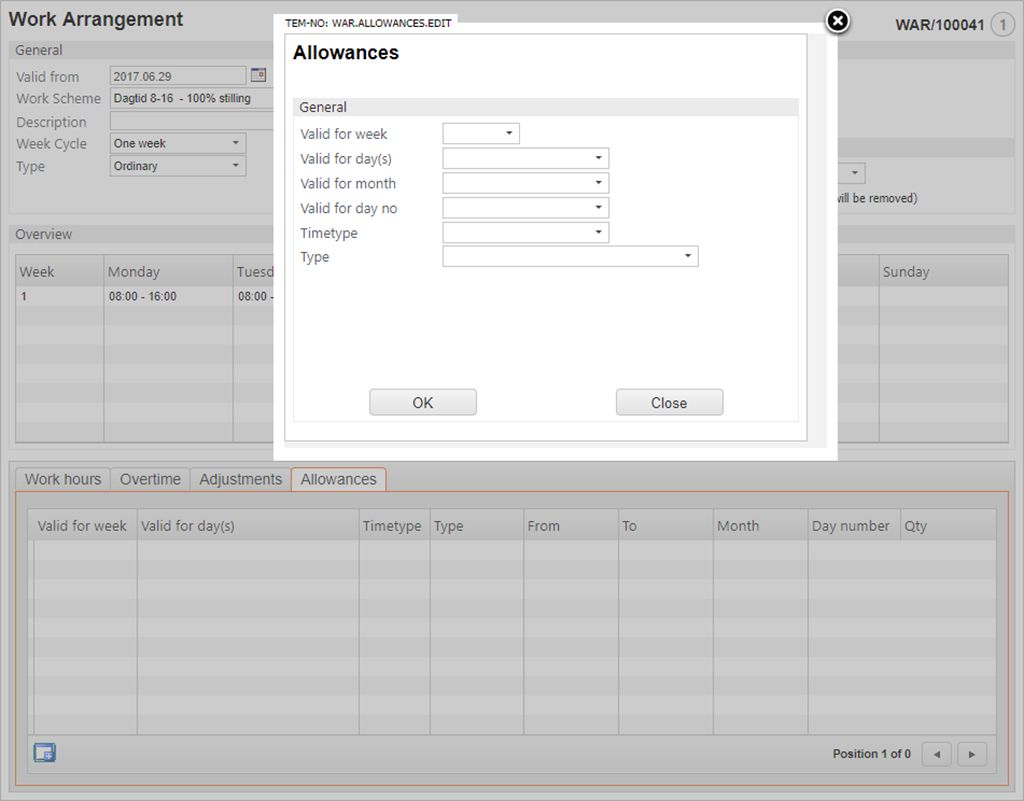
In the Allowances window, fill in the fields as follows:
Valid for week: Select ALL or a week number.
Valid for days: Select the days for which the allowance is relevant - Mon-Sun.
Valid for month: Select the month(s) that are relevant. Select December for a special allowance on the 24th.
Valid for day no: Select the specific day(s) that are relevant within the chosen month(s). For instance the 24th of December.
Code: Select the allowance time type from the TIMETYPE register.
Type: Select the appropriate option regarding type. An allowance may be based on a fixed quantity, or it may be based on hours worked.
Qty: If the type is based on a fixed quantity, a Qty field becomes visible. Enter a value that corresponds with the "fixed quantity" option in the Type field.
From time: Optionally enter a time on the format hh:mm. Only applicable if Type is based on hours worked.
To time: Optionally enter a time on the format: hh:mm. Only applicable if Type is based on hours worked.