Handling individual rights in RamBase
Object and restrict
It is important to notice that information can be extracted from a system from both the inside and the outside of the company. While the data processing agreement ensured protection against “data-theft” from the outside, you should use the RamBase role system to restrict the access to person related data. Only people who really needs to extract person related data in reports or files should have access to it. If you are not familiar with the RamBase role system, read about it in RamBase help, contact your ERP partner or contact our professional services department to learn how to use it.
How to manage consent on a Contact Person
Open the Contact Persons (CNT) application, find CRM in the RamBase menu and then Customer Management. Click Contacts to enter the CNT application.
To open a CNT, highlight the CNT and press ENTER.
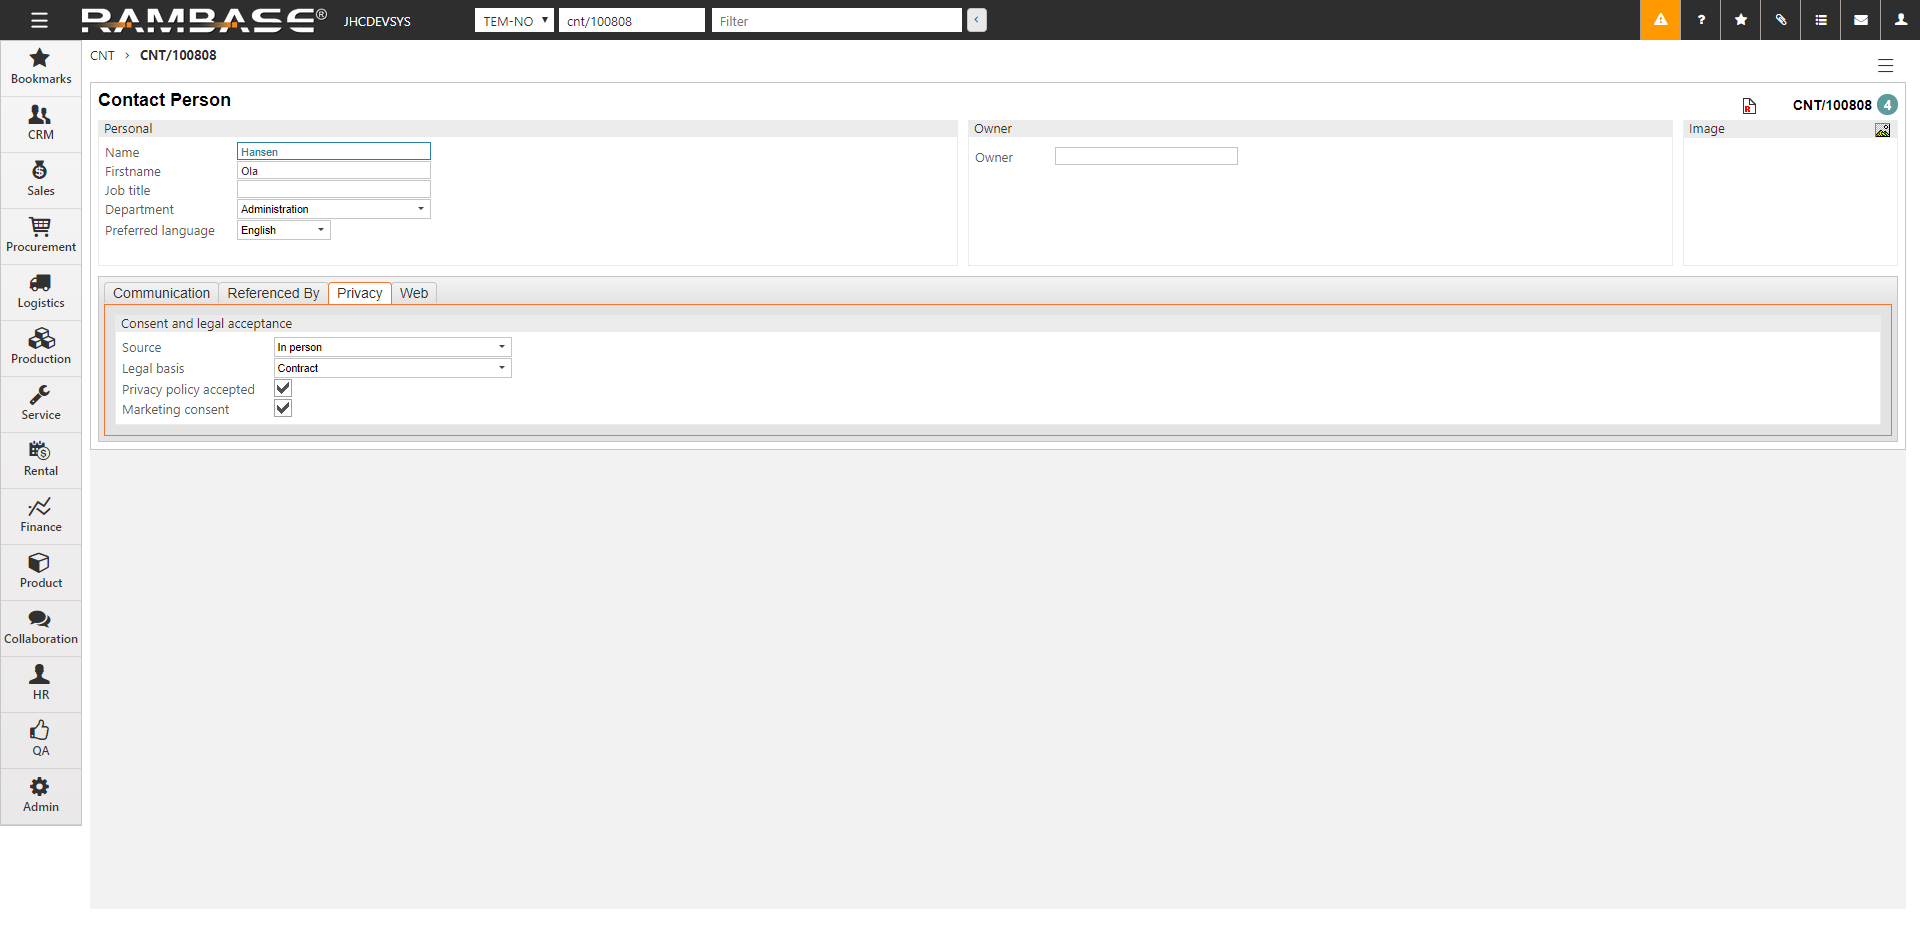
Click on the Privacy folder.
Select the source of which the personal information was obtained in the Source drop down field.
Online form
In person
Referred by third party
Collected from open online source
Select the legal basis for processing contact's data in the Legal basis drop down field.
Consent - The individual has given clear consent for you to process their personal data for a specific purpose.
Contract - The processing is necessary for a contract you have with the individual, or because they have asked you to take specific steps before entering into a contract.
Legal obligation - The processing is necessary for you to comply with the law (not including contractual obligations).
Vital interests - The processing is necessary to protect someone's life.
Public task - The processing is necessary for you to perform a task in the public interest or for your official functions, and the task or function has a clear basis in law.
Legitimate interests - The processing is necessary for your legitimate interests or the legitimate interests of a third party, unless there is a good reason to protect the individual's personal data which overrides those legitimate interests. (This cannot apply if you are a public authority processing data to perform your official tasks).
Click the Privacy policy accepted and/or the Marketing consent checkboxes, if the CNT has given their consent to it.
Information and portability
To inform and inspect personal information in the Personnel (PER), Customer (CUS) or Contact (CNT) application, use one of the following reports:
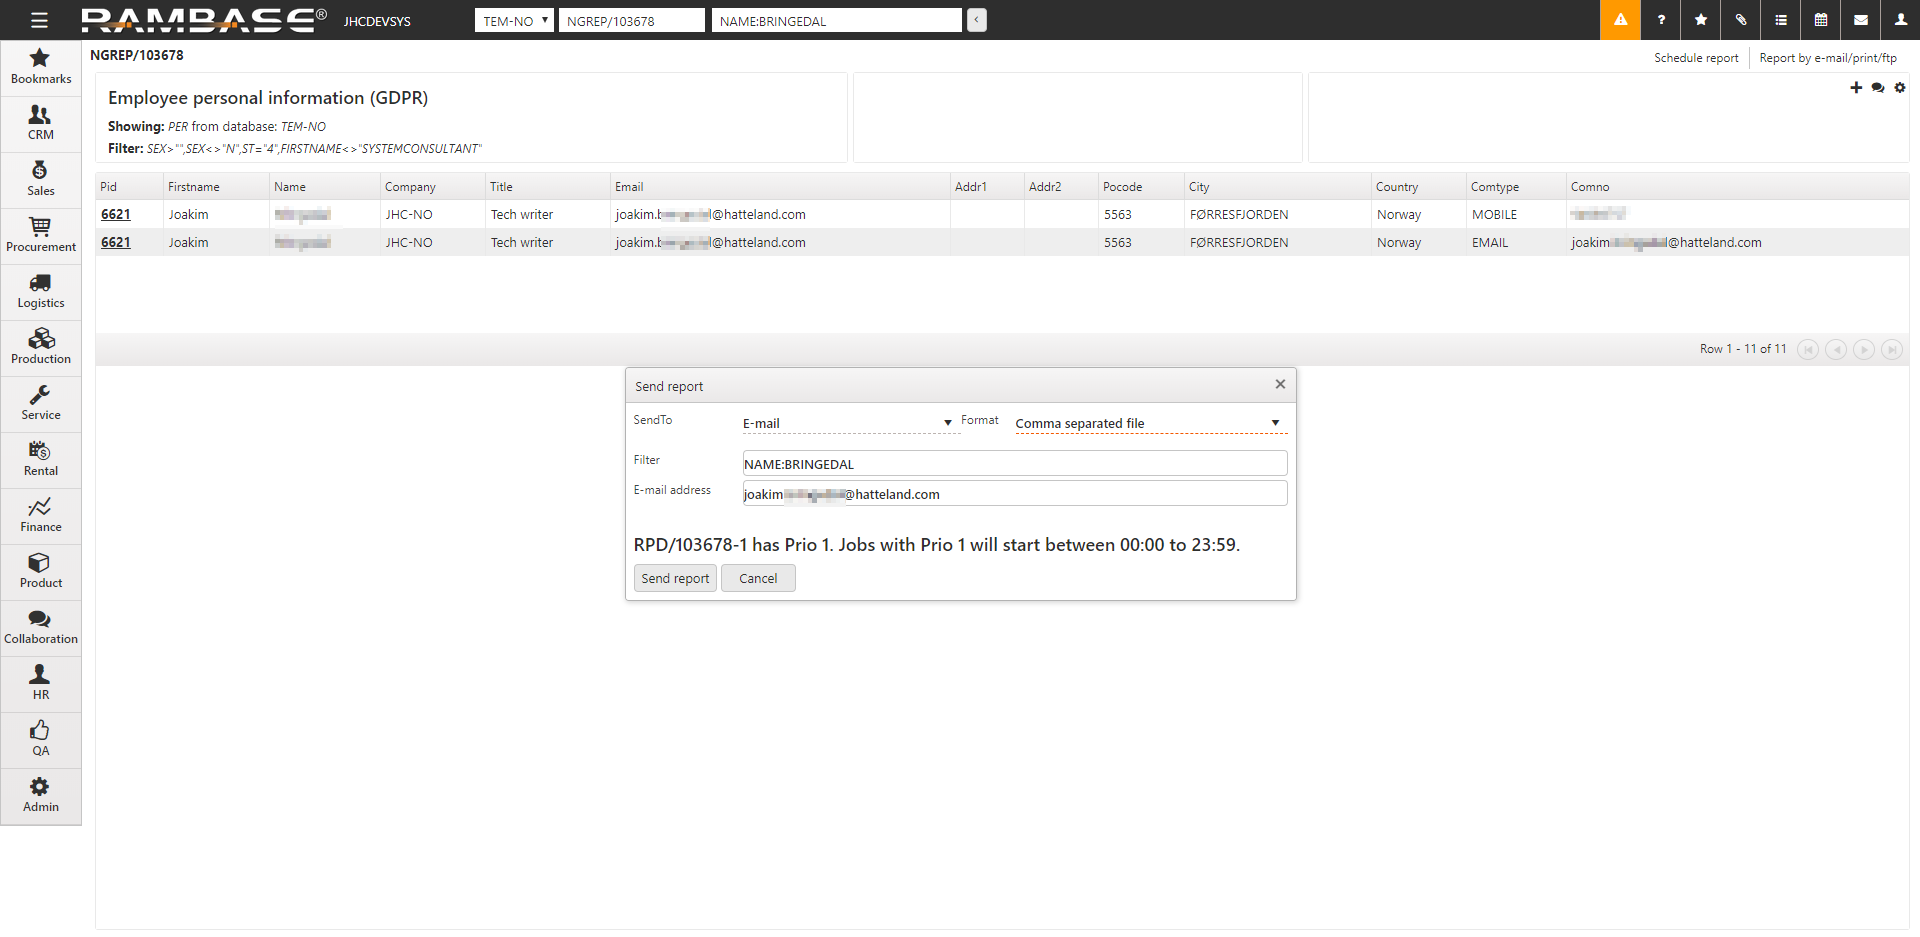
Personal data from the Personnel (PER) application can be extracted from the Employee personal information (GDPR) report. REP/103678.
Customer data from the Customer (CUS) application can be extracted from the Customer personal information (GDPR) report. REP/103682.
Contact data from the Contact Person (CNT) application can be extracted from the Contacts personal information (GDPR) report. REP/103684.
Write REP/****** in the program field, and press ENTER to open the selected report.
Use the reports to list labeled fields with personal information from the PER, CUS or CNT application. Use the Filter field to filter the reports, for instance to see all communication (email, phone, etc.) information about one person.
Filter the report so it is restricted to information from one single person/company.
Click the Report by e-mail/print/ftp option in the context menu.
In the Format drop-down field, select Comma separated file, not Comma separated file (Full header). This will send the report in a common file format, accepted by most other systems.
Correct and forget
When storing of personal information is no longer needed, it must be deleted or anonymized. This is not done automatically by the system and must be done manually in the PER, CUS and CNT applications.
Correct or delete/anonymize personal data about an Employee (PER)
Open the Personell (PER) application, find HR in the RamBase menu and then Employee management. Click Employees to enter the PER application.
Highlight the PER you want to delete and press ENTER.
Change the fields in the Name and Address area.
For example - Name: Employee, Firstname: Former, Addr1: XX Address, etc.
Delete the content in the OurRef field.
Delete each line in the Telecom, Qualifications and Emergency Contacts tab.
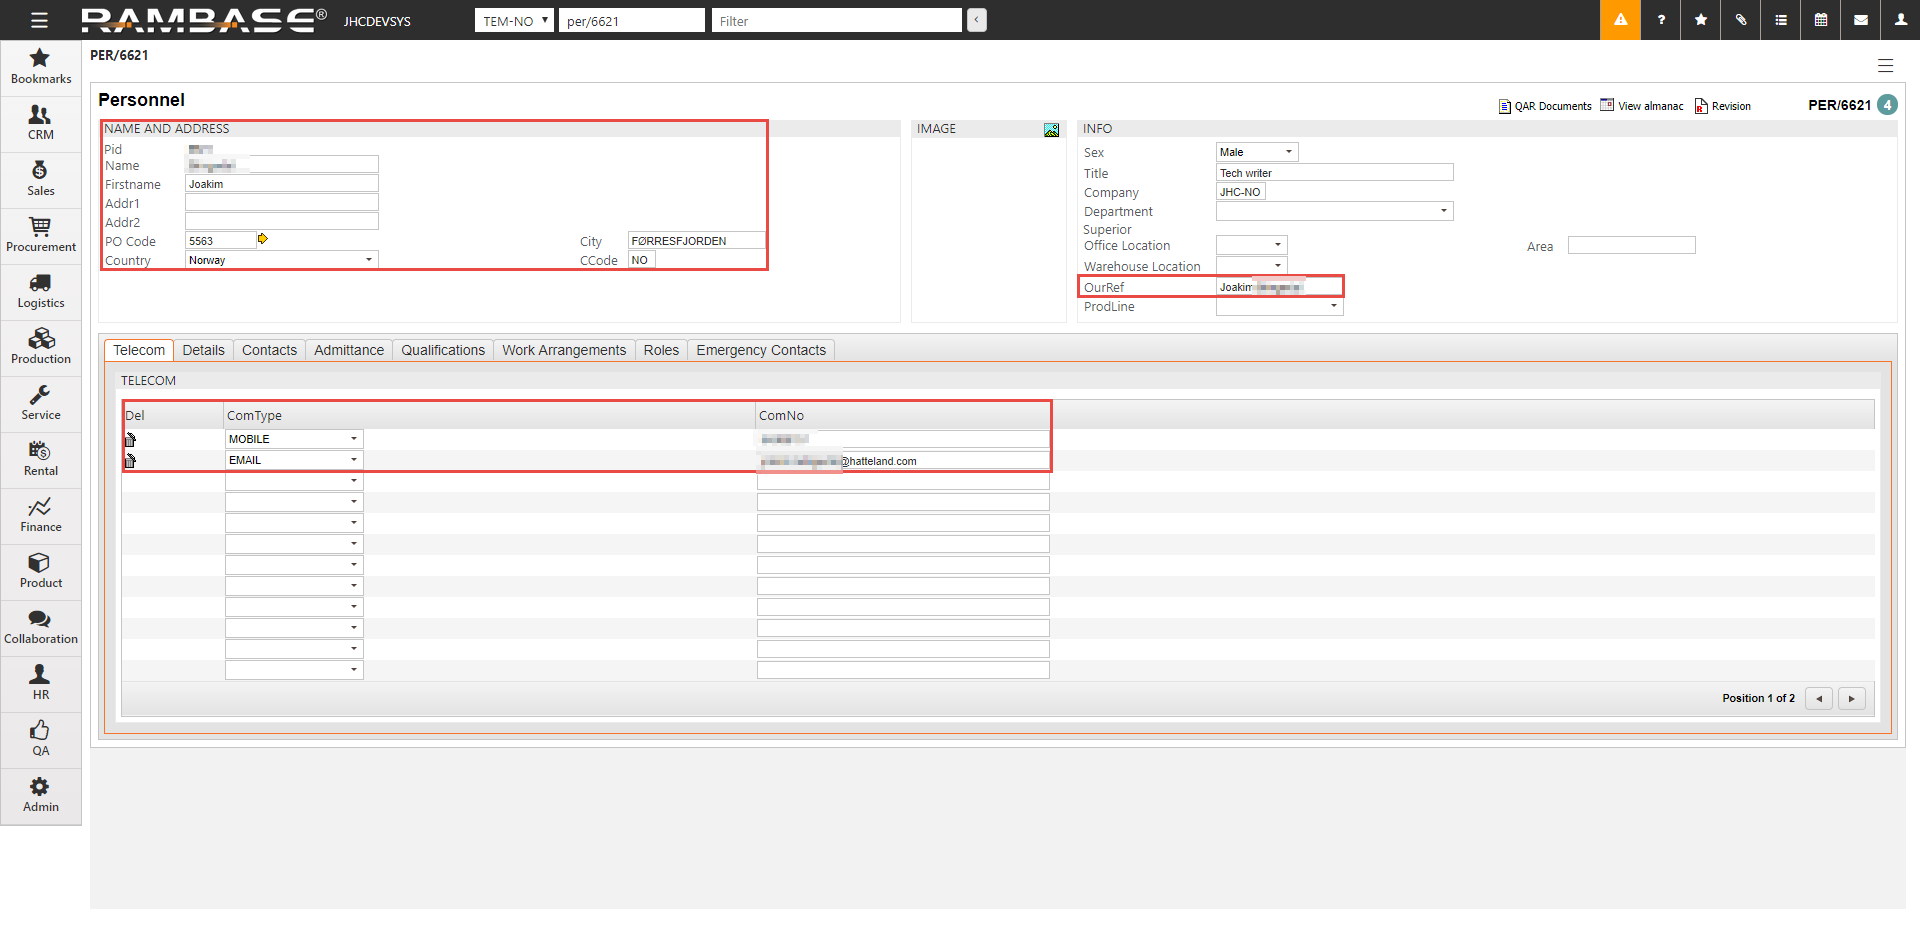
In the Details tab, delete the Email field.
Click Add Notes and Attachments in the top right corner and delete if necessary.
Make sure all person related data is deleted or anonymized.
Click F12 to open the action menu and choose the Resign (ST:9) option.
Correct or delete/anonymize personal data about a Customer (CUS)
Open the Customer (CUS) application, find Sales in the RamBase menu and then Customer management. Click Customers to enter the CUS application.
Highlight the CUS you want to delete, and press ENTER.
Change the fields in the Name and Address area.
For example - Name: Employee, Firstname: Former, Addr1: XX Address, etc.
Delete the content in the leftmost fields in the Misc section
Notice that the Enterprise field should be empty. If the customer has an enterprise number, it is considered a non-person customer.
Delete the lines in the Document Handling section on the Handling tab.
Delete the records on the Contacts tab, do the same with the Addresses tab.
Delete notes and attachments/files connected to the customer.
Press F12 to open the action menu and choose the Close customer (St=9) option.
Correct or delete/anonymize personal data about a Contact (CNT)
Open the Contact (CNT) application, find Collaboration in the RamBase menu and then Contact management. Click Contacts to enter the CNT application.
Highlight the CNT you want to delete and press ENTER.
Change the Name and Firstname in the Personal area.
For example - Name: Former, Firstname: Contact001.
Click on the magnifying glass icon, next to the Owner field. This brings up the connected object (usually a customer).
Click on the contacts tab and remove the link to the current contact.
Back in the CNT, click the trashcan icon in the image area to remove the image.
Delete each record of addresses, emails and phone and mobile numbers in the communications tab. Delete records and clear out the fields in the other tabs.
Remove notes and attachments on the contact.
Press F12 to open the action menu and choose the Discontinue (St=9). The contact is now cleaned.