Rental contract (RCT) application - Rental contract tab
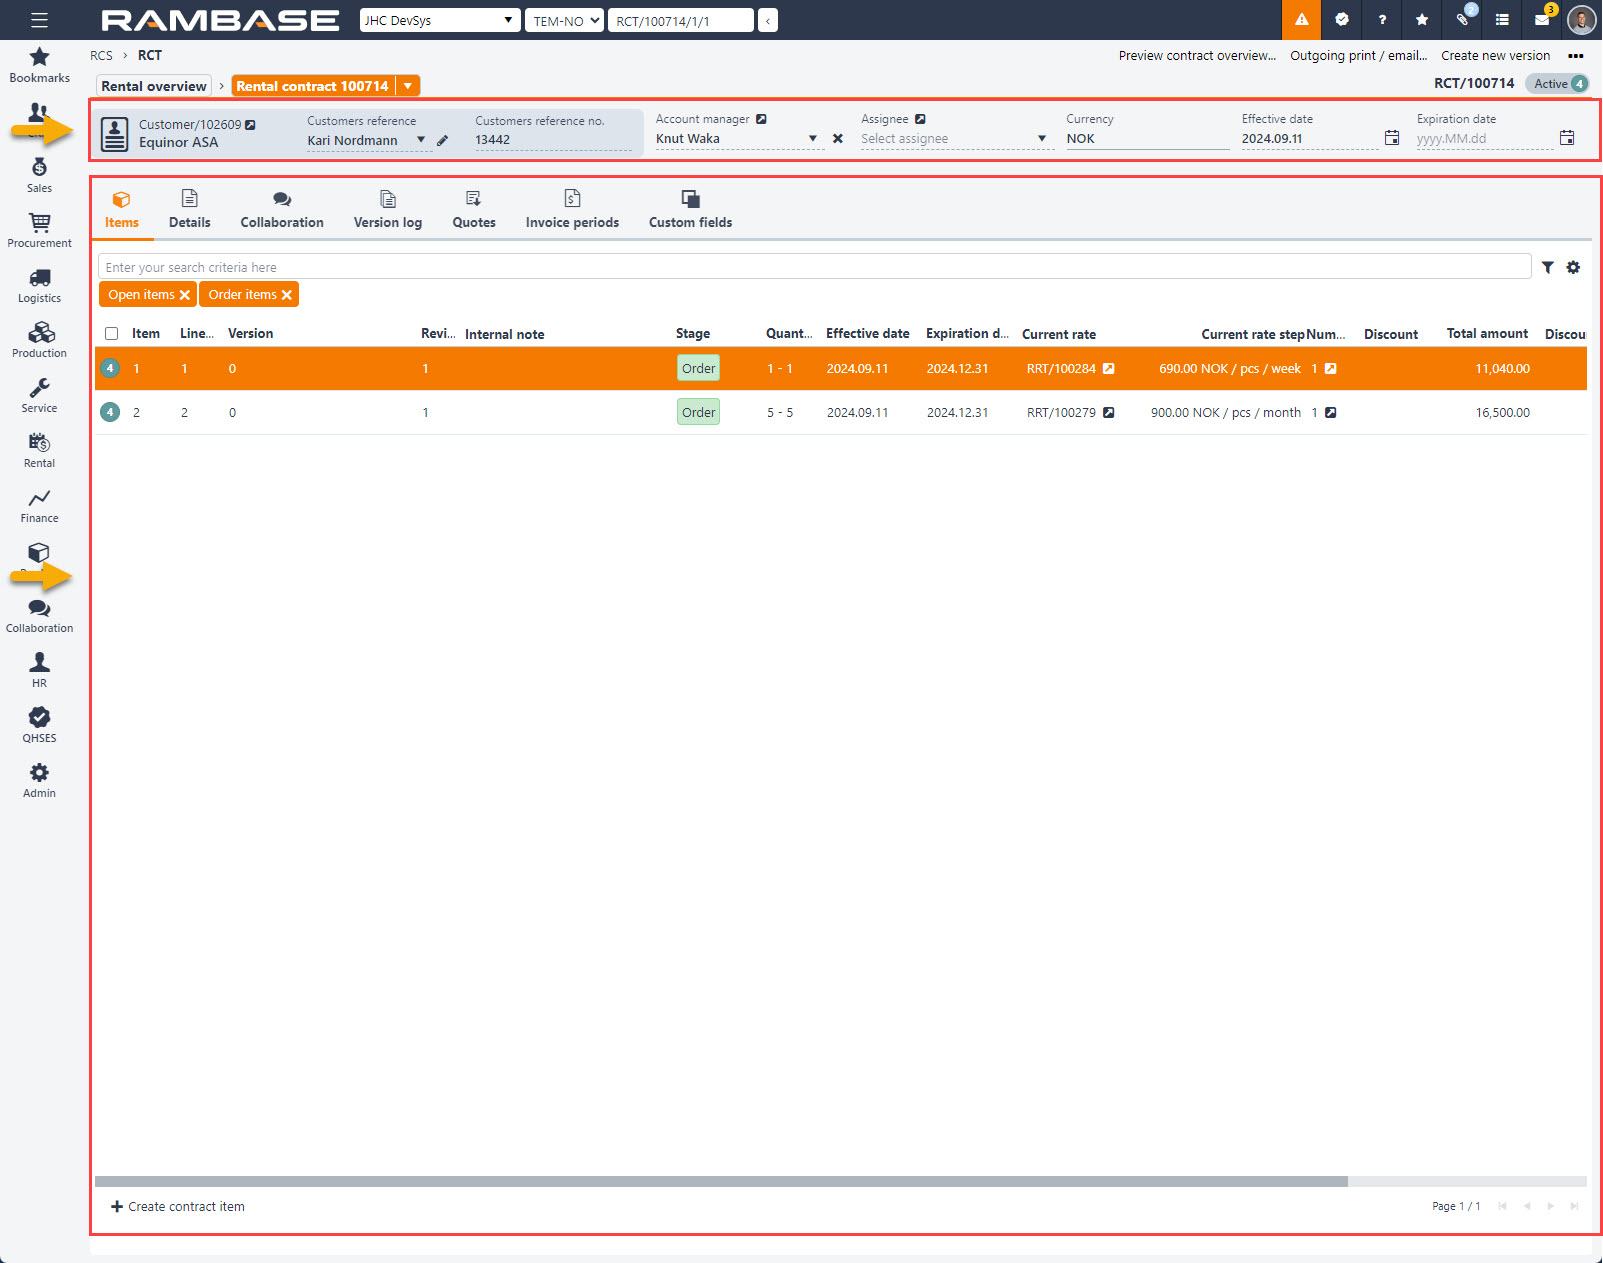
The Rental contract (RCT) application is the main application for specifying a rental or subscription contract. A contract is flexible in the sense that it can contain both quotes and orders, these stages are highlighted by the green order stages and blue quote stages. The contract also supports versioning for both quotes and orders, but there can only be one Status 4 - Active version per order. The user can decide when to create a version of a contract.
The application also supports that multiple quotes can be sent to the customer, and these can wholly or partially be approved or rejected.
Overview
The Rental contract (RCT) application provides all contract information condensed into one view. In addition to the information provided in the header, in depth details and functionality is available in the sub-tabs. The description of the functionality can be found in the sections below; from header, sub-tabs and context menu options.
The notable function of creating a contract item is described in the Items sub-tab section.
Application Header area
The header provides information on the customer, sales handling, the set currency and relevant dates. Most of the provided information can be edited in the application or by navigating to another application to perform the edits.
A detailed description is provided in the table below.
Fields and drop-down menus | Icons | Description |
|---|---|---|
Customer |
| Displays the name of the Customer (CUS). To view and edit details on the customer, click the View icon to open the Customer (CUS) application. |
Customer's reference |
| Displays the name of the person set as the external customer contact. The contact is set when creating the contract. To change the contact person of the contract, click the Customers reference drop-down menu to select a new contact, or click the Customers reference field to edit the name, press ENTER to confirm. Alternatively, click the Pen icon to edit. Choose either to click the Save or Cancel icons. |
Customers reference no. | Displays the customers reference number. E.g. the internal sales order identifier the customer use in their own system. To edit the customers reference number on all items and/or invoice periods, click the Customers reference no. field to edit the number. Press ENTER to save the changes in the following popup. Choose to update the contract items and/or invoice periods by selecting the related checkbox. To confirm, click the Yes button. | |
Name | Displays the short descirption for the rental contract. Click to edit. | |
Assignee |
| Displays the name of a user assigned handling the contract details in RamBase. |
Currency | Three character code in accordance with the ISO 4217. Currency is selected when creating the Rental contract (RCT). To edit, click the Currency drop-down menu and select the required currency. Unable to edit?If a Rental contract (RCT) has Rental contract items (RCTITEM), the currency can not be changed. Add new currencyTo add a currency to a Customer (CUS), click the View icon next to the Customer field. This will open the Customer (CUS) application. Click the Settings tab and then the Finance sub-tab. In the Finance data area, click the Currencies drop-down menu, and select the required currencies. | |
Effective date |
| Start date of the recurring contract. Displayed in yyyy.MM.dd format. Mandatory when creating the contract. To edit the date, click the Effective date field and type the new date in the required yyyy.MM.dd format, or click the Calendar icon and select a new Effective date. |
Expiration date |
| End of the recurring contract. Displayed in yyyy.MM.dd format. To edit the date, click the Expiration date field and type the new date in the required yyyy.MM.dd format, or click the Calendar icon and select a new Expiration date. |


Sub-tabs
The sub-tabs allow for quick navigation between the categorized functionality, allowing the user to maintain overview while accessing detailed information.
The sub-tabs of the Rental contract (RCT) application can easily be customized by drag and drop, tailoring the application based on the users preferences.
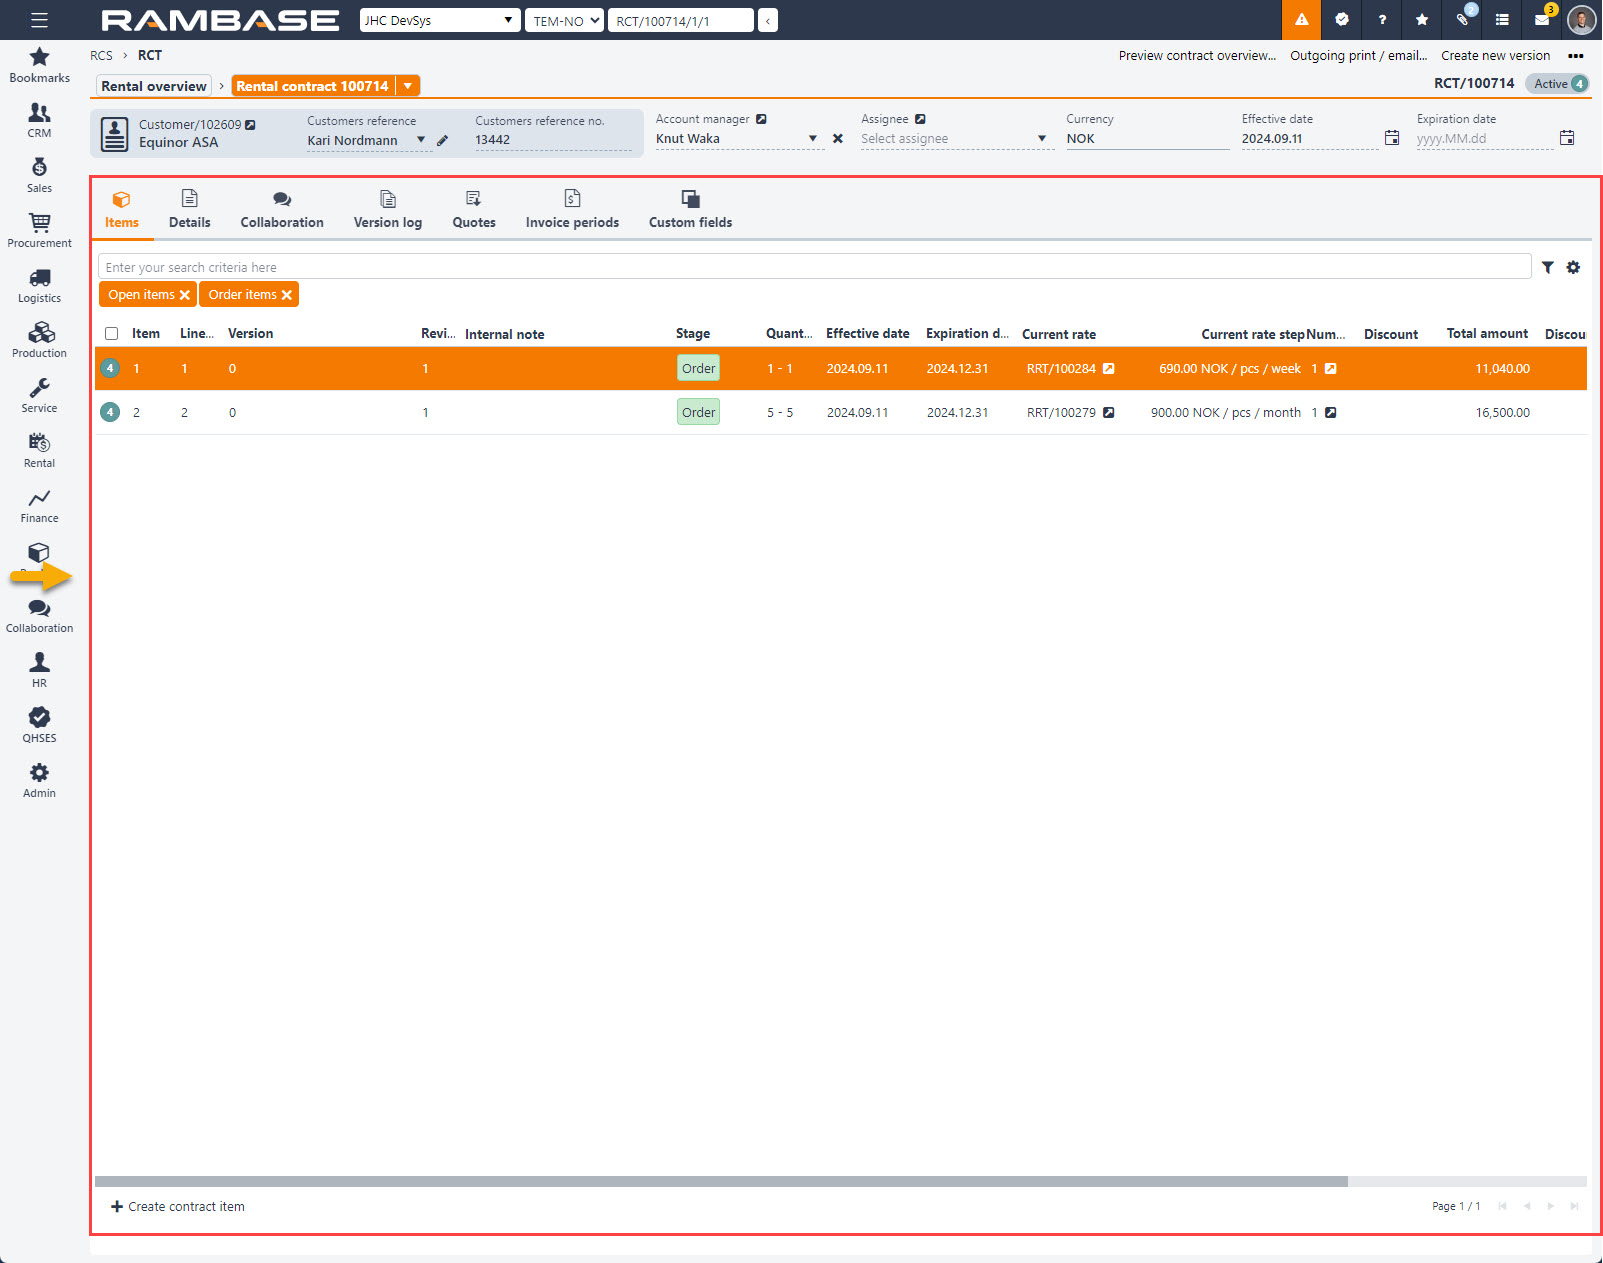
Items sub-tab
Header area
Search field - The Search field can be used to search for specific rental contract items. Click the Search field and press SPACEBAR to list all the available parameters to search on, including, but not limited to Quote number, Stage, Version.
Filter builder icon- The Filter builder includes a set of predefined filters, listed below. A selected and active predefined filter will be placed underneath the Search field and marked with color orange. A selected and inactive field will still be placed underneath the search field, but marked with color gray. Click the Remove icon on the filter, to remove the predefined filter. The user can also Create custom filters by selecting Field, Operator and Value in the Create custom filters area, and then clicking the Save filter button. Saved filters will be available from the My saved filters area. Click the saved filter to apply it and add it below the Search field.
Standard filters
Open items
Order items
Quote items
Rental items
Subscription items
Column settings icon - Click the Column settings icon to open the column settings. Here the user can add and remove columns from the Items sub-tab, Export to excel, Reset to default view and Include custom fields. The Reset to default view can be especially useful if information in the list is not displayed as expected as columns can be dragged and dropped to suit the user. A description of the columns are listed in the table below.
List area
The table below includes all available columns in the Items tab.
Columns | Icon | Description |
|---|---|---|
| Displays the status of the Rental contract items (RCTITEM) in the list. Available statuses:
To select single or multiple contract items, click the Status icon(s). To select all, click the Checkbox in the Column header. Context menu optionsThe available options change depending on the selection of contract items. | |
Item | Displays the contract item identifier. The identifier is assigned to the item as they are created chronologically. To inspect the history of all items, in the Context menu, select the Show all versions and revisions option. In the Column settings in the following popup, enable the Item column. | |
Line no. | Displays the line- or sequence number of the item. Items can be rearranged in the list by drag and drop, resulting in a new order line- and sequence number. | |
Version | Displays the rental contract item version. Note the Version log tab where new versions of the rental contract can be created. The version number represents in which version the item was added. | |
Revision | Displays the rental contract item revision. A new revision of the Rental contract item (RCTITEM) will be created when terms are updated. Examples are Effective date, Expiration date, Discount. | |
Stage |
| Displays the current stage of the Rental contract item (RCTITEM). Rental contract items (RCTITEM) in the quote stage can be inspected in the context of the contract quote in the Quotes sub tab. To view all details in the Rental contract item (RCTITEM) application, click the Right arrow icon or click to highlight the item and press ENTER. TipTo quickly filter on Rental contract items (RCTITEM) in;
|
Quote no. | Displays the rental contract quote identifier. | |
Quote name | Displays the name set when creating the Rental contract (RCT) quote. | |
Product |
| Displays the name and description of the Rental contract item (RCTITEM). To view and edit details on the Product (ART), click the View icon. |
Customers ref. no | Displays the Customers reference no. for the Rental contract item (RCTITEM). E.g. the internal sales order identifier the customer use in their own system. To edit, click the Right arrow icon to open the Rental contract item (RCTITEM) application and locate the Customers reference no field in header. | |
Type | Displays the product type of the Rental contract item (RCTITEM). Expected values can be Subscription or Rental. | |
Quantity | Displays the contract item quantity of the product. | |
Effective date | Start date of the Rental contract item (RCTITEM). Displayed in yyyy.MM.dd format. To edit the date, click the Edit icon to open the Update the rental contract item popup. | |
Expiration date | End date of the Rental contract item (RCTITEM). Displayed in yyyy.MM.dd format. To edit the date, click the Edit icon to open the Update the rental contract item popup. | |
On rent days |
| Displays the number of on-rent days for the product. To navigate to the Calendar sub-tab in the Rental contract item (RCTITEM) application, click the Calendar icon. |
Current rate |
| Displays the Recurring rate (RRT) identifier. The Recurring rate (RRT) is set up per Product (ART). To inspect and edit details on the recurring rate, click the View icon to open the Recurring rate (RRT) application. |
Current rate step | Displays currency / piece or batch / interval. Details the current rate step in: Price/Piece or batch/Duration. Example: 700.00 USD/pcs/month. The example used will have an estimated monthly revenue of 700 USD per piece. | |
Discount | Displays the current discount in percent. | |
Rates per day | Displays the average rate per day. | |
Total amount | Displays the total amount excl. VAT of the Rental contract (RCT). | |
Number of rates |
| Details the number of Recurring rates (RRT) utilized by the Rental contract item (RCTITEM). To open the Rental contract item (RCTITEM) application and inspect and edit the details in the Rental rates sub-tab, click the View icon. |
Discount amount | Displays the total discount amount excl. VAT. | |
Total net amount | Displays the total amount excl. VAT, after discount. | |
| To open the Update the rental contract item popup, click the Edit icon. The following fields can be updated in the popup:
| |
| To delete the Rental contract item (RCTITEM), click the Delete icon. Note that only Rental contract items (RCTITEM) in Status 1 - Draft, can be deleted. | |
| To open the Rental contract item (RCTITEM) application, click the Right arrow icon. |


Procedure - Create a new Rental contract item (RCTITEM) in Status 1 - Draft
Button | Icon | Popup |
|---|---|---|
Create contract item |
| To create a new Rental contract item (RCTITEM) in Status 1 - Draft , click the Create contract item button located in the footer of the Rental contract (RCT) application, in the Items tab. Required fieldsAll standard fields are required, only the Create special rate functionality is optional. Create contract item popup
|
Context menu options
Option | Description |
|---|---|
Print / send | |
Preview contract overview | To generate a preview of the contract overview, in a limited PDF-viewer, select the Preview contract overview option in the Context menu. |
Outgoing print/email | To display all outgoing print jobs and email for the Rental contract (RCT), select the Outgoing print/email option in the Context menu. Notable functionality is found in the View and Inspect columns where the user can download a copy of the print/email and/or view key information. |
Create new version | To create a new version of the contract, select the Create new version option in the Context menu. **** Missing further details - missing components |
Quote | |
Register quote | To register the contract quote and forward a contract quote in Status 1 - Pending registration to Status 2 - Registered, select the contract quote in the Contract quotes list and select the Register quote option in the Context menu. A contract quote in Status 2 - Registered, will not allow the creation of additional contract quote items. Option is available in status:
|
Send quote to customer | To send the contract quote and forward a contract quote in Status 2 - Registered to Status 3 - Active quote, select the contract quote in the Contract quotes list and select the Send quote to customer option in the Context menu. A contract quote in Status 3 - Active quote, will not allow the creation of additional contract quote items. Option is available in status:
|
Send and approve quote | To send and approve the contract quote, forwarding a contract quote in Status 2 - Registered to Status 9 - Processed. |
Approve quote | To approve the contract quote by forwarding a contract quote in Status 3 - Active quote to Status 9 - Processed, select the contract quote in the Contract quotes list and select the Approve quote option in the Context menu. All contract quote items will follow the status of the contract quote, meaning they will also be approved and set to Status 9 - Processed. The contract quote in stage Quote will be converted to stage Order and can be inspected in the Items sub-tab. Available in status:
|
Reject quote | Will set the quote in Status 7 - Rejected. |
Delete quote | Select to delete quotes in Status 1 and 2. |
Quote items | |
Register quote item | Select to forward a quote in Status 1 to Status 2. |
Send quote item to customer | Select to forward the quote items to the customer, setting the quote items in Status 3. |
Approve quote item | To approve contract quote item(s) by forwarding it from Status 3 - Active to Status 9 - Processed, select the contract quote, with the contract quote items to be approved, in the Contract list and then select the contract quote items in the Contract quote items by clicking the Status icon(s). Then select the Approve quote item option in the Context menu. If all contract quote items in a contract quote is processed, the contract quote is then forwarded from Status 3 - Active quote to Status 9 - Processed, converting it from the stage Quote to the stage Order. The Rental contract items (RCTITEM) can then be inspected in the Items sub-tab. Option is available in status:
|
Reject quote item | To reject contract quote item(s) by forwarding it from Status 3 - Active to Status 7 - Rejected, select the contract quote, with the contract quote items to be approved, in the Contract list and then select the contract quote items in the Contract quote items by clicking the Status icon(s). Then select the Reject quote item option in the Context menu. |
Update selected rental contract items | The Update selected rental contract items are used to quickly update the Effective and Expiration date, including Discount. If a Rental contract item (RCTITEM) is selected by clicking the Status icon or Select all checkbox in the List area, select the Update selected rental contract item in the Context menu. Update selected rental contract items
|
Order items | |
Register order item | |
Cancel order item | |
Invoice and payment | |
Update invoice period | |
Create invoice for selected period |
Details sub-tab
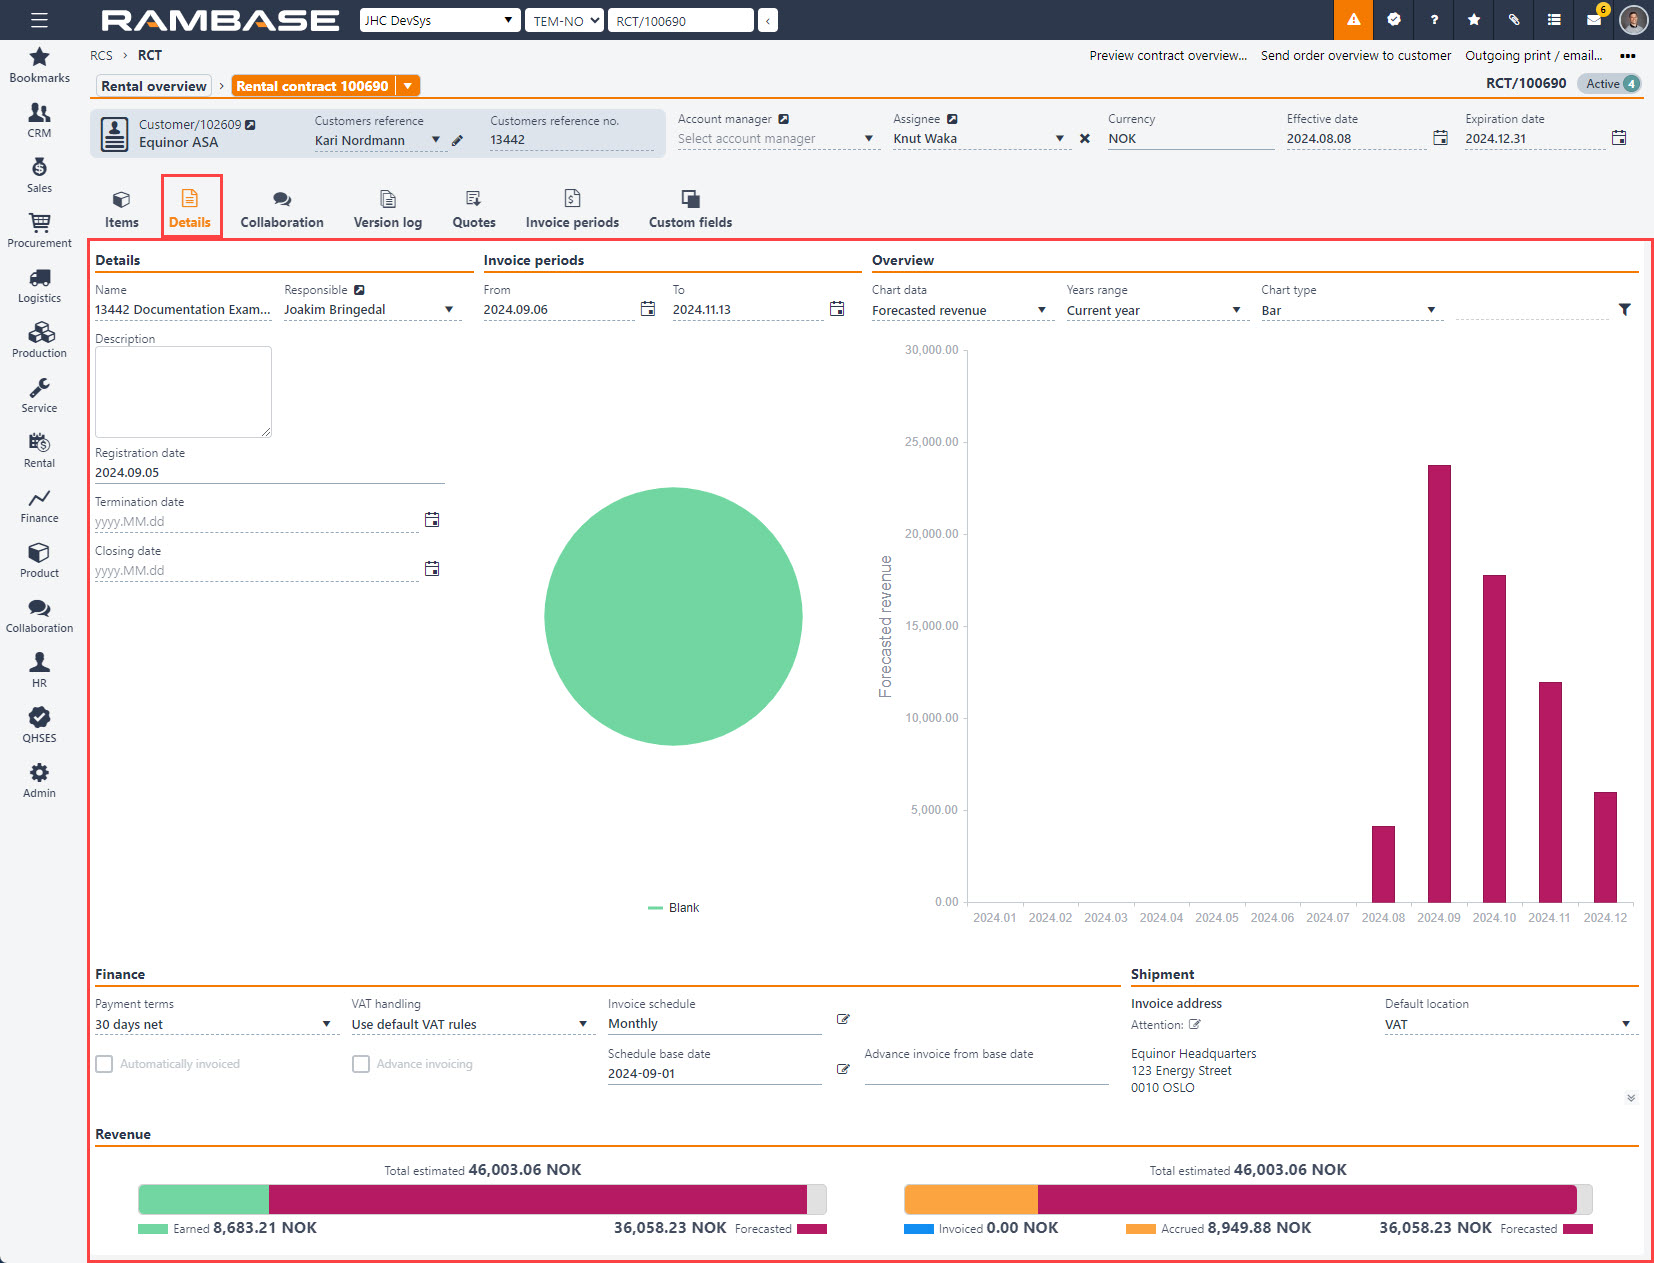
Details area
Name - Short description for the rental contract. Set when creating the contract in the Rental overview (RCS) application.
Responsible - Displays the name of the user responsible for the contract, typically a sales assistant. To inspect details on the responsible, click the View icon. To edit, click the Responsible drop-down menu.
Description - Displays the detailed description for the contract. To edit, click the Description textbox.
Registration date - Displays the date of registration of the contract.
Termination date - Displays the date of termination of the contract. To edit, click the Termination date field and provide a date in the yyyy.MM.dd format, or click the Calendar icon to select.
Closing date - Displays the date after the final invoicing. The contract is sealed and cannot be changed. To edit, click the Closing date field and provide a date in the yyyy.MM.dd format, or click the Calendar icon to select.
Invoice periods area
From - Details the From date that invoice periods should be created. To edit, click the To field and provide a date in the yyyy.MM.dd format, or click the Calendar icon and select a date in the following popup.
To - Details the To date that invoice periods should be created to. To edit, click the To field and provide a date in the yyyy.MM.dd format, or click the Calendar icon and select a date in the following popup.
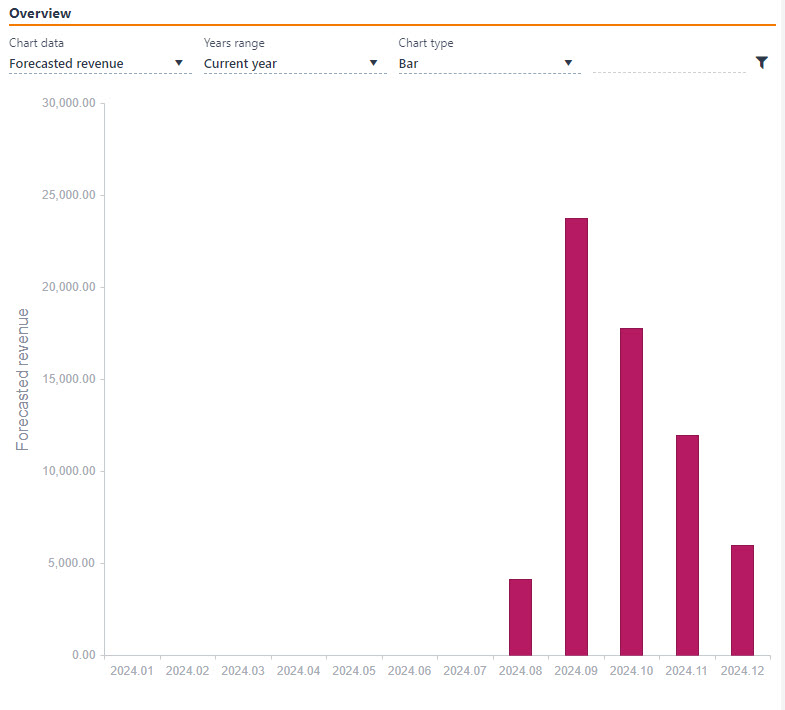
Pie-chart
Overview area
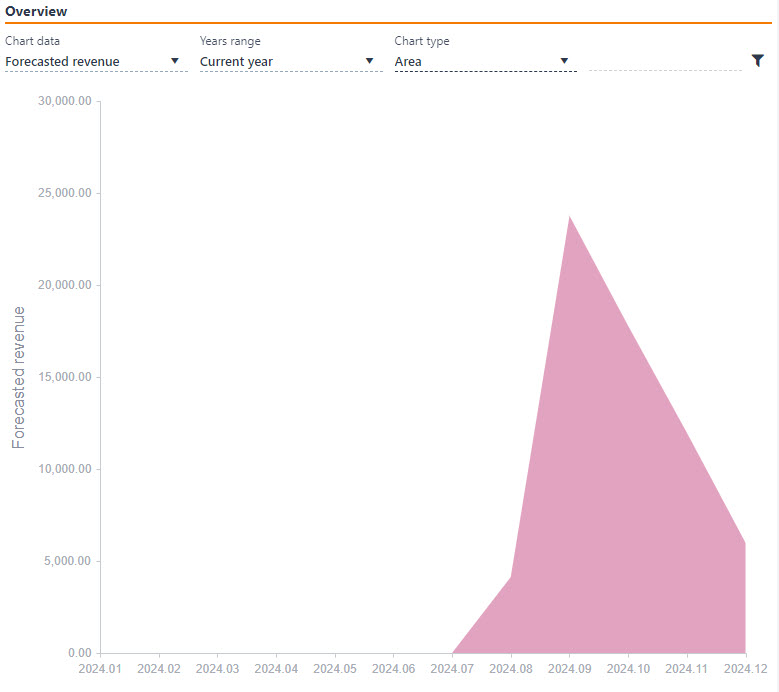
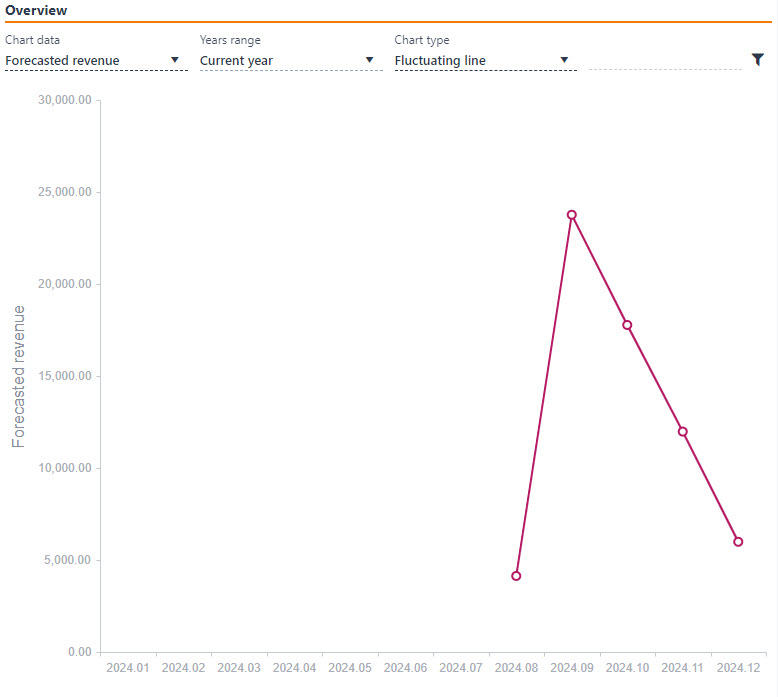
The Overview area is used to define how the data is presented. The user may specify the Chart data, Years range and Chart type.
Chart data - Select which chart data will be displayed.
Chart data options:Subscriptions per product
Subscriptions per product and financial period
Invoiced amounts
Forecasted revenue
Earned revenue
Years range - Select which years the chart data will filter on. Current year will always be an option, in addition to years which are relevant to the user's system. Data from the selected years range will be displayed.
Years range options:Current year
Chart type - Select a Chart type to be displayed.
Bar
Area
Fluctuating line
Search field
Finance area
The Finance area includes the baseline financial information and options for the contract. The fields and options and described in the itemized list below.
Payment terms - Displays the Payment terms for the contract. The initial payment terms are set in the Customer (CUS) application. To edit, click the Payment terms drop-down menu and select an option from the list.
VAT handling - Displays the VAT handling for the contract. The VAT handling specifies how value added tax should be calculated. Either always include VAT or use standard/default VAT rules. To edit, click the VAT handling drop-down menu and select an option from the list.
VAT handling options are:Always include VAT
Never include VAT
Use default VAT handling rules
Invoice schedule field - Displays the Invoice schedule. To edit, click the Edit icon to open the Update rental item popup where the following options are available
Automatically invoiced checkbox - Enable the checkbox if invoices in the contract should be released automatically. If grayed out, click the Edit icon to edit.
Advanced invoicing checkbox - Enable the checkbox if the contract is invoiced in advance. If grayed out, click the Edit icon to edit.
Schedule base date - Displays the date from which invoices is or will be start to be generated from. To edit, click the Edit icon to open the Update rental item popup. The options in the popup is described in the table below.
Advance invoice from base date field - Displays the number of days from the schedule base date that invoices will be generated from.
Edit icon - The Edit icon can be used to update the contract item.
Edit icon
Update rental item popup

The following options are available in the popup:
Invoice schedule drop-down menu
Options:Weekly
Fortnightly
Monthly
Quarterly
Annually
Schedule base date with Calendar icon -

To set a new schedule base date, provide a new date in yyyy.MM.dd format, or click the Calendar icon and select a date.
Automatically invoiced checkbox - Enable the checkbox if invoices in the contract should be released automatically.
Advance invoicing checkbox - Enable the checkbox to set a number of days to advance invoicing from the schedule base date. If enabled the user may
If enabled:Select the number of days in advance by clicking theAdvance invoice from base date (in days) drop-down menu and select a number of days to invoice in advance in the range of 0 to 30 days.
Shipment area
The Shipment area includes Customer (CUS) information regarding shipping, as well as Invoice address and Default location.

Edit icon
Revenue area
The Revenue area displays the revenue in two graphical views.
Total estimated - A bar graph with the values; Earned and Forecasted-
Total estimated - A bar graph with the values; Invoiced, Accrued and Forecasted.
Collaboration sub-tab
The Collaboration sub-tabs allow for the creation of Notes and Tasks related to the contract.
Sub-tabs
Notes sub-tab
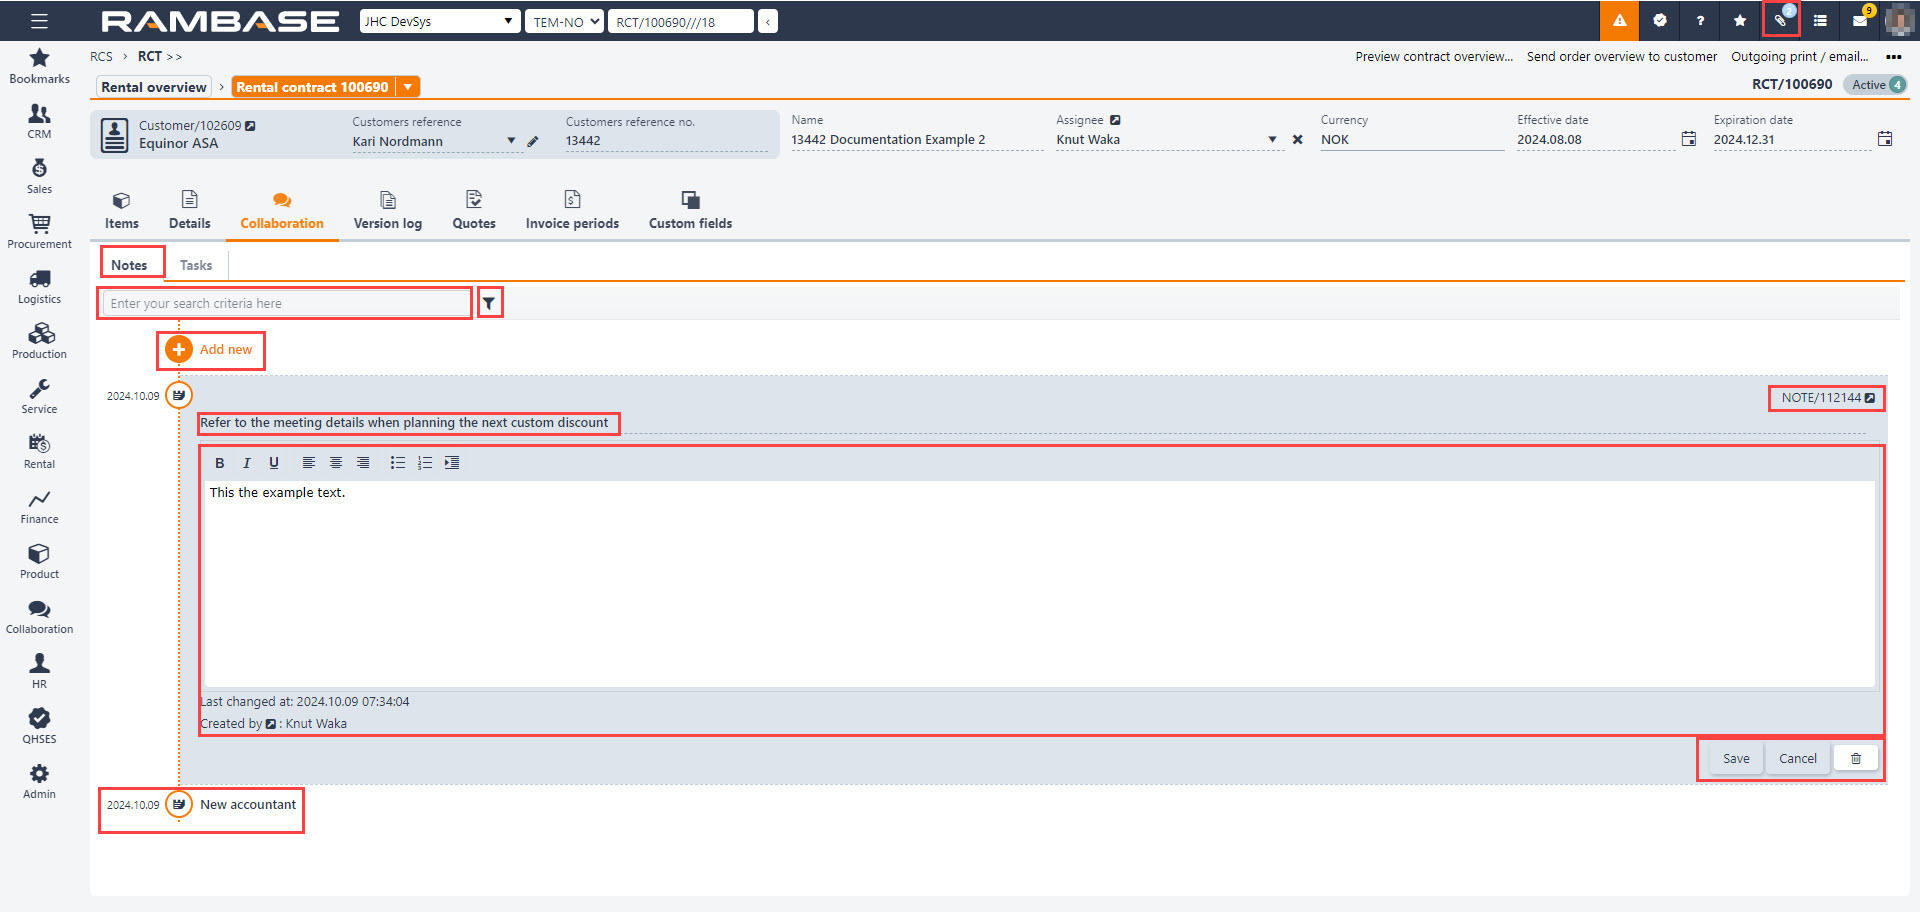
The Notes sub-tab is a useful tool which is used to create and follow up notes related to the contract. The sub-tab supports the creation of multiple notes, and these can be searched and filtered efficiently. This is in addition to the persistent Note functionality located in all RamBase applications.
Navigate to Notes (NOTE) application
When a note has been created, selecting it and clicking the View icon in the top right corner of the note, will open the Notes (NOTE) application where all notes can be viewed and handled.
Search field - The search field can be used to search on a specific note subject. By clicking the field and pressing SPACEBAR all available parameters are listed.
Filter builder - To filter the notes on the standard filters listed below or to create a custom filter, click the Filter builder icon.
Standard filters
Last edited by me
My notes
My private notes
Notes I created
Add new button - To add a new note, click the Add new button. Provide a Title and optionally, a Description.
Title field - Required, add a title to the note.
Description - Optionally, add a description.
Tasks sub-tab
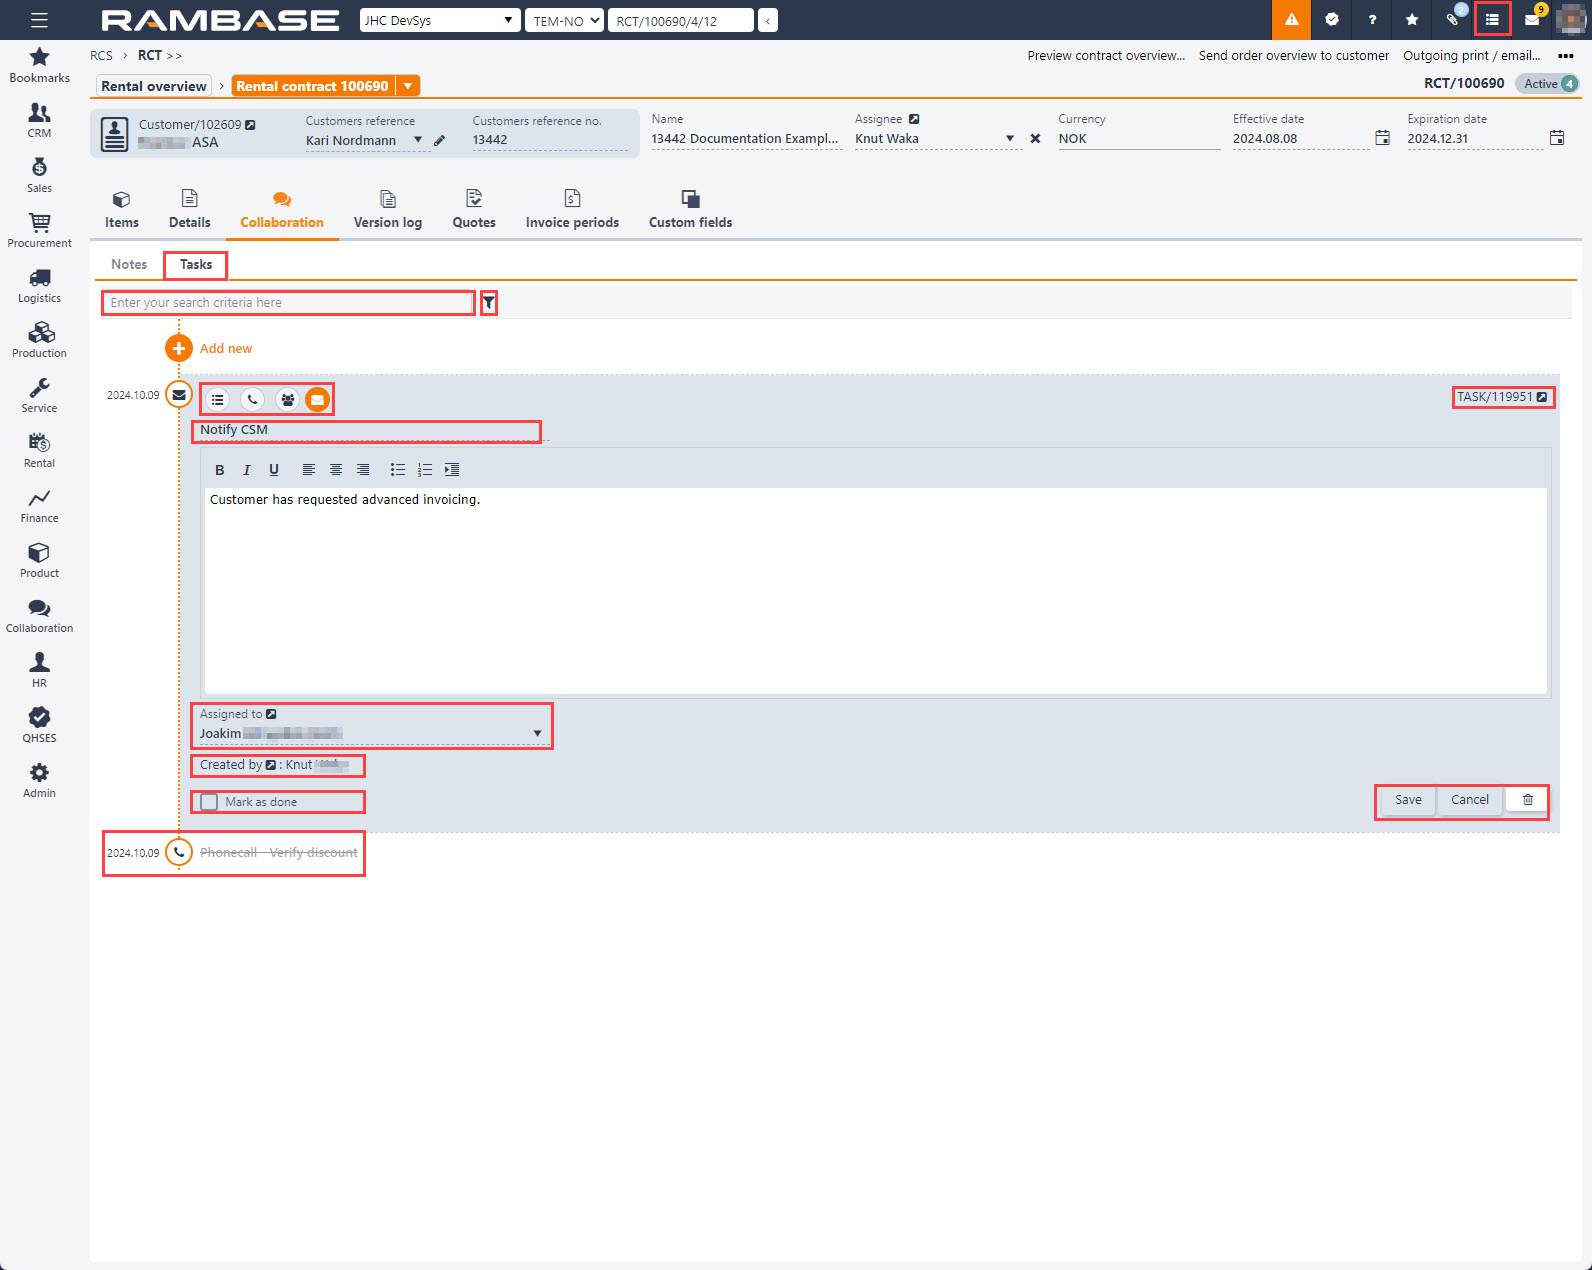
The Tasks sub-tab is a useful tool which is used to add and follow up tasks related to the contract. The sub-tab supports the creation of multiple tasks, and these can be searched and filtered efficiently. This is in addition to the persistent Tasks functionality located in all RamBase applications.
Navigate to Tasks (TASK) application
When a task has been created, selecting it and clicking the View icon in the top right corner of the task, will open the Task (TASK) application where all tasks can be viewed and handled.
Notable functionality in the Tasks sub-tab
Search field - To quickly search on the contents of a title, click the Search field and type, then press ENTER. To list all available search variables, click the Search field and press SPACEBAR.
Filter builder - To filter the tasks on the standard filters listed below, or to create a custom filter, click the Filter builder icon.
Standard filters
Standard filtersActive tasks
Archived tasks
Tasks assigned to me
Tasks created by me
Finished tasks
Tasks in progress
My active tasks
My tasks
My unfinished tasks
My private tasks
Tasks in my company
Unfinished tasks
Add new icon - To add a task, click the Add new button.
Button
Icon
Description
Add new task
 Add a new task in the Rental contract (RCT) application
In the Rental contract (RCT) application select the Collaboration tab and then the Tasks sub-tab.
To add a new tasks, click the Add new button.
In the expanded box, categorize the task by clicking one of the buttons; New task, Phone-call, Meeting or Email.
Add a title by clicking the Title field and type.
Assign the task by clicking the Assigned to drop-down menu and selecting the assignee.
When the task is done, click the Mark as done checkbox.
To finish creating the task, click the Save button.
Assigned tasks in the Tasks (Task) application
Once a task is assigned, the person assigned the task can handle the task in the Tasks (Task) application.
Fields and buttons | Icon | Description |
|---|---|---|
New task |
| To categorize the task as standard, click the New task button. |
Phone-call |
| To categorize the task as a phone-call, click the Phone-call icon. |
Meeting |
| To categorize the task as a meeting, click the Meeting icon. |
| To categorize the task as an email, click the Email icon. | |
Title field | To add a title, click the Title field and type. | |
Description field | The Description field is optional, and is used to further describe the task. | |
Assigned to drop-down |
| To view details on the person assigned to the task, click the View icon to open the Personnel (PER) application. |
Create by field |
| To view details on the person who created the task, click the View icon to open the Personnel (PER) application. |
Mark as done checkbox | To mark the task as done, enable the Mark as done checkbox. | |
Save button |
| To create the task, or save edits, click the Save button. |
Cancel button |
| To cancel the creation of the task, or potential edits, click the Cancel button. |
Delete button |
| To delete a task, click the Delete button. |


Version log sub-tab

The Version log allows for the creation of versions which contains all the contract changes.
The Versions area on the left are used to inspect versions, as well as creating a new version in Status 4 - Active.
Note
There can only be one active versions at a time. Previous versions will be set in Status 9 - Closed, but the items can still be inspected.
The Items area on the right lists all the contract items of the created versions. Notable functionality is the Inspect item history icon, which allows the user to inspect all changes made to an item, by who and at what time.
There are both internal version and external version.
External versions, are created by the user.
Versions area - Left side
Used to select and inspect, and/or to create new versions.
Inspect an active or closed version of Rental contract (RCT)
From the RamBase menu, click Rental, followed by Rental contract and finally Rental contracts to open the Rental overview (RCS) application.
In the Rental overview (RCS) application, select the rental contract and click the Right arrow icon to open the Rental contract (RCT) application.
To view closed and active versions, click the Version log sub-tab.
Select one of the active or closed versions, in the Versions area.
Once a version is selected, information on version, registration date, changed date, created by and changed by is displayed in the Versions area on the left side. On the right side, in the Items area, all items are listed with the status and stage
Create a new version of the Rental contract (RCT)
To create a new version of the Rental contract (RCT), click the Create new version button.
| Create new version button |
From the RamBase menu, click Rental, followed by Rental contract and finally Rental contracts to open the Rental overview (RCS) application.
In the Rental overview (RCS) application, select the rental contract and click the Right arrow icon to open the Rental contract (RCT) application.
To view closed and active versions, click the Version log sub-tab.
To create a new version, click the Create a new version button in the Versions area.
Set a name for the new version in the Name field.
Note the version number.
To set the new version as the version in Status 4 - Active, and set the previous version in Status 9 - Closed, click the Save button.
Items area - Right side
The Items area lists all relevant information for the items in the selected contract version.
Notable functionality is found in the Inspect item history icon, which by clicking will list the complete history of that item. This includes when changes were made, and who performed them.
Column | Icon | Description |
|---|---|---|
St |
| Displays an icon indicating the status of the contract item. The stage of the contract item defines the meaning of the status. Contract items in stage Order
Contract items in stage Quote
|
Item | Rental contract item identifier The item identifier will be displayed as a suffix to the contract identifier. Example of contract identifier with item identifier: "RCTITEM/100000-1", the "-1" being the quote identifier. | |
Line no. | Line- or sequence number of the contract item. | |
Stage |
| Displays the stage of the item. |
Product |
| Displays the product name and description. To inspect and view details, click the View icon. |
Customers ref. no | Displays the customers reference number. E.g. the internal sales order id the customer use in their own system. | |
Type | Displays the product type of the Rental contract item (RCTITEM). Expected values can be Subscription or Rental. | |
Quantity | Displays the number of units ordered. | |
Effective date | Start date of the Rental contract item (RCTITEM). Displayed in yyyy.MM.dd format. | |
Expiration date | End date of the Rental contract item (RCTITEM). Displayed in yyyy.MM.dd format. | |
Rate | Displays the current rate for the contract item. The rate is set when creating the contract item. | |
| To view the entire contract item history, click the Inspect item history icon. Each line in the Item history popup represents an item change:
|

Quotes
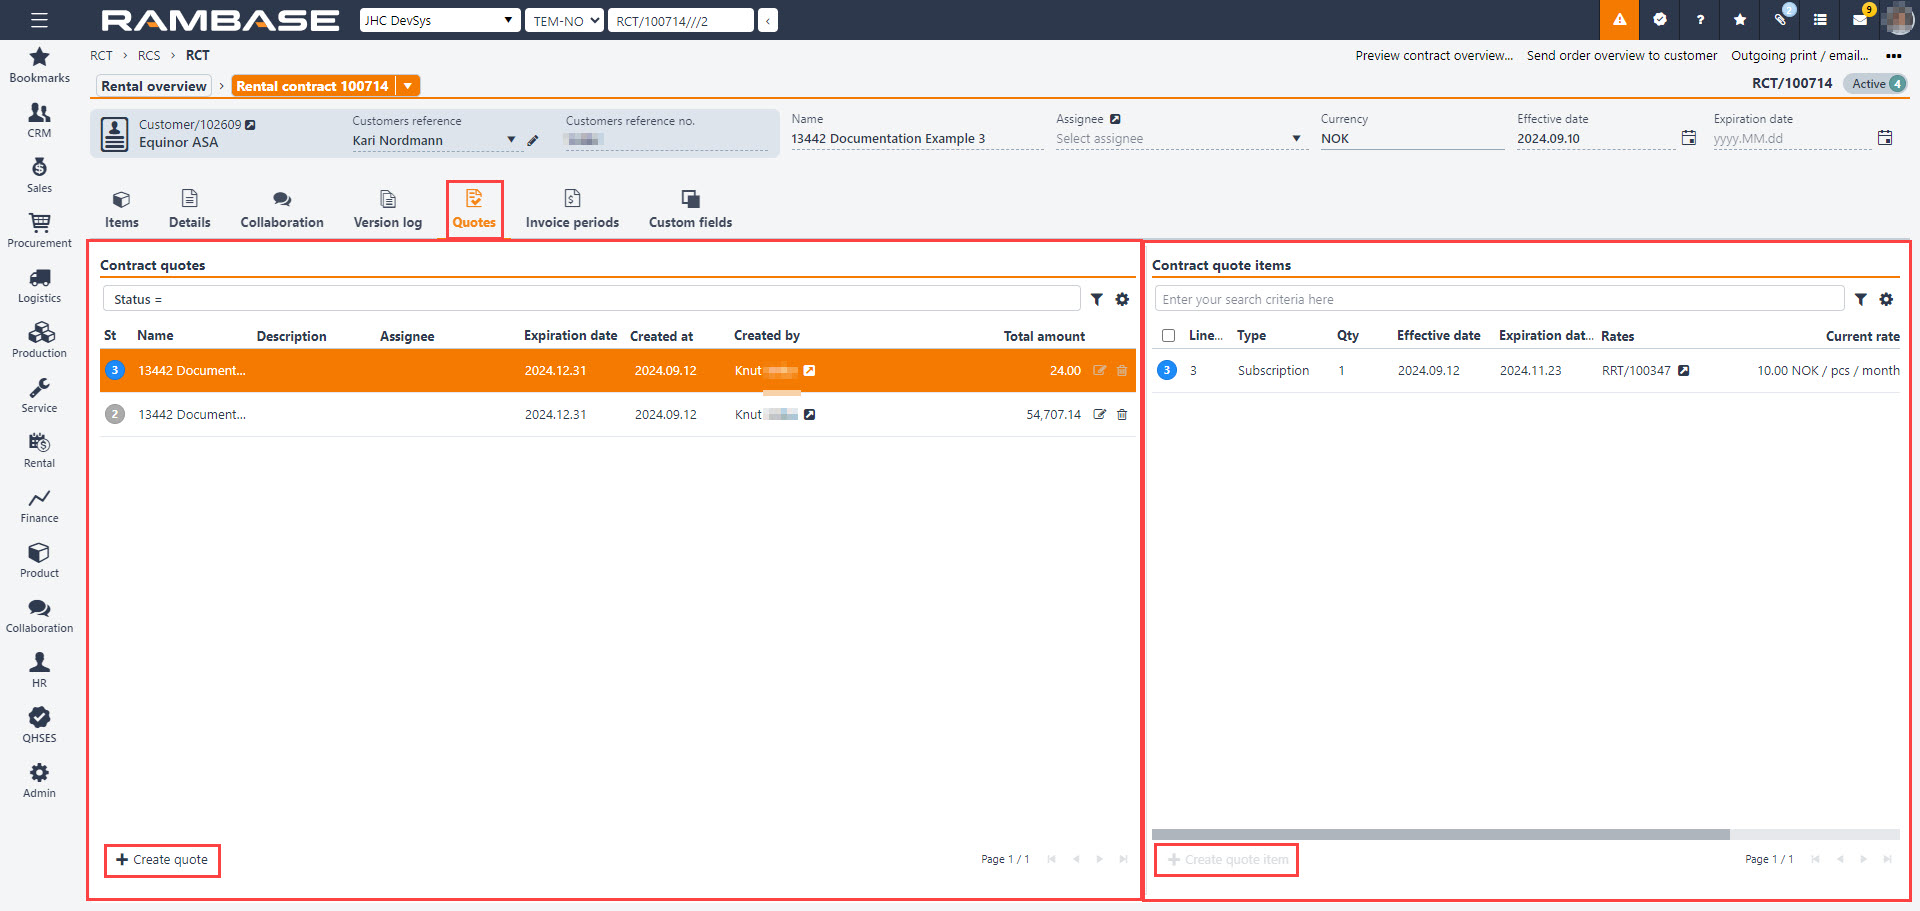
The Quotes sub-tab is used to follow up and create contract quotes, in addition to adding contract items.
The left side allows for a quick overview of the quotes as they progress to orders.
The right side allows for the addition of rates, quantity and quick navigation to specific Rental contract items (RCTITEM). In addition, the user may create quote items which can be registered and sent to the customer.
Contract quotes - Left side
The left side allows for a quick overview of the quotes as they progress to orders.
Columns, icons and other functionality is described in the table below:
Columns and buttons | Icon | Description |
|---|---|---|
St | Displays an icon indicating the status of the quote. Available statuses:
| |
Item | Displays the contract quote item identifier. | |
Name | Displays the name of the contract quote. The Name is set when creating the quote. | |
Description |
| Displays the description of the contract quote. The Description is set when creating the quote. As the space is limited, hovering over the Information icon will list the complete description. |
Assignee | Displays the name of a user assigned handling the contract details in RamBase. | |
Expiration date | Displays the Expiration date of the contract quote, set when creating the contract quote. | |
Created at | Displays the date the contract quote was created in yyyy.MM.dd format. | |
Created by |
| List the full name of the person who created the contract quote. To view details, click the View icon to open the Personnel (PER) application. |
Total amount | Displays the total amount of the contract item. | |
| To update the contract quote, click the Edit icon. This will open the Update rental contract quote popup with the following options:
| |
| To delete a contract quote in Status 1 - Pending registration, click the Delete icon. |

Name | Button | Description |
|---|---|---|
Create quote button |
| To create a quote in Status 1 - Pending registration, click the Create quote button. Create quote popup
|
Contract quote items - Right side
The right side allows for the addition of rates, quantity and quick navigation to specific Rental contract items (RCTITEM).
The notable functionality of creating quote items is found in the Create quote item button.
Columns, icons and other functionality is described in the table below:
Columns | Icons | Description |
|---|---|---|
Item | Displays the contract quote item identifier. | |
Line no. | Displays the line- or sequence number of the quote item. | |
Version | Displays the contract quote item version. | |
Revision | Displays the revision of the contract quote item | |
Product |
| Displays the name and the potential description of the Product (ART). To view and edit details, click the View icon top open the Product (ART) application. |
Customers ref. no. | Displays the customers item reference number. This typically refers to the customers internal system. | |
Type | Displays the Product (ART) type: Expected values are:
| |
Qty | Displays the number of units included in the quote. | |
Effective | Displays the quoted start date of the contract, in yyyy.MM.dd format. | |
Expiration date | Displays the quoted end date of the contract, in yyyy.MM.dd format. | |
Rates | Displays identifier of the Recurring rate (RRT) applied to the quoted Product (ART). To view and edit details, click the View icon to open the Recurring rates (RRT) application. | |
Current rate | Displays the current rate: Rate in Currency (CUR) / Rate aspect / Recurring period Example: 50 USD / pcs / month | |
Total net amount | Displays the total net amount of the quoted contract item. | |
| To open the Rental contract item (RCTITEM) application to view and edit details, click the Right arrow icon. |
Name | Button | Description |
|---|---|---|
Create quote item button | ' | Create quote item popup
|

Invoice periods
Displays invoice periods as items, aggregates all items which are invoice in that period, click right most icon in the Items column to display period billing items. Note that Status 3 are future periods. The Billing documents column is useful in accessing the Sales invoices (CIN) application.
Column | Icon | Description |
|---|---|---|
| To select all, click the Empty checkbox icon. | |
| Displays the status of the listed invoice periods for the Rental contract (RCT). To select an invoice period for handling via the Context menu, click the Status. Available statuses:
| |
Start date | Displays the start date of the invoicing period in yyyy.MM.dd format. | |
End date | Displays the end date of the invoicing period in yyyy.MM.dd format. | |
Planned invoice date | Displays the planned invoice date for the period in yyyy.MM.dd format. | |
Amount | Displays the total amount of the period excl. discount. | |
Discount amount | Displays the total discount amount for the period. | |
Net amount | Displays the total amount of the period incl. discount. | |
Invoiceable amount | Total amount to be invoiced for the period. | |
Invoiced amount | Total amount invoiced for the period | |
Billing documents | Displays the Sales invoice (CIN). To open the Sales invoice (CIN) application, click the icon. | |
Total no. of days | Displays the total number of days for the contract. | |
Currency | Displays the three character code following the ISO 4217 standard. | |
Customers ref. no | Displays the customer reference number for the invoice period. | |
Items |
| To open the Billing period items popup, which displays all billing period items organized by product, click the View icon. |

