The Work order operations (WOO) application
Overview
Accessing the Work order operations (WOO) application is done from the Production work order (PWO) application.
To open the Production work order (PWO) application, find Production in the RamBase menu and then Production. Click Production work orders to open the Production work orders (PWOMENU) application. From the listed Production work orders (PWO), click the intended Production work order (PWO) and press ENTER. This opens the Production work order (PWOD) application for the selected Production work order (PWO). Click on the View icon next to the Work order operations field to open the Work order operations (WOO) application. The Work order operations field is found in the lower right corner in the Product units and current work order operation area.
The Work order operations (WOO) application is used by the production personnel to monitor and interact with planned Production work orders (PWO). It is optimized for easy viewing.
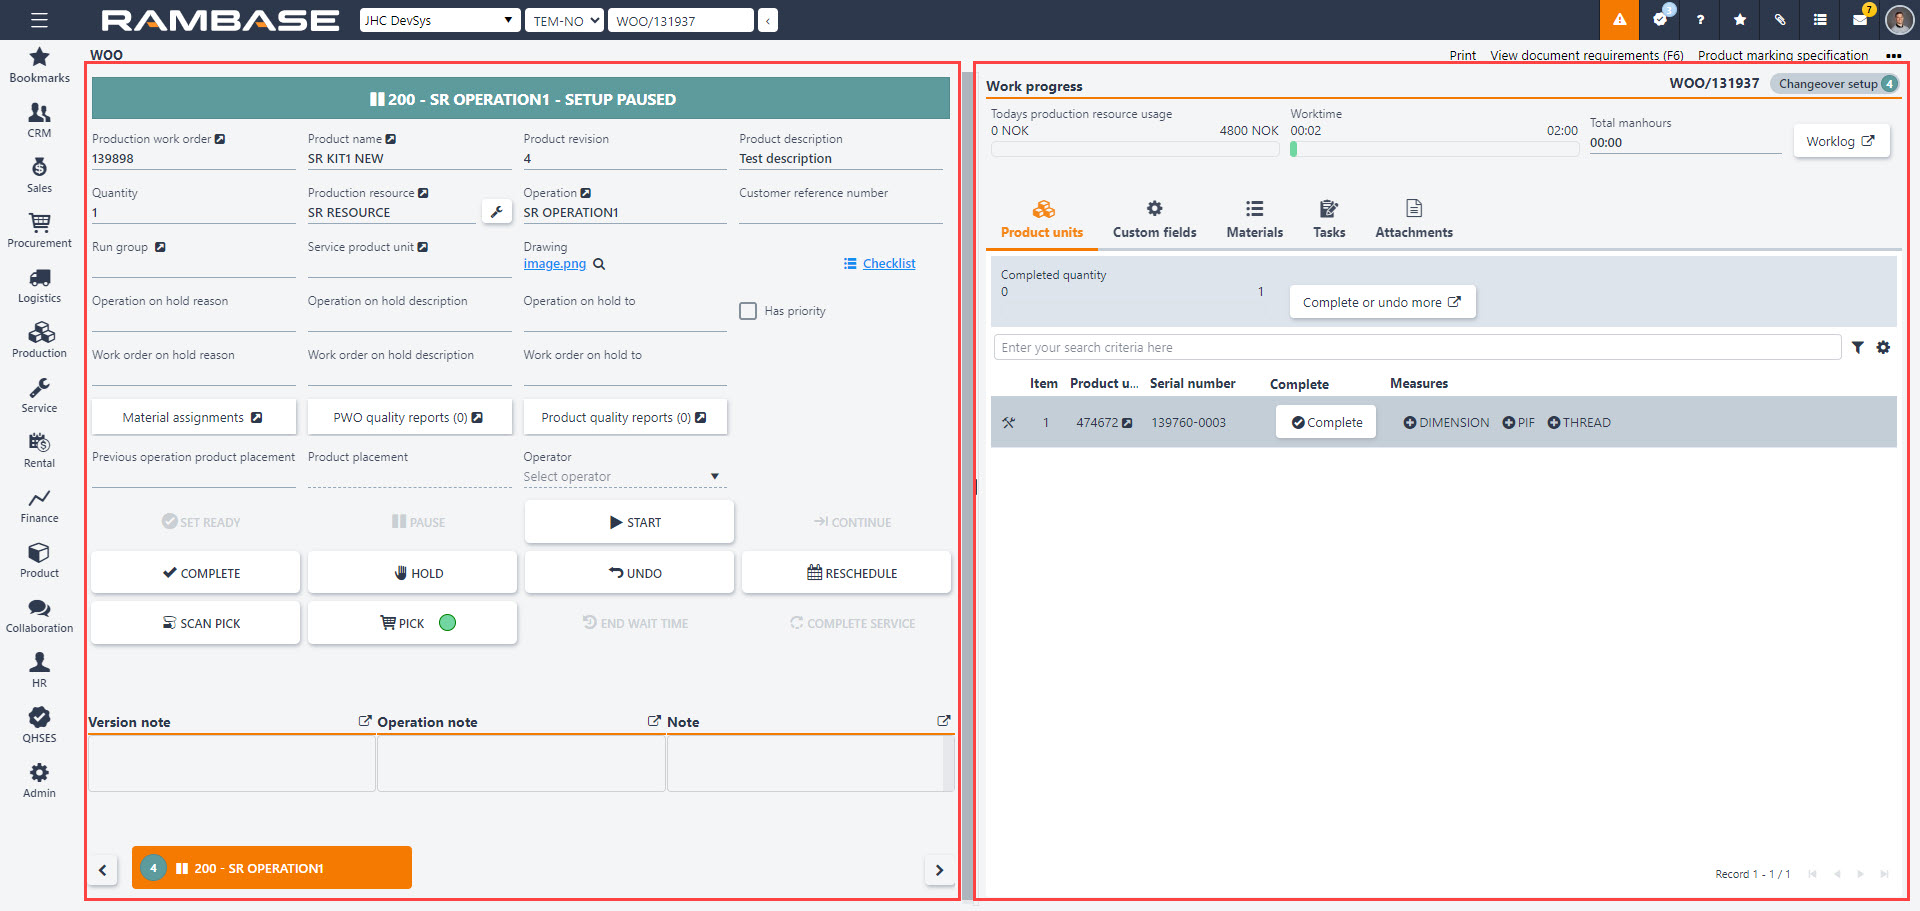
The application is divided into two main areas, the work space on the left side and the details on the right side. Click and drag the Handle icon in between the two areas to resize the areas.
Work space - Left side
The work space includes informational fields, checkboxes and buttons used in the Work order operations (WOO). Version and operation notes are available in the lower part of the application. At the bottom the previous, current and future Work order operations (WOO) are displayed in a carousel. If there are multiple operations, the current operation is highlighted and centered and the arrows are used to scroll through preceding and following Work order operations (WOO).
Additional icons are placed on the operations buttons in the carousel, if the operation has one of the following statuses; high priority, on hold or paused.
Fields and checkboxes in the Work space
The table below describes the fields and checkboxes available in the work space.
Fields and checkboxes | Description |
|---|---|
Production work order | An informational field that provides the name of the Production work order (PWO). To view details and open the Production work order (PWOD) application, click the related View details icon. |
Product name | An informational field that provides the name of the Product (ART) being produced by the Work order operation (WOO). To view details and open the Product (ART) application, click the related View details icon. |
Product revision | An informational field that provides the number of the revision being produced. |
Product description | An informational field that provides the description related to the Product (ART) in production. Click here to read more about the Product (ART) application. |
Quantity | An informational field that provides the quantity being produced by Work order operations (WOO). |
Production resource | An informational field that provides the resource name assigned to this operation, where Product units received column may be activated and that it will display the progress of picking for external goods for each operation performed by this resource. To view details and open the Resource work order operations (RWOO) application, click the related View details icon. The details will include a list with all associated Work order operations (WOO) for this resource. Click here to read more about the Resource work order operations (RWOO) application. The user can also flag the Production resource (RESCONFIG) by clicking the Set production resource condition icon which will open the corresponding popup. This can be used to flag Production resources (RESCONFIG) for maintenance or inform the planner that the machine has stopped. Setting the resource condition will only visually flag, and not limit any functions of Production resource (RESCONFIG). Read more about the Set production resource condition in the section below. |
Operation | An informational field that provides the operation associated with the production resource. To view details and open the Production operation (OPR) application, click the related View details icon. Click here to read more about the Production operations (OPR) application. |
Customer reference number | An informational field that provides the customer's order reference, if the Production work order (PWO) is derived from a Sales order (COA). Typically a reference to an external system. |
Run group | An informational field that provides the group name of the Work order operation (WOO), if the Work order operation (WOO) is set to run with several other Work order operations (WOO). To view details and open the Group work order operations (GWOO) application, click the related View details icon. Click here to read more about the Group work order operations (GWOO). |
Service product unit | An informational field that provides the serial number of Product (ART), if the Production work order (PWO) is a service. To view details and open the Product unit (LCM) application, click the related View details icon. |
Operation on hold reason | An informational field that provides the reason for why a Work order operation (WOO) has been put on hold. The value is derived from the selected option in the drop-down menu Reason. The drop-down menu is available by clicking the On hold button in the Work order operations (WOO) application. The field is mirrored in the Production work order (PWOD) application informing the planner that a started Work order operation (WOO) is on hold. |
Operation on hold description | An informational field that provides an additional description for why a Work order operation (WOO) has been put on hold. The value is derived from the On hold reason free-text field. The free-text field is available by clicking the On hold button in the Work order operations (WOO) application. The field is mirrored in the Production work order (PWOD) application informing the planner that a started Work order operation (WOO) is on hold. |
Operation on hold to | An informational field that provides the date and time of when the operation will be available for production after being put on hold. The values are set in the On hold to field when clicking on the On hold button. The field is mirrored in the Production work order (PWOD) application and is used to inform the production planner. |
Has priority | Checking this box sets a star icon in the colored band in the top left area of application indicating that the current Work order operation (WOO) has been prioritized. |
Work order on hold reason | An informational field that provides the reason for why a Work order operation (WOO) has been put on hold and by whom, either by the company or customer. The value is derived from the selected option in the drop-down menu Reason. The drop-down menu is available by clicking the On hold button in the Work order operation (WOO) application. The field is mirrored in the Production work order (PWOD) application. The field is used to inform the planner or other operators why a started Work order operation (WOO) is on hold. The Work order on hold reason field will colored red, if the Work order operation (WOO) is put on hold. |
Work order on hold description | An informational field that provides an additional description for why a Work order operation (WOO) has been put on hold. The value is derived from the On hold reason free-text field. The free-text field is available by clicking the On hold button in the Production work order (PWOD) application. The field is mirrored in the Production work order (PWOD) application. The field is used to inform the resource why a started Work order operation (WOO) is on hold. |
Work order on hold to | An informational field that provides the date and time of when the work order operation will be available for production after being put on hold. The values are set in the On hold to field when clicking on the On hold button in the Production work order (PWOD) application. The field is mirrored in the Production work order (PWOD) application. The field is used to inform the resource. |
Previous operation product placement | An informational field that provides the location of Product (ART) during the previous operation. Examples are on a specific machine or in a production area. |
Product placement | An input field that can be used to provide the present location of the Product (ART). |
Operator | A drop-down menu where the current operator can be selected. This drop-down menu will only be available for Work order operations (WOO) where the Production resource (RESCONFIG) assigned is set to Allow multi operator. This is set in the Production resource (RESCONFIG) application, in the Settings area by selecting the Allow multi operator checkbox. When an operator is selected and the Work order operation (WOO) is started, an work log element starts counting worked time. If several operators have work log elements in Status 5 (Active), the Work order operation (WOO) can not be completed. The Operator drop-down menu will display date and time in the Work started at column, indicating that the work log element is started. All operators must pause their Work order operations (WOO) to allow completion of the Work order operation (WOO). |
Checkpoint | An informational field listing a checkpoint action, i.e. quality control. The Checkpoint field is related to the Approve button. If the actions taken in Work order operation (WOO) have met the requirements of the Checkpoint text, click the Approve button. The field is derived from the Production operation (OPR) application in the Settings area. Read more about the Production operations (OPR) application here. |
Version note | Displays the note attached to the version created in the Product (ART) by clicking the Structure button in the Production work order (PWOD) application and opening the KITDOC application. Notes can be added to a version by clicking the Add info icon, next to the Version field, in the KITDOC application. To improve readability of the content, click the Open note in popup icon icon, at the top right corner of the Note area. |
Operation note | Displays the note attached to the operation added to the structure in the Product (ART) application. From the Production work order (PWOD) application, by clicking the Structure button will open the KITDOC application. Operation note can be added to a version by clicking the Inspect info icon next to the listed operation. To improve readability of the content, click the Open note in popup icon icon, at the top right corner of the Note area. |
Note | An editable field where the operators can add and exchange relevant notes related to the current operation. The user can type directly into the Note area or open the Note popup. To improve readability of the content, click the Open note in popup icon icon, at the top right corner of the Note area. After adding intended input, click the Save and close button to save the changes. |
The Set production resource condition popup
The user can flag the condition of the Production resources (RESCONFIG) by clicking the Set production resource condition icon next to the Production resource field, which will open the corresponding popup.
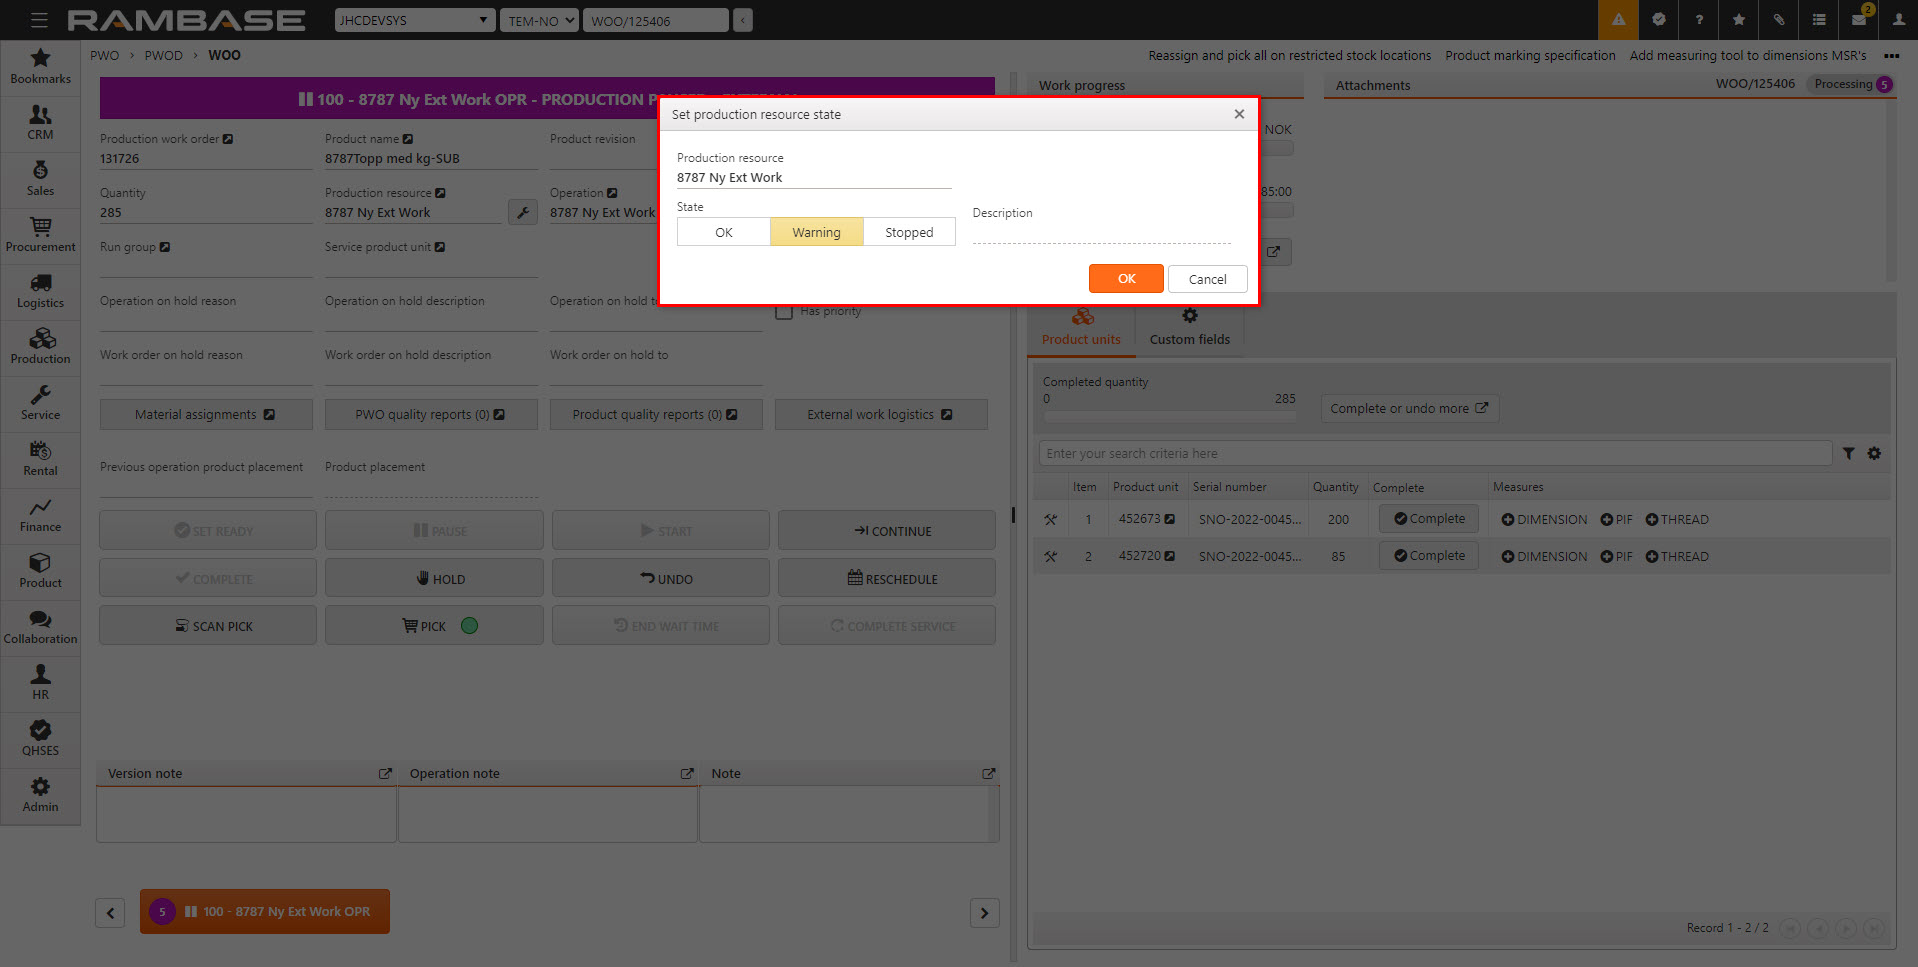
This can be used to flag Production resources (RESCONFIG) for maintenance or inform the planner that the machine has stopped. Setting the resource condition will only visually flag, and not limit any functions of the Production resource (RESCONFIG).
Fields/buttons | Description |
|---|---|
Production resource field | An informational field displaying the name of the Production resource (RESCONFIG). The name is set when creating a new resource in the Production resources (RESCONFIG). Read more about Production resources (RESCONFIG) here. |
Condition buttons |
|
The set resource condition will be displayed, with an icon or a banner with the optional note, in the following applications:
Distribute work order operations from resource group to member resources (DWOO) application - An icon in the Member resources area, in the Name column.
List of work order operations for production resource category (RECWOO) application - As an icon in the Resource column.
Operators list of production work order operations (RWOO) application - As a banner in the header.
Production resources (RESCONFIG) application - As a banner in the Production resource details area.
Production resource capacity and load overview (RCL) application - As an icon in the Name column.
Functions in the work space
The table below describes the functions in the work space.
Functions/Buttons | Description |
|---|---|
Material assignments | The Material assignments button is used to open the linked Production work order assignments (PWOSARLINKS) application. The Production work order assignments (PWOSARLINKS) application details the assigned links between the Productinon work order (PWO) and the stock or supplier backlog. |
PWO quality reports (#) | The PWO quality reports (#) button opens the Quality report archive (QAR) application. The Quality Assurance Report archive (QAR) contains reports on quality deviations and actions taken to improve the overall productivity and service quality. |
Product quality reports (#) | The Product quality reports (#) button opens the Quality report archive (QAR) application. The Quality Assurance Report archive (QAR) contains reports on quality deviations and actions taken to improve the overall production quality. Read more about the Quality report archive (QAR) here. The Quality report archive menu (QAR) - experience data provides information on whether a Quality report (QAR) has previously been created for the specific Product (ART). |
External work logistics | The External work logistics button opens the External work logistics (EXTWORKINFO) application. The External work logistics (EXTWORKINFO) application shows all the purchase and logistics details for the Operation (OPR), the Purchase orders (SPO), Supplier returns (SRT), the received quantity and information about the previous and next Operations (OPR) and the scheduled dates for those Operations (OPR). Read more about External work operation handling and logistics here. |
Set ready | The Set ready button is used when external work is involved in the Work order operation (WOO). When the external work has been completed, click the Set ready button. Read more about external work here. |
Pause | Clicking the Pause button will momentarily stop the Work order operation (WOO), including stopping counting of work time. This function is useful in case of machine breakdown or pending other unforeseen event or even a break. |
Start | Clicking the Start button will set the Work order operation (WOO) from Status 3 (ready to start) to Status 5 (Processing). The following functions will be available:
The work time will also start counting as evident in the Work time area in the lower right corner. |
Continue | Clicking the Continue button will continue the counting of work time and allow the same actions as starting the Work order operation (WOO). |
Complete | Clicking the Complete button will set the Work order operation (WOO) in Status 9 (Completed). The following functions will be available:
|
On hold | Clicking the On hold button will halt the Work order operation (WOO) and notify the planner via Production work order (PWOD) application. The Work order operation (WOO) must first be paused, before it can be put On hold. The following fields will be available to detail the halt:
|
Undo | To undo an action, click the Undo button. If picking is initialized, the Undo button will generate an error message. To undo an action after picking is initialized, click the Pick button, and click the Undo initiate pick button. The Undo function will then be available. |
Reschedule | Clicking the Reschedule button will open a popup where the following fields can be used to reschedule the Work order operation (WOO):
Rescheduling a Work order operation (WOO) will generate a system notification in planners Product work order (PWOD) application. |
Scan pick | Click the Scan pick button to pick parts for the Work order operation (WOO) by scanning using a handheld terminal. |
Pick | The Pick button will indicate the state of the picking:
Click the Pick button to open the Pick list details (PICK) application. From the Pick list details (PICK) application the following options are available from the header:
|
End wait time | Click the End wait time button, to end the current waiting period set in the KITDOCof the Product (ART), in the QueueTime field. This option is used for Products (ART) requiring wait time in Work order operation (WOO) process. Examples are drying of paint or glue. Click here to learn more about KITDOC and how production structures can be modified. |
Complete service | Click the Complete service button to complete Work order operations (WOO) with operation type service. The button is available when the Work order operation (WOO) is in Status 9 (Completed). Click there to learn more about service in RamBase. |
Approve | The Approve button is related to the Checkpoint field. If the actions taken in Work order operation (WOO) have met the requirements of the Checkpoint text, click the Approve button. The field is derived from the Production operation (OPR) application in the Settings area. Read more about the Production operations (OPR) application here. |
Forward to goods reception | Click the Forward to goods reception button to forward the completed Work order operations (WOO) to a stock location. To specify the stock location, click the Select stock location drop-down menu and select the intended location, then click the Forward to goods reception button.
|
Reopen | Click the Reopen button to open the Reopen work order operation popup. Select a reopen reason, either; Choose from existing or Create a reason. Selecting Choose from existing will display the Reopen reason drop-down menu. Select a reason from the list. Selecting the Create a reason option will display the New reopen reason field where the user can type a reason. Clicking the OK button to set the Work order operation (WOO) in Status 7.
|
The details area
Work progress area
The Work progress area gives a time and cost overview for the current Work order operation (WOO). The following fields and functions are available:
Today production resource usage - displays either today's resource usage based on turnover, or time. The information displayed can be edited in the Company settings (CSV) by the setting Resource usage gauge type in WOO application.
Total manhours - displays the total of manhours worked on the current Work order operation (WOO).
Worktime
The Worklog button - Opens the Work order operation worklog popup. Read more about the Production work order worklog (PWOWL) here.
The Product units tab
The Product units tab displays the product units to be produced and relevant information for the Work order operation (WOO). The header displays a progress bar visualizing the progress of the completion of the Product units. It also includes a Complete/Undo more button which is useful in handling the Product units (LCM) efficiently. Product units can be searched for by using the Enter your search here field. Custom filters for searching, can also be built by clicking the Filter builder icon. To customize the viewed columns, click the Column settings icon and check the intended checkboxes.
Header
Header
Description
Completed quantity - progress bar
The progress of Work order operation (WOO) visualized by a progress bar. Completing a Product unit (LCM) can impact the progress bar differently as a batch Product unit (LCM) will have a different quantity than a unit Product unit (LCM), that will always be 1.
Complete/undo more - button
Clicking the Complete/undo more button will open the corresponding popup. Use it to efficiently switch between operators and handle multiple Product units (LCM) at once.
Product units tab - list
Column
Description
Item
Displays the item number for the product unit. For example, if there are 10 units to be produced, there will be listed 10 product units with the Item numbers 1 to 10.
Product unit
Lists the Product unit (LCM) number for the individual product unit. Click the View icon to open the Product unit (LCM) application. Read more about Product unit (LCM) here.
Marking of a Product unit (LCM) is done by clicking the View icon and from the Product unit (LCM) application type the intended marking in the Marking input field in the header.
To view rules or templates for how a Product unit (LCM) should be marked, click on the Product marking option in the Context menu.
Serial number
Displays the serial number on the individual product unit. Editable via the Product unit (LCM) application.
Quantity
An informational field that displays the number of units being produced in that Product unit (LCM). For unit Production work orders (PWO) the quantity will always be 1, for each Product unit (LCM).
For batch productions, if the Is manufactured in batches option is checked in the Production work order (PWOD) application, the quantity column will be relevant.
Complete
Click the Complete button to mark the individual product unit as complete.
Measures
Displays the available measurements to be checked for the individual product unit.
Dimension
PIF
Thread
Click the intended button to open the related application and add the relevant measurements.
Finished at
Displays the date and time the Product unit (LCM) was completed.
Finished by
Displays the name of the operator who finished the Product unit (LCM).
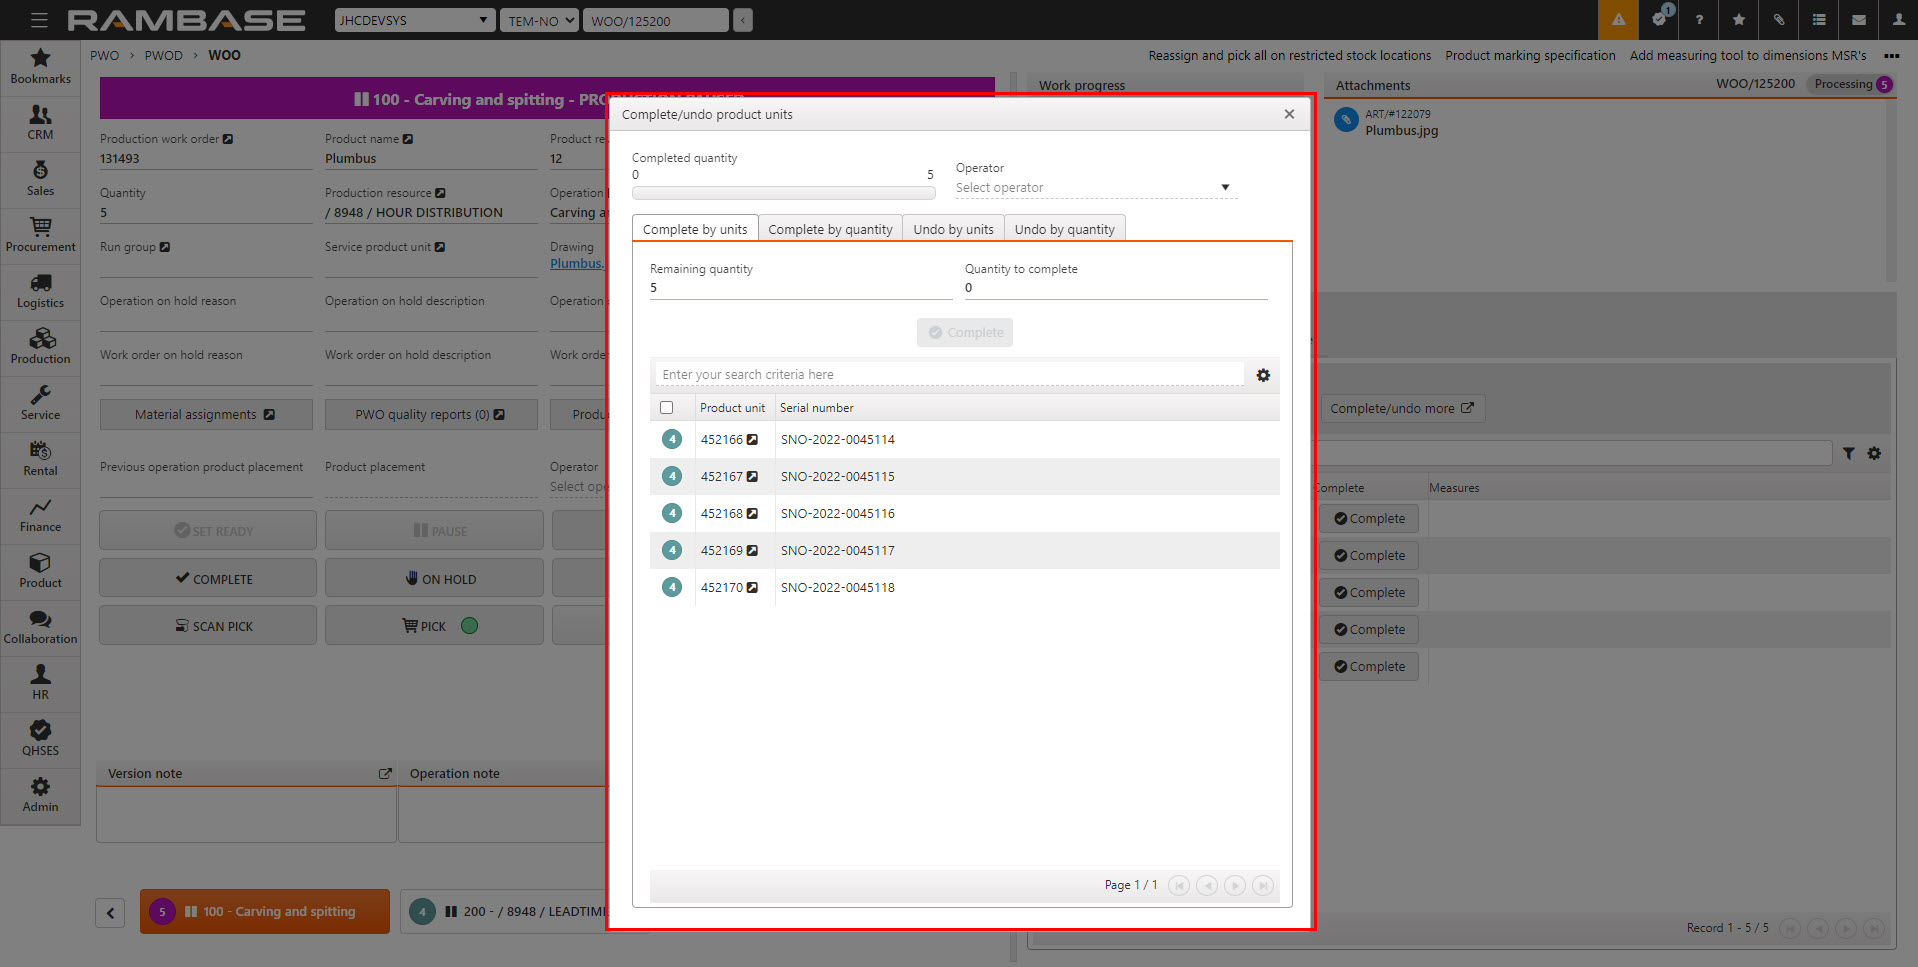
The Complete/undo product units popup
From the Work order operation (WOO) application, click on the Complete/undo more button in the Product units tab to efficiently select and complete Product units (LCM). The tables below describe the popup in detail.
Header
Fields and columns
Description
Completed quantity - Progress bar
The progress of Work order operation (WOO) visualized by a progress bar. Completing a Product unit (LCM) can impact the progress bar differently as a batch Product unit (LCM) will have a different quantity than a unit Product unit (LCM), that will always be 1.
Operator - drop-down menu
Click the Operator drop-down menu to select which operator is completing the Product unit (LCM).
This drop-down menu will only be available for Work order operations (WOO) where the Production resource (RESCONFIG) assigned is set to Allow multi operator. This is set in the Production resource (RESCONFIG) application, in the Settings area by selecting the Allow multi operator checkbox.
Complete by units tab
Lists Product units (LCM) to be completed. Select or search for individual or multiple Product units (LCM) and efficiently complete them. Use the Column settings to select which columns are displayed in the list.
Icon
Fields, buttons and columns
Description
Remaining quantity field
An informational field that displays the total remaining quantity of the Work order operation (WOO).
Quantity to complete - field
The number of selected Product units (LCM) in the Complete by units list, by selecting all by clicking the top most checkbox or clicking the Status icon of the intended Product units (LCM).
Complete - button
Flag the selected Product units (LCM) as completed by clicking the Complete button. Note that the Quantity to complete field displays the quantity selected, and the Remaining quantity field reflects the completion by subtracting the completed Product units (LCM).

The Status icon indicates the status of Product unit (LCM). Click the intended Status icons to select one or several Product units (LCM). Click the checkbox in the top most column to select all Product units (LCM). Note that the Quantity to complete field lists the numbers of selected Product units (LCM).
After selecting the intended Product units (LCM), click the Complete button to flag the Product units (LCM) as completed. Note that the Remaining quantity field reflects the change by subtracting the completed Product units (LCM).

Product unit
Lists the Product unit (LCM) number for the individual product unit. Click the View icon to open the Product unit (LCM) application. Read more about Product unit (LCM) here.
Serial number
Displays the serial number on the individual product unit. Editable via the Product unit (LCM) application.
Quantity
An informational field that displays the number of units being produced. For unit Production work orders (PWO) the quantity will always be 1, for each Product unit (LCM). Therefore the quantity column is deselected in the Column settings by default for unit productions.
For batch productions, if the Is manufactured in batches option is checked in the Production work order (PWOD) application, the quantity column will be relevant.

Radio buttons
Used to navigate the Product unit (LCM) list.
Complete by quantity tab
Used to input the intended quantity to be completed.
Fields and buttons
Description
Remaining quantity (max) - field
An informational field that displays the quantity yet to be completed. This the maximum quantity that can be typed in the Quantity to complete field.
Quantity to complete - field
An input field that is used to specify the quantity to be completed. Type the intended quantity to complete in the field or click the Arrows. Click the Complete button to flag the Product units (LCM) as completed. Note that the quantity in the Remaining quantity (max) field will decrease with the quantity being completed. The Product units (LCM) will be completed in the order of Item number displayed in the Product unit list.
Undo by units tab
Lists completed Product units (LCM). Used to flag completed Product units (LCM) as undone.
Icon
Fields, buttons and columns
Description
Completed quantity field
An informational field that displays the total quantity of the Work order operation (WOO), completed.
Quantity to undo - field
The number of selected Product units (LCM) in the Complete by units list, by selecting all by clicking the top most checkbox or clicking the Status icon of the intended Product units (LCM).
Undo - button
Flag the selected Product units (LCM) as completed by clicking the Complete button. Note that the Quantity to complete field displays the quantity selected, and the Remaining quantity field reflects the completion by subtracting the completed Product units (LCM).
The Status icon indicates the status of Product unit (LCM). Click the intended Status icons to select one or several Product units (LCM). Click the checkbox in the top most column to select all Product units (LCM) in the list. Note that the Quantity to undo field lists the numbers of selected Product units (LCM).
After selecting the intended Product units (LCM), click the Undo button to flag the Product units (LCM) as uncompleted. Note that the Completed quantity field reflects the change by subtracting the Product units (LCM) undone.
Product unit
Lists the Product unit (LCM) number for the individual product unit. Click the View icon to open the Product unit (LCM) application. Read more about Product unit (LCM) here.
Serial number
Displays the serial number on the individual product unit. Editable via the Product unit (LCM) application.
Quantity
An informational field that displays the number of units being produced in that Product unit (LCM). For unit Production work orders (PWO) the quantity will always be 1, for each Product unit (LCM).
For batch productions, if the Is manufactured in batches option is checked in the Production work order (PWOD) application, the quantity column will be relevant.
Finished at
Displays the date and time the Product unit (LCM) was completed.
Finished by
Displays the name of the operator who finished the Product unit (LCM).
Radio buttons
Used to navigate the completed Product unit (LCM) list.
Undo by quantity tab
Used to input the intended quantity to be flagged as undone.
Fields and buttons
Description
Completed quantity (max) - field
An informational field that displays the quantity yet to be completed. This the maximum quantity that can be typed in the Quantity to undo field.
Quantity to undo - field
An input field that is used to specify the quantity to be undone. Type the intended quantity to be flagged as undone in the field, or click the Arrows. Click the Undone button to flag the Product units (LCM) as completed. Note that the quantity in the Completed quantity (max) field will decrease with the quantity being completed.
The Materials tab
The Materials tab is an overview over the list of materials in the Product structure (KITDOC) of the Production work order (PWOD). Products can be searched for by using the Enter your search criteria here field.
Parts can be added to the Product structure (KITDOC) by using the Add new product button.
Parts can be added to the Product structure (KITDOC) by scanning the Goods reception item (SSAITEM).
Parts can be removed from the Product structure (KITDOC) by clicking the Remove icon in Actions column.
Custom filters for searching, can also be built by clicking the Filter builder icon. To customize the viewed columns, click the Column settings icon and check the intended checkboxes.
The Company setting (CSV), View Structure Tab in WOO app, must be turned on to be able to see the Materials tab in the Work order operation (WOO) application.
Search field - The Search field can be used to search for specific materials, being used in the operation. Click the Search field and press SPACEBAR to list all the available parameters to search on, including, but not limited to PickStatus, ProductId, ProductName.
Filter builder icon - Click the filter builder to list the available standard filters Pick process completed, Pick process initialized and Pick process not started. The user can also Create custom filters by selecting Field + Operator + Value and clicking the Save filter button. The saved filter will be save in the My saved filters area in the Filter builder popup.
Column settings icon - To select which information is displayed, click on the Column settings icon and hover over Columns. Then select the intended columns. The selection of data can be exported to Excel via the Export to excel option in the Column settings. The Reset to default view is also useful in resetting column width and placement, since columns can be dragged and dropped to suit the user. A description of the columns are listed in the table below.
Columns | Icons | Description |
|---|---|---|
Item | Displays the identifier of the item in Product structure (KITDOC) | |
Product | Displays the name of the Product (ART) used as a material in the operation. Click the View icon to open the Product (ART) application to view and edit details. | |
ProductId | Displays the Product (ART) identifier. | |
Revision | If a Product structure (KITART) has multiple revisions, the current revision name will be displayed. | |
Type |
| Displays an icon indicating which type of material the Product (ART), is. Examples are P - part, M - material, K - Product structure. |
Assignments |
| The Assignments column displays the Stock assignments production order kit item (SARK) icon. Click the icon to view the linking of the material, or even relink. |
Unit qty | Material quantity to be used for each product unit. | |
Total qty | The total/planned material quantity needed to perform the work order operation. | |
Picked qty | Quantity that has been picked by the operator. | |
Pick status |
| Picking completed - Will be displayed next to products where the Total qty has been picked |
| Picking not started - Will be displayed next to products where picking has not been initiated. | |
| Picking in progress - Will be displayed next to products where picking has been initiated, but not completed. | |
Actions |
| Click the View icon to open the Pick (PICK) application where the user can pick materials for the selected Product (ART). The Pick (PICK) application will filter on the selected Product (ART). |
| Click the Remove icon to remove the product from the Product structure (KITDOC). |


Add new product button - Click the Add new product button to open a popup with the following options:
Part dropdown - Click the Part dropdown to select a part to be added from the list. Click the Filter builder icon to list available predefined filters for quick filtering.
Add by goods reception item field - A Goods reception item (SSAITEM) can be scanned to add a part to the Product structure (KITDOC).
Note
This will only use the Goods reception item (SSAITEM) as a reference to identify the Product identifier (KITART). Parts will only be added to the Production structure (KITDOC).
Quantity per unit field - Type the quantity of parts to be added to each Product unit (LCM).
Create button - Click to create and add the selected part to the Product structure (KITDOC).
Cancel button - Click to cancel the addition of the part.
The Attachments tab
The related files and notes for the Work order operation (WOO) are listed in the Attachments tab.
The use can click; the icons to preview or download attachments, the buttons to filter the list on their source, or hover over the Information icon to displays further file and source information.
To filter the list on a specific source, the user can click the buttons. The user can also filter the list on File types (FIT).
All button - The list will display all related attachments for the Work order operation (WOO).
Work order button - The list will be filtered on attachments from the Production work order (PWO).
Product unit button - The list will be filtered on attachments from the Product unit (LCM).
Product structure button - The list will be filtered on attachments from the Production structure (KITDOC).
Operation - The list will be filtered on attachments from the Operation (OPR).
Product button - The list will be filtered on attachments from the Product (ART).
Type dropdown menu - To filter the list on a File type (FIT), click the Type dropdown menu and select a file type.
Columns | Icons | Description |
|---|---|---|
| The icons represent the file extension. To preview the file, click the icon. If the attachment is a note created in RamBase, clicking the icon will open the note in the Note (NOTE) application where the user can create new notes, add tags or even delete notes. | |
To download a file locally, click the Download icon. | ||
Type | Displays the file type defined in the File types (FIT) application. Read more about the File types (FIT) application here. | |
Document | Displays the document name which is a combination of a text noting if it is uploaded or created in RamBase, and the file name. Examples: Filename: Drawing of kit.jpeg or Note: Setup note for the operator. | |
| An informational icon which can be hovered over to display further details on the attachment and its source, including the source identifier. Example: ART/#123456 | |
Rev | A file can be revised in the File manager (FILEMANAGERAPI). This column displays the current revision name. | |
Source | Displays the abbreviation of the application where the attachment was created or uploaded. Examples: ART, PWO, KIT |


The Custom fields tab
Read more here to learn how to add Custom fields (CUSTOMFIELDS).
Context menu options
The context menu options are found in the top right corner by clicking the Context menu icon. The available options are listed below.
Option | Description |
|---|---|
Click to open the Print popup where the user can view which documents can sent or printed. | |
View document requirements (F6) | This action will open the View document requirements popup where the user can view if there are document requirements for the Product unit (LCM). The popup will display:
|
Reassign and pick all on restricted stock location | This action will pick all needed parts from the Location (LOC). The result of the picking can be verified checking the color of the icon on the Pick button. Read more in the Efficient work flow - Reassign and pick all on restricted stock location section below. |
Product marking specification | This action will open the Product marking specification popup where the user can enter Product marking rules or templates describing how the Product units (LCM) should be marked. Roles that allow editing this input are usually Production managers and Production planners. The Roles with this permission can be viewed in the Permissions (PRM) application. Related Permissions (PRM):
Note that the Product marking specification input field is mirrored in the Production work order (PWO) and the Work order operations (WOO) applications. Meaning that changing one, will update the other. |
Add measuring tool to dimensions MSR's | This action will open the Select measuring tool where the user can add measuring tool to be used for measuring the Product unit (LCM) from the Product unit tab. |
View details | This option will open the Work order operation details (WOODETAILS) application where information on operation and resources, planned time, accrued time, planning and work progress can be viewed. |
Settings relevant for the Work order operation (WOO) application
An overview of related settings for production can be found here.
Setting | Description |
|---|---|
Allow Continuous Work Order Delivery To Stock | Allow Delivery to stock from Work order operations (WOO) where only part of the quantity has been completed. |
View Structure Tab in WOO app | If ON - Structure tab will show in WOO application. |