[en] Automated bank statement reconciliation (BST)
[en] The Bank statement (BST) application lists all bank statement documents. These documents are based on the files imported from the bank(s).
[en] From the Bank statement (BST) application, you may import bank statement files from a bank and initiate an automated bank reconciliation. The reconciliation will be performed automatically on a regular basis if the Company setting (CSV) ‘Reconcile bank statement automatic’ is activated. Manual bank reconciliation can be initiated from each Bank statements (BST) document in Status 2 or from the Bank statement (BST) menu.
[en] To go to Bank statement (BST) enter Finance, then Cash management and then Bank statements.
[en] Importing a bank statement file manually
[en] Start in the Bank statement (BST) application.
[en] Click the Import bank statement... option in the Context menu.
[en] Choose a format.
[en] Click the Next button
[en] Click the Select file button and browse to the bank statement file. Click the Upload button and a progress bar will appear.
[en] When the import is finished, one or several Bank statement (BST) documents are created One Bank statement (BST) document is created for each transaction date. All transactions on the same date will appear as items on the relevant Bank statement (BST) document. The generated Bank statement (BST) documents will be listed in Status 2. This means that is and are ready for reconciliation. If the Bank statement (BST) document is listed in Status 1, there is a deviation. The deviation is typically between closing and opening balance between two dates or if the sum of Bank statement (BST) item does not match the sum of opening balance - closing balance for that specific Bank statement (BST).
[en] Import bank statements from bank integration manually
[en] The company using RamBase must have the bank integration active to import bank statements from bank integration manually.
[en] Click the Import bank statement from bank integration... option in the Context menu.
[en] Fill out Bank account, From date, To date fields in the popup.
[en] Click Confirm. When import job is finished, one or several Bank statements (BST) in Status 1 is created.
[en] When the import is finished, one or several Bank statement (BST) documents are created in Status 1. One Bank statement (BST) document is made for each transaction date. All transactions on the same date will appear as items on the relevant Bank statement (BST) document. The generated Bank statement (BST) documents will be listed in Status 1 until the opening and closing balance for the Bank statement (BST) is imported. When the opening and closing balance are imported, the Bank statement (BST) will be listed in Status 2. Bank statement (BST) in Status 2 means that it is ready for reconciliation. If the Bank statements (BST) documents remain in Status 1 after having imported the opening and closing balance, there is a deviation. The deviation is typically between closing and opening balance between two dates or if the sum of Bank statement (BST) item does not match the sum of opening balance-closing balance for that specific Bank statement (BST).
[en] Import bank balances from bank integration
[en] The company using RamBase must have the bank integration active to import bank balances from bank integration manually.
[en] This will happen automatically, but it is possible to trigger it if you want to start the job manually.
[en] Start in the Bank statement (BST) application
[en] Mark the Bank statement (BST) in Status 1 and click the Context menu and choose the Import bank balances from bank integration option.
[en] The Bank statement (BST) document will be listed with Status 2 after the import is done. Bank statement (BST) in Status 2 means that it is ready for reconciliation. If the Bank statements (BST) document remains in Status 1 after having imported the opening and closing balance, there is a deviation. The deviation is typically between closing and opening balance between two dates or if the sum of Bank statement (BST) item does not match the sum of opening balance-closing balance for that specific Bank statement (BST).
[en] Start a bank reconciliation
[en] From the Bank statement (BST) application, you may initiate a bank reconciliation. The reconciliation will be performed automatically on a regular basis if the Company setting (CSV) ‘Reconcile bank statement automatic’ is activated.
[en] Manual bank reconciliation can be triggered from each Bank statements (BST) document in Status 2 by clicking the Reconcile this bank statement… option or from the Bank statement (BST) menu.
[en] Start in the Bank statement (BST) application.
[en] Open the Context menu and click on the Start bank statement reconciliation job option. The reconciliation tries to match the bank transactions in the Bank statement (BST) against the Payment (PAY) documents registered in RamBase.
[en] If RamBase finds a match between a Bank statement (BST) item and a Payment (PAY) document, the Bank statement (BST) item will be put to Status 8. When all Bank statement (BST) items in one BST have a match against a Payment (PAY) document, the Bank statement (BST) will be set to Status 8. A Bank statement (BST) document in Status 8 can be confirmed as reconciled to Status 9 which is typically done at month end.
[en] If RamBase finds a partial match, that is a match with minor deviations, the Bank statement (BST) item is put to Status 3.
[en] If RamBase does not find a match, the Bank statement (BST) item is put to Status 2.
[en] Bank statement (BST) documents in Status 1 indicates a deviation. The deviation is typically between closing and opening balance between two dates or if the sum of Bank statement (BST) item does not match the sum of opening balance-closing balance for that specific Bank statement (BST).
[en] Reconcile an unmatched transaction (Status 2)
[en] Start in the Bank statement (BST) application.
[en] Select a Bank statement (BST) document in Status 2.
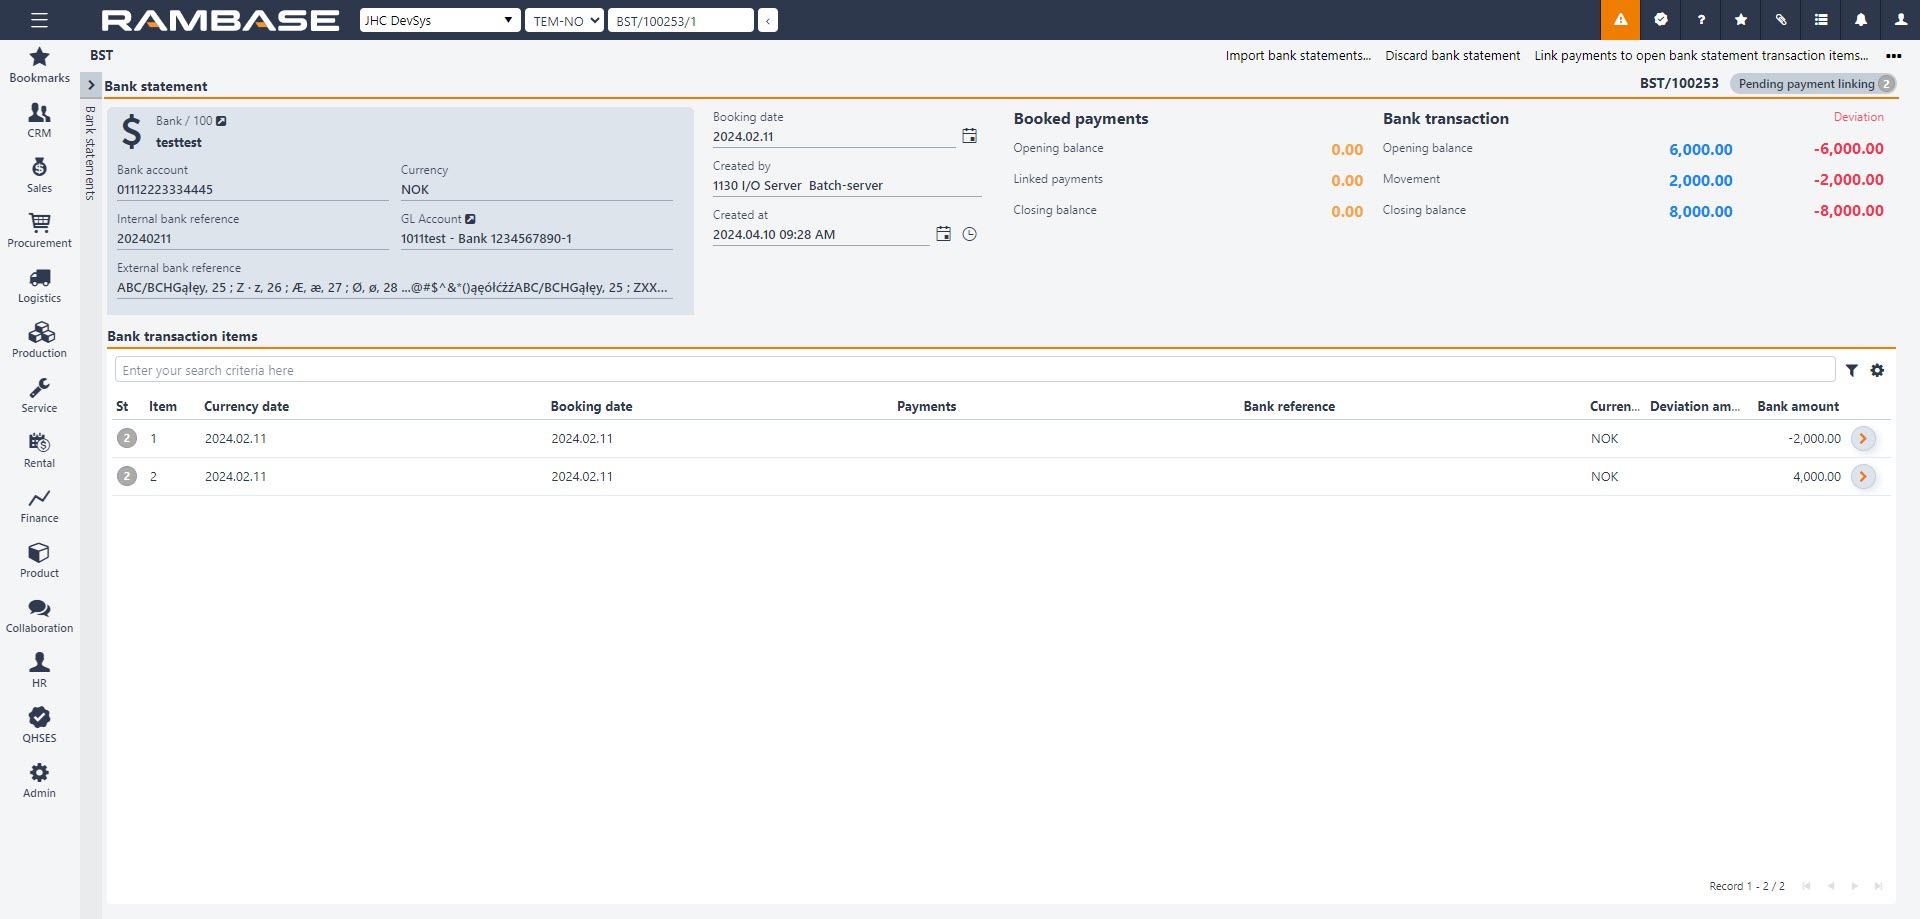
[en] On the Bank Transaction item lines, all transactions for that specific date Bank statement (BST) items will be listed. The list is sorted by status code, putting transactions with Status 2 on top.
[en] Select an unmatched transaction Status 2.
[en] Click on the Arrow symbol. The Bank Statement Line popup will appear.
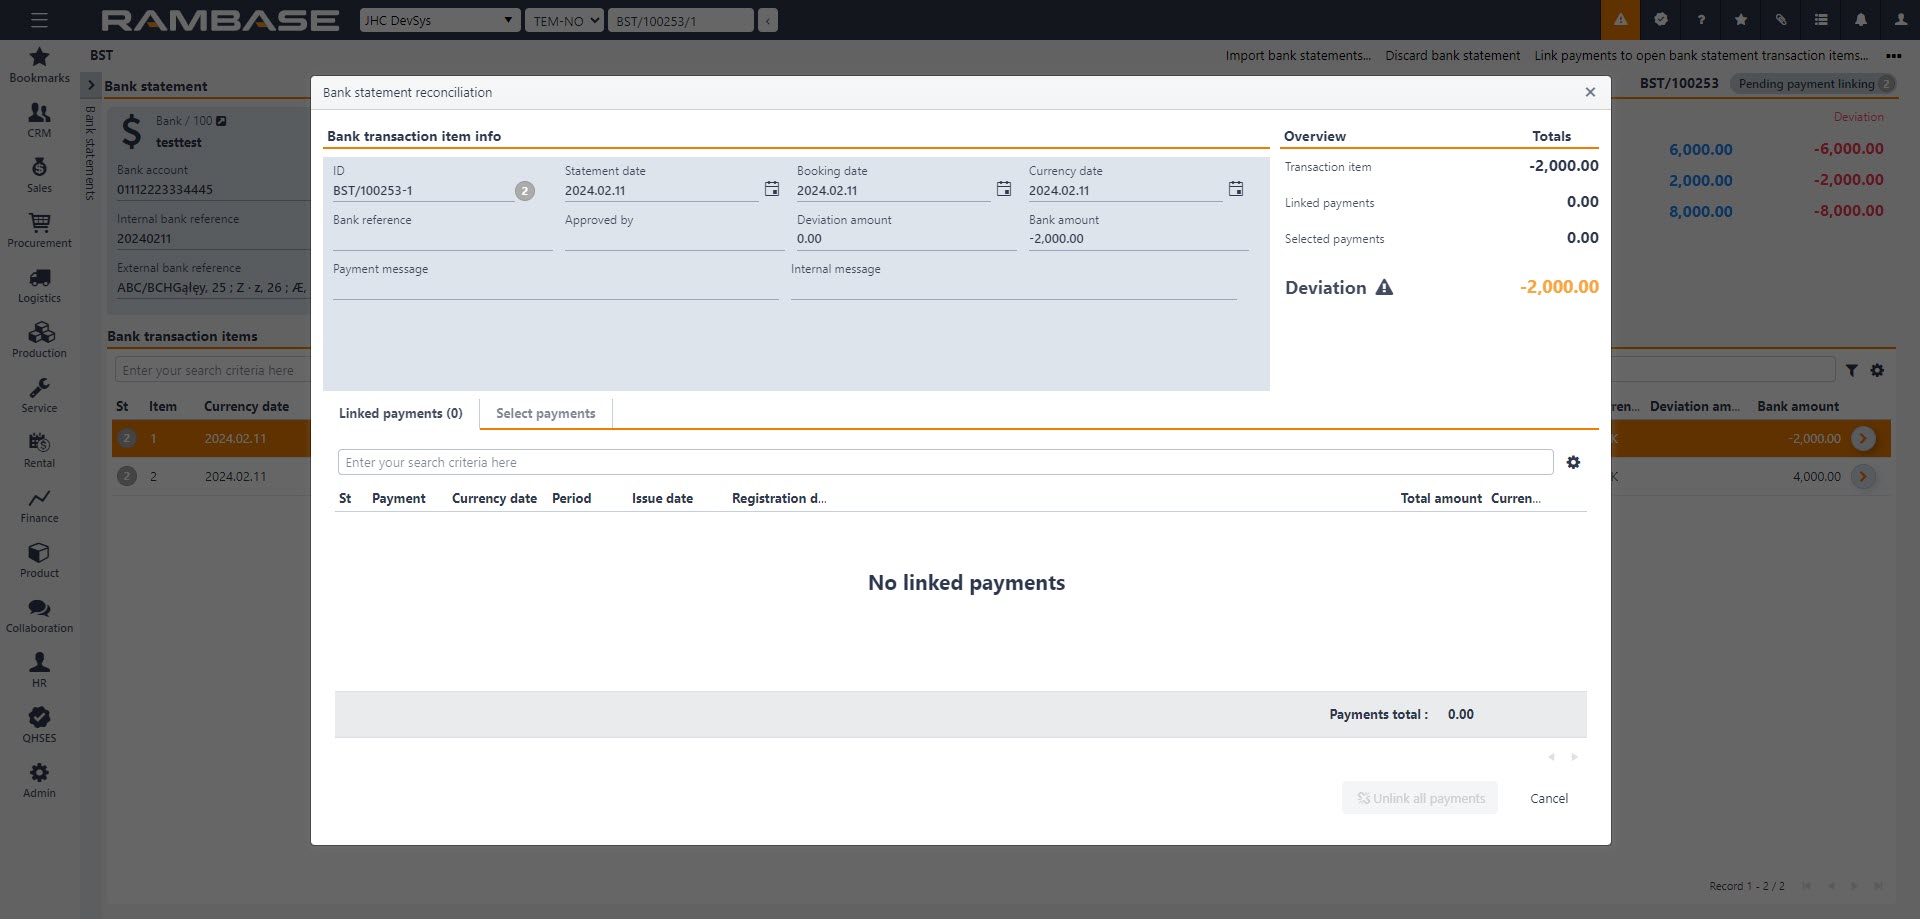
[en] The Linked Payments section displays Payment (PAY) documents that correspond to the Bank statement (BST) item.
[en] In the Select Payments section, users have two options:
[en] Users can initiate the selection process by clicking on the relevant status symbol associated with each Payment (PAY) document and then click on Link selected to BST item.
[en] Alternatively, users can utilize the filter options to refine their search, and then click on Link filtered payments to BST item to link all displayed payments to the Bank statement (BST) item. It opens a popup with the numbers of Payment (PAY) that will be linked.
[en] Note the default value in the Date from and Date to fields. Change them if necessary. Users may also use the Amount (minimum) and Amount (maximum) fields to limit the number of possible documents.
[en] Create a Payment (PAY) directly from a Bank statement (BST) document
[en] If no Payment (PAY) document matches, a payment has not been registered yet. If so, you can create a payment manually or follow this procedure:
[en] Click on the Arrow icon in the Bank statement (BST) item and select the Select payment tab.
[en] Click the Create new Payment button. A Payment (PAY) document in Status 1 is created.
[en] Check the payment information and make necessary changes.
[en] Use the Context menu on the Payment (PAY) and click on the Register Payment option.
[en] Reconcile a partial matched transaction (Status 3)
[en] Start in the Bank statement (BST) application.
[en] Select a Bank statement (BST) document in Status 3.
[en] Press ENTER. All transactions for that specific date will be listed. The list is sorted by status code, putting transactions with Status 3 on top.
[en] Select a partial matched transaction.
[en] Click on the Arrow symbol. The Bank Statement reconciliation popup will appear.
[en] Inspect the invoice, the bank statement, and the Payment (PAY) document, and compare the amounts.
[en] If the deviation is due to errors when entering the Payment (PAY) document manually, do as follow:
[en] Click on the Unlink this payment button on the line of the incorrect Payment (PAY) document/documents. The Payment (PAY) is no longer linked to the BST.
[en] Make corrections on the Payment (PAY) and make sure to register the Payment (PAY) to Status 4 after the correction.
[en] Go back to the Bank statement (BST) and enter the BST item. Link the corrected Payment (PAY) to the BST item manually or use the menu option Reconcile this bank statement for linking the corrected Payment (PAY) to the Bank statement (BST) item.
[en] If there exists a deviation between the Bank statement (BST) item and the Payment (PAY) and if it’s not possible to correct the Payment (PAY), the Bank statement (BST) item remains in Status 3. The Bank statement (BST) item then must be approved. By highlighting the Bank statement (BST) item, using the Context menu and clicking on the Approve bank statement item option, the Bank statement (BST) item will be forwarded from Status 3 to Status 4.
[en] If there are more Bank statement (BST) items in Status 3 on the same BST, the Bank statement (BST) remains in Status 3. Repeat the procedure until all Bank statement (BST) items in Status 3 are reconciled. All Bank statements (BST) items and the Bank statements (BST) document will be put to Status 8 when the last Bank statement (BST) item is reconciled.
[en] Confirm bank statement to Status 9
[en] To complete the bank reconciliation, the Bank statements (BST) must be confirmed to Status 9. There are two ways of doing it; either confirming all Bank statements (BST) for one bank at the same time or confirming each Bank statement (BST) document individually.
[en] Before confirming the Bank statements (BST) to Status 9, the closing balance of the Bank statement (BST) of the last day of the month should be reconciled against the balance of the connected General Ledger account (ACC) for that specific accounting period.
[en] Also, it is recommended to make sure that there are no unreconciled Payments (PAY) in Status 4, for the given accounting period and for the given bank account which is not linked to a Bank statement (BST). If there exists such a Payment (PAY), investigate why it is not linked to a Bank statement (BST) and/or if it is a duplicate.
[en] Confirm a single bank statement
[en] Start in the Bank statement (BST) application.
[en] Select a Bank statement (BST) document in Status 8.
[en] Click on the Context menu and choose the Confirm Bank Statement option.
[en] Confirm all bank statements for one bank
[en] Start in the Bank statement (BST) application.
[en] Click on the Context menu and choose the Confirm Bank Statements based on bank account and date option to confirm multiple bank statements for one bank with the To date field filled.
[en] When a Bank statement (BST) document is confirmed to Status 9, the connected Payment (PAY) document will be put to Status 9. This indicates that it is reconciled and there is no need for further handling.
[en] Bank statement item missing on the BST causing deviation
[en] If there is a deviation between the value in the Movement field in the Bank transaction-section and the total amount of the item lines, the Bank statement (BST) document will be in Status 1, and you will not be allowed to proceed.
[en] If this deviation depends on a BST item missing on the Bank statement (BST) compared to the bank statement in the online bank, Click the Context menu and select the Create new item from deviation amount option.
[en] A new Bank statement (BST) item line with the amount of the deviation will be created. The Bank statement (BST) document will be in Status 2, and you can continue the bank reconciliation procedure.