[en] Subscription
[en] The subscription module is a modernize way of managing subscriptions in RamBase and is a part of Rental 2.
[en] To be able to create a subscription item (ART), Standard recurring prices (ASP), Sales orders (COA) and Sales quotes (CQU) with subscription items and Recurring invoice plan (RNP) the Rental module must be activated in your company and the CSV settings: Allow creating subscriptions items, Auto-renewable subscription, and Default change of price for subscription items must be turned on.
[en] You will also need the required roles.
[en] Create a subscription product
[en] A Product (ART) is a product which is available for sale or purchase. The ART application contains information about all the products handled by RamBase, including some special products i.e., to record travel expenses. Special products are separated from ordinary products by means of classification.
[en] To open the Product (ART) application, find Product in the RamBase menu and then Product management. Click Products to enter the ART application. Or write ART in the Program filed and click enter.
[en] All products created are listed in the left view while information about the selected item can be seen to the right.
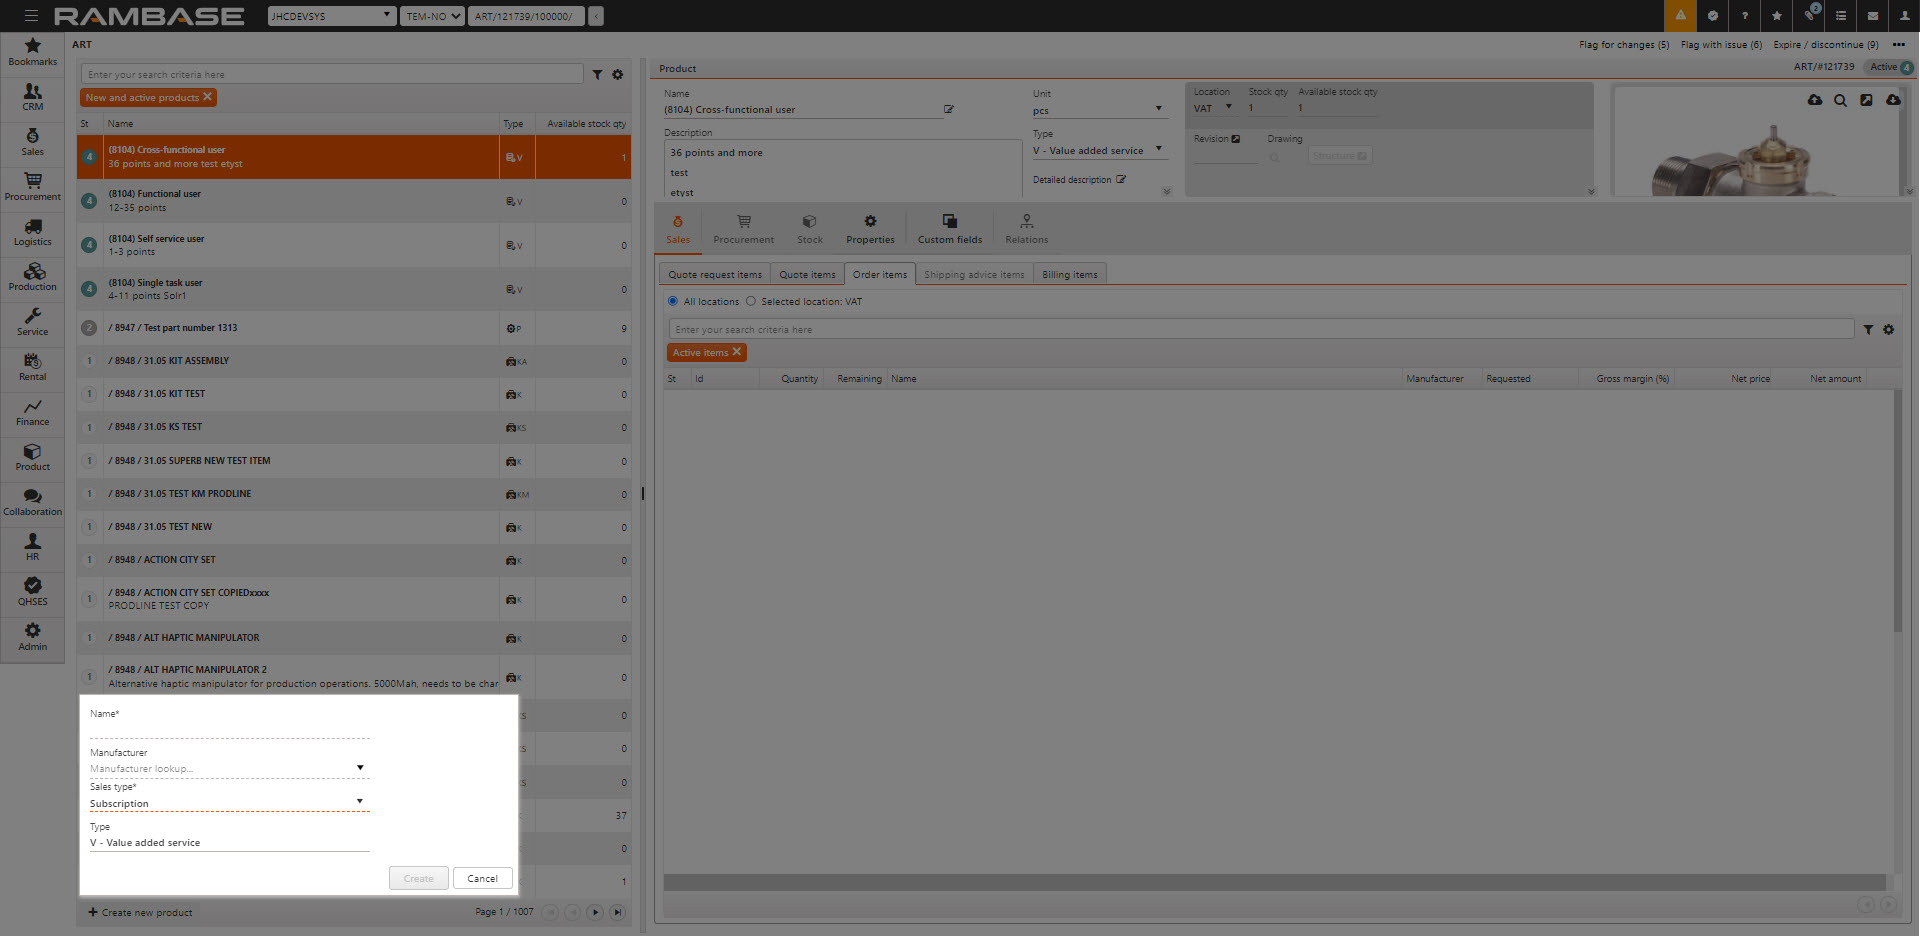
[en] To create a new subscription item click the Create new product button in the lower left corner.
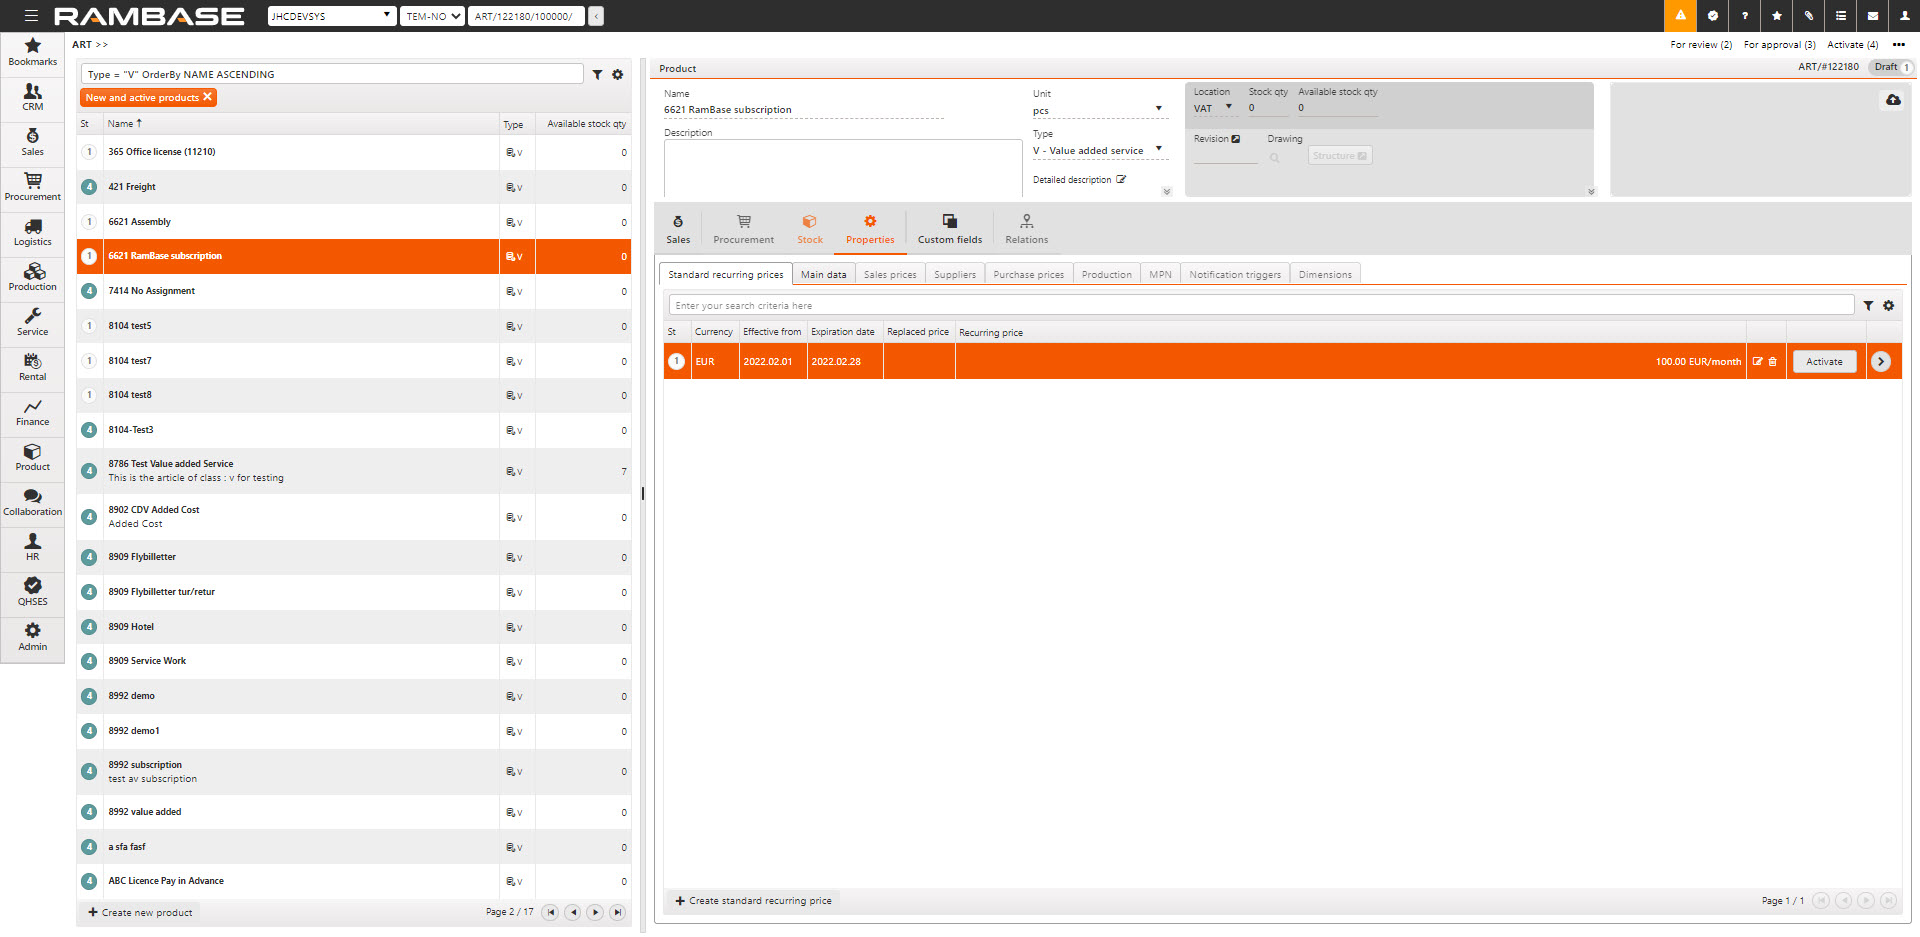
[en] In the popup select Subscription in the Sales type field, this will enable some tabs after the item is created. A subscription item will always have Class = V and is also a product which is a non-stock type. (Is not using assignments will always be set).
[en] Give the product a name, select Manufacturer (optional) and click the Create button.
[en] Give the product a name, select Manufacturer (optional) and click the Create button.
[en] The Product (ART) is created in Status 1.
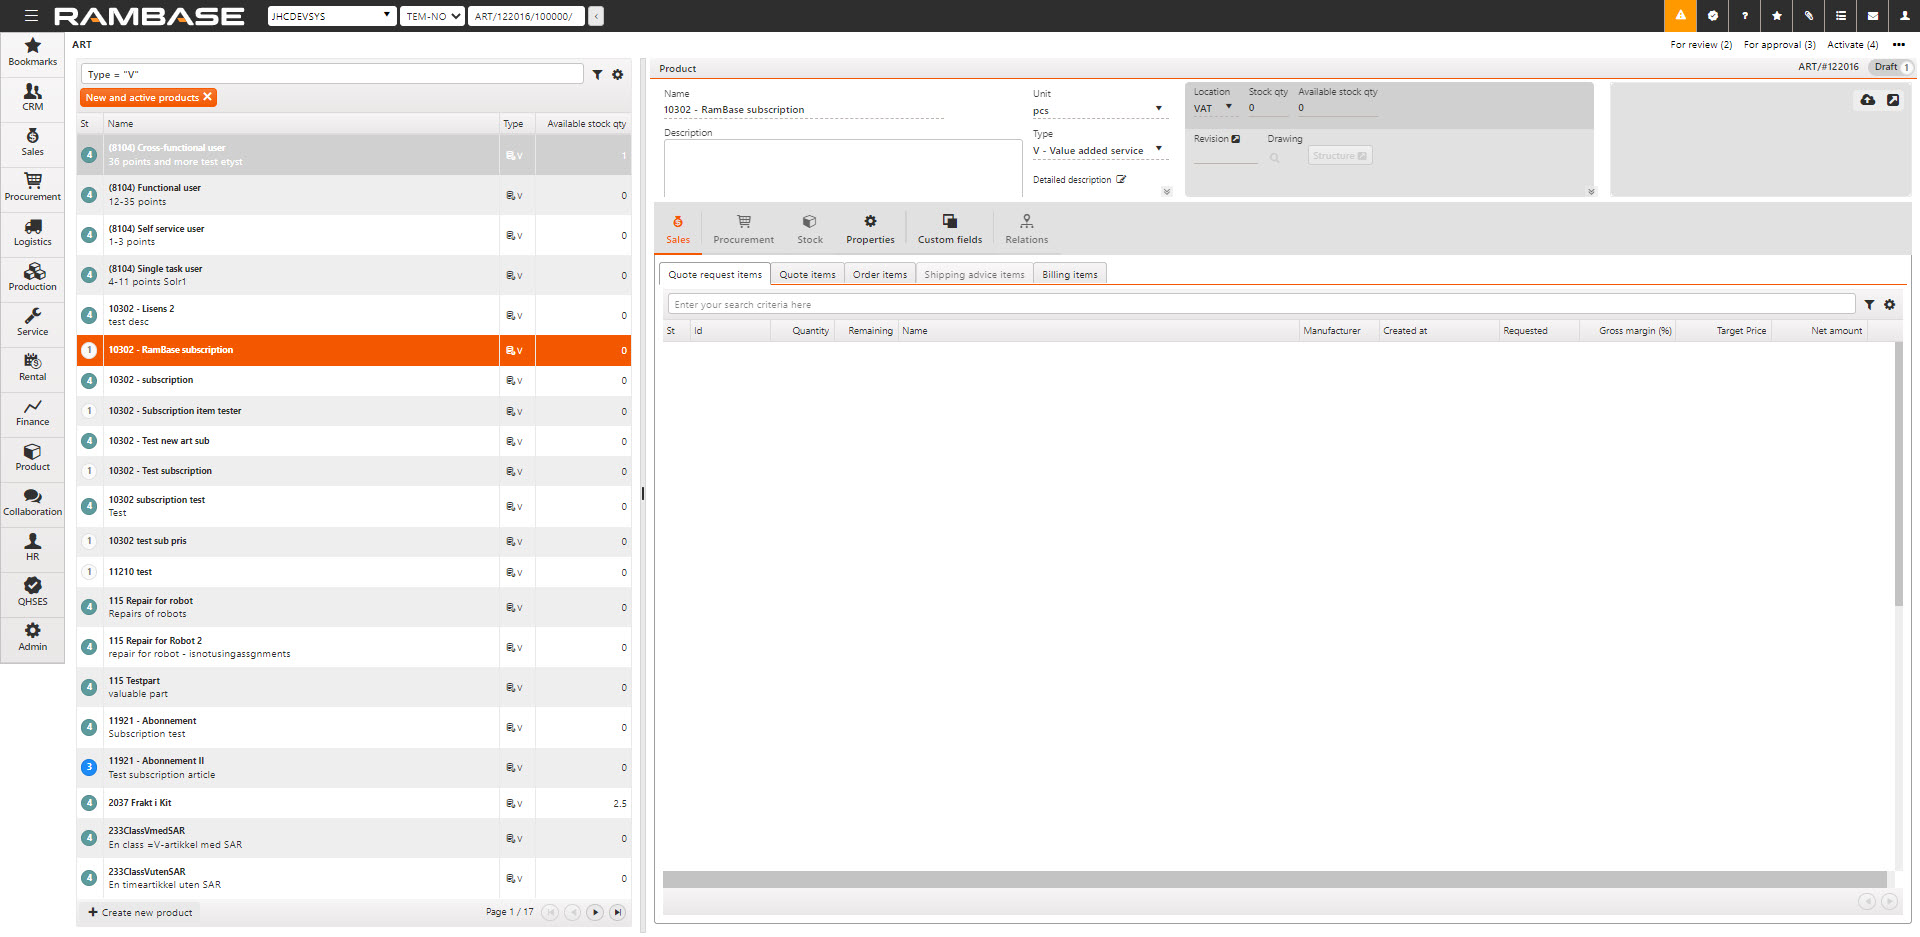
[en] The Product (ART) is created in Status 1.
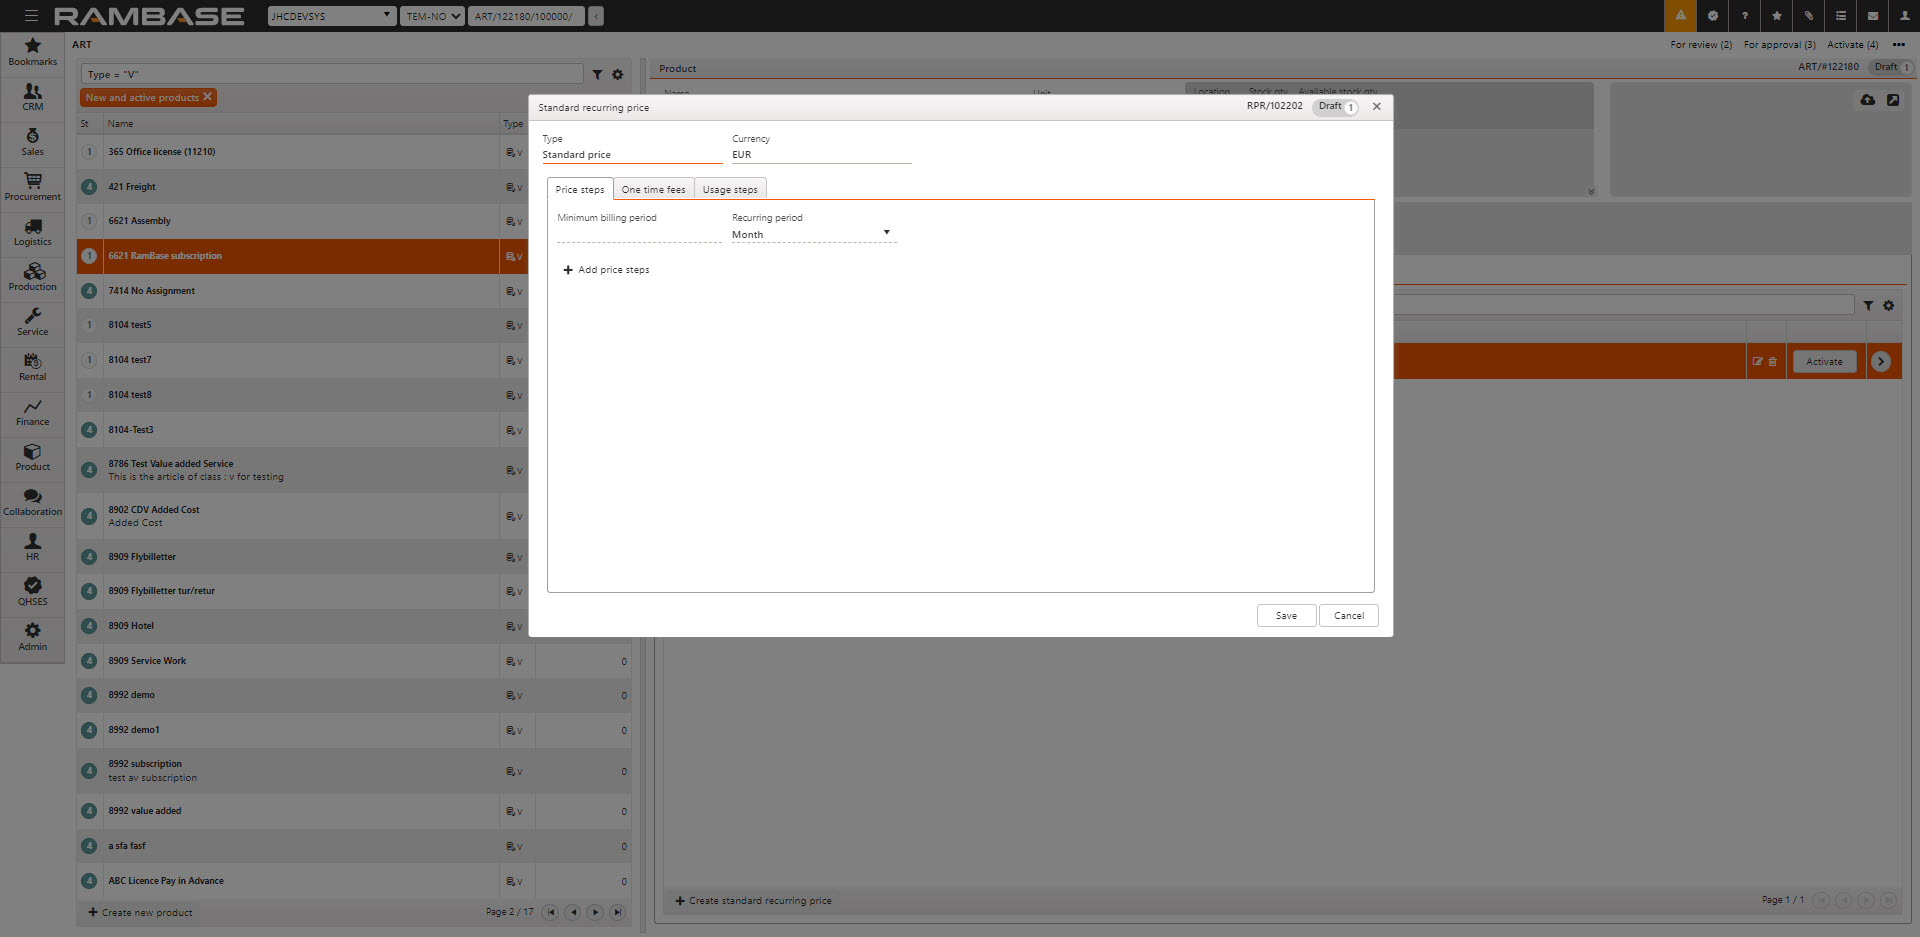
[en] Standard recurring prices will be listed under Standard recurring prices which can be found under the Properties tab. To create a new standard recurring price, select the Create standard recurring price button in the lower left corner, this will open a popup.
[en] Select currency in the Currency field.
[en] Select when the recurring price should be valid from and Expiration date, this is optional. These two fields are defining when the standard price will be available to users while creating new subscription items to sales orders (COA) or sales quotes (CQU). Expiration date is also used in the replace price mechanism, it is explained below. Click the Create button.
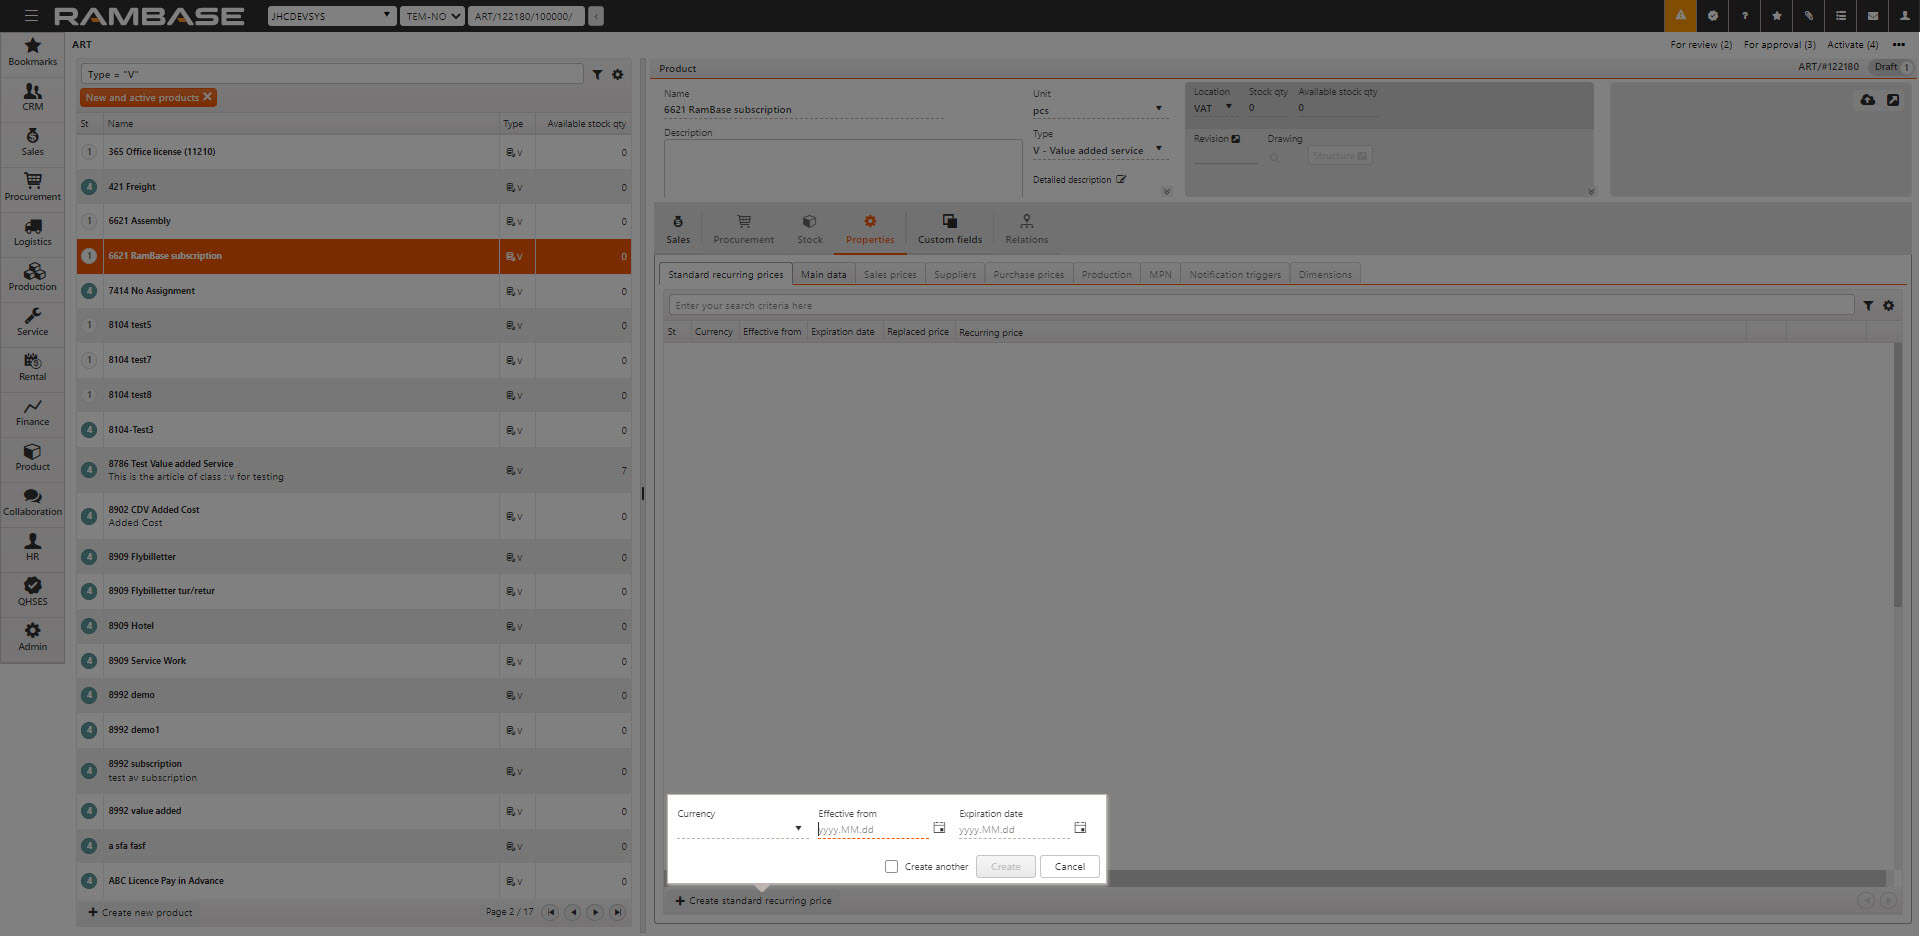
[en] Select when the recurring price should be valid from and Expiration date, this is optional. These two fields are defining when the standard price will be available to users while creating new subscription items to sales orders (COA) or sales quotes (CQU). Expiration date is also used in the replace price mechanism, it is explained below. Click the Create button.
[en] A line in Staus 1 will be added to the Standard recurring prices view. Select the edit icon to add standard prices, this will open a popup.
[en] A line in Staus 1 will be added to the Standard recurring prices view. Select the edit icon to add standard prices, this will open a popup.
[en] How to add Price steps, One time fees and Usage steps are described under the Standard recurring prices (ASP) section below. The information is added to the recurring price by clicking on the Save button.
[en] Click the Activate button.
[en] Click the Activate button.
[en] You can add several Standard recurring prices on the same item.
[en] Standard recurring prices
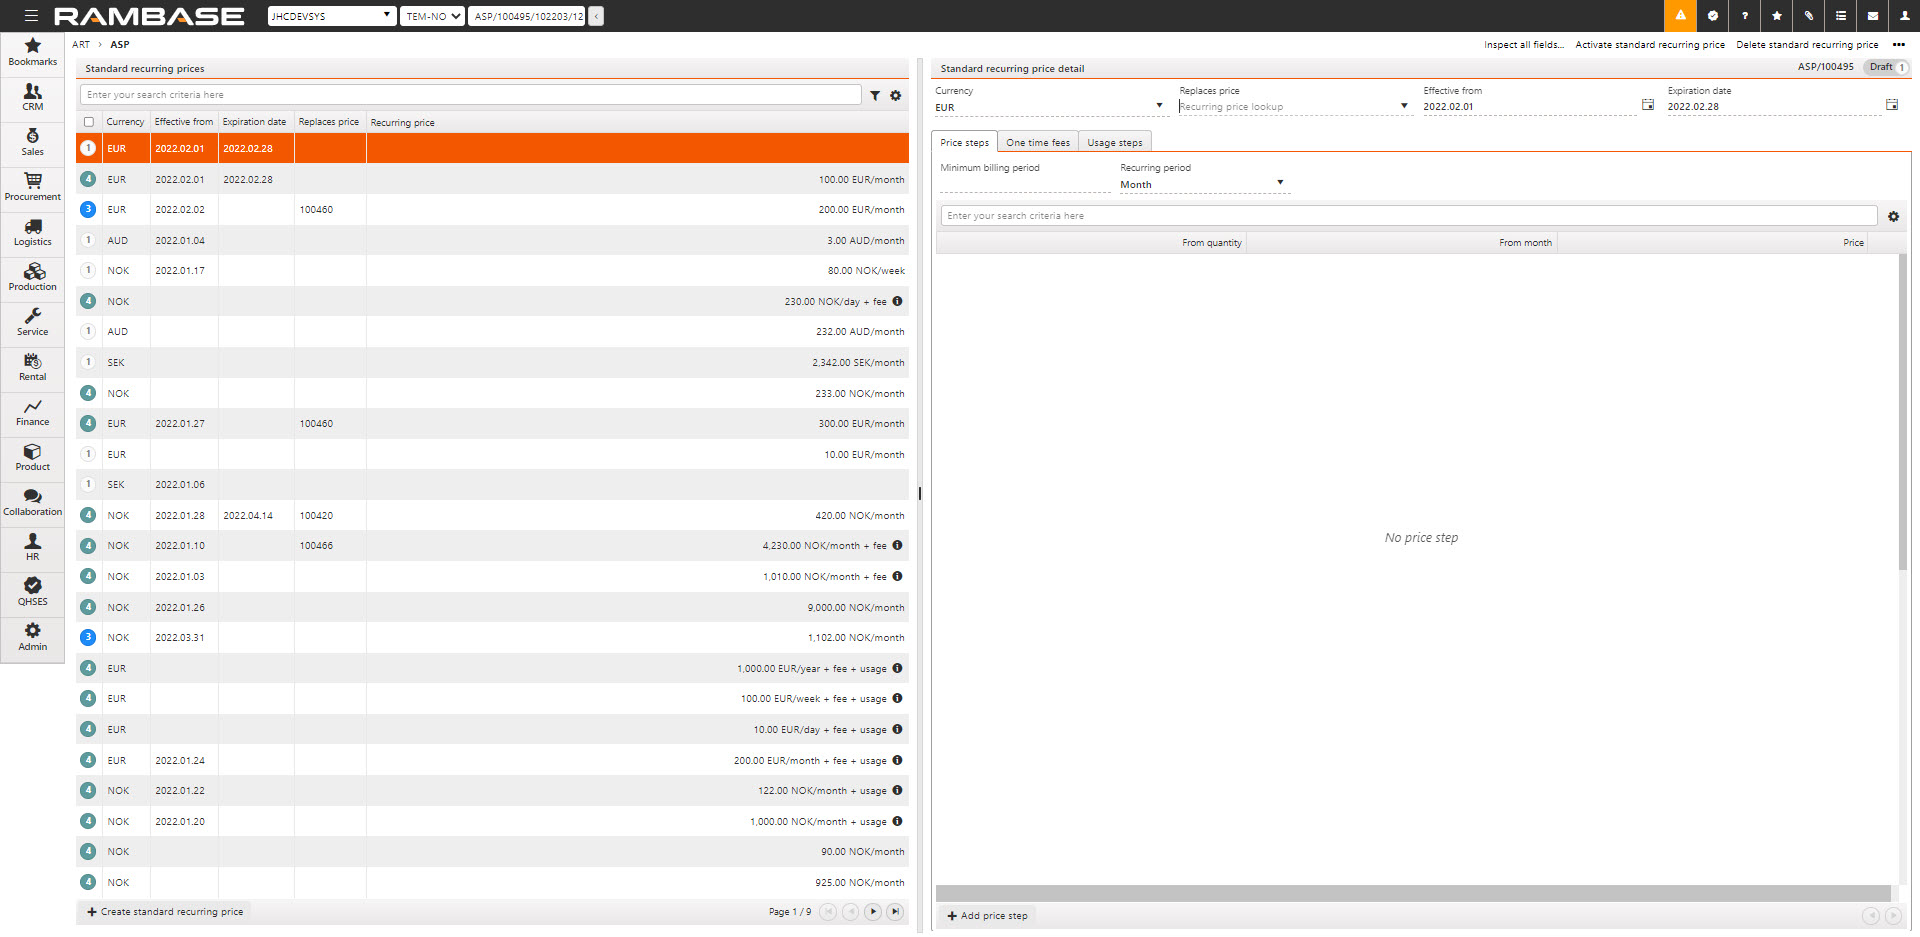
[en] All prices created for subscription items are displayed in the left view in the Standard recurring prices (ASP) application, while information about the selected ASP is displayed to the right.
[en] Subscription products will not have standard sales prices, but instead have a standard recurring price model. Standard recurring prices are recurring prices that are defined to a specific product and can be used in many different subscription agreements. It is possible to define special prices for new and ongoing subscriptions. The procedure for creating and using special prices is described here <- Link to description of using special prices in COA/CQU. Special prices are valid for single subscription agreements.
[en] The current statuses in Standard recurring prices (ASP) are:
[en] 1 = Draft
[en] 4 = Active
[en] 9 = Discontinued
[en] When navigating to the Standard recurring prices (ASP) application from a standard recurring price on a subscription item (ART) the Standard recurring price is pre-selected and Standard recurring price details are listed on the right.
[en] You can also enter the ASP application by writing ASP in the program field.
[en] Create standard recurring price
[en] Click on the Create standard recurring price button and enter the product in the Product field or select the arrow to open the lookup menu and choose a Product (ART).
[en] Select currency in the Currency field.
[en] Select when the recurring price should be valid from and Expiration date, this is optional. These two fields are defining when the standard price will be available to users while creating new subscription items to Sales orders (COA) or Sales quotes (CQU). Expiration date is also used in the replace price mechanism explained below.

[en] Select when the recurring price should be valid from and Expiration date, this is optional. These two fields are defining when the standard price will be available to users while creating new subscription items to Sales orders (COA) or Sales quotes (CQU). Expiration date is also used in the replace price mechanism explained below.
[en] Click on the Create button and the ASP will be created in Status 1 (draft).
[en] Click on the Create button and the ASP will be created in Status 1 (draft).
[en] Replaced price
[en] When expiration date for a price step is reached the recurring invoice plans with this recurring price added can be replaced with a new recurring price.
[en] In the Replaced price dropdown field, you will find other prices created for this product. Note only prices with the same currency will be displayed and can be used as replacement prices.
[en] You can read more about this under RNPITEM – Change of price which you will find below.
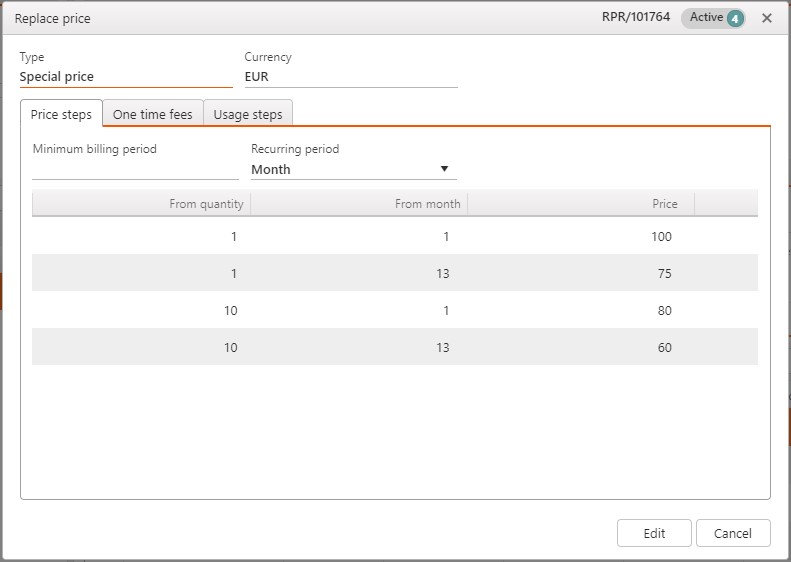
[en] Price step
[en] Minimum billing period indicates minimum chargeable periods.
[en] Recurring period indicates whether the price is per day, week, month, or year.
[en] Click on the Add price steps button and enter From quantity, From day, Week, Month or Year, Price and click the check mark.
[en] A recurring price can have several price steps, but only one price period e.g., price per month.
[en] Example for price per month:
[en] The price for 1 quantity, from the first month is 100 Euro.
[en] The price for 1 quantity, from the thirteenth month is 75 Euro.
[en] The price for 10 quantities, from the first month is 80 Euro.
[en] The price for 10 quantities, from the thirteenth month is 60 Euro.

[en] The same principle also applies when Recurring period is set to Week or Year.
[en] If the Recurring period is set to Day, you can choose what days the price should be valid for. You can have different prices on for example workdays and weekends. After the price steps for days are created you can Edit them.
[en] Example price per day:
[en] The price for 1 quantity, Monday, Tuesday, Wednesday, Thursday 5 Euro
[en] The price for 1 quantity, Saturday, and Sunday 7 Euro
[en] The price for 5 quantities, Monday, Tuesday, Wednesday, Thursday 4 Euro
[en] The price for 5 quantities, Saturday, and Sunday 6 Euro
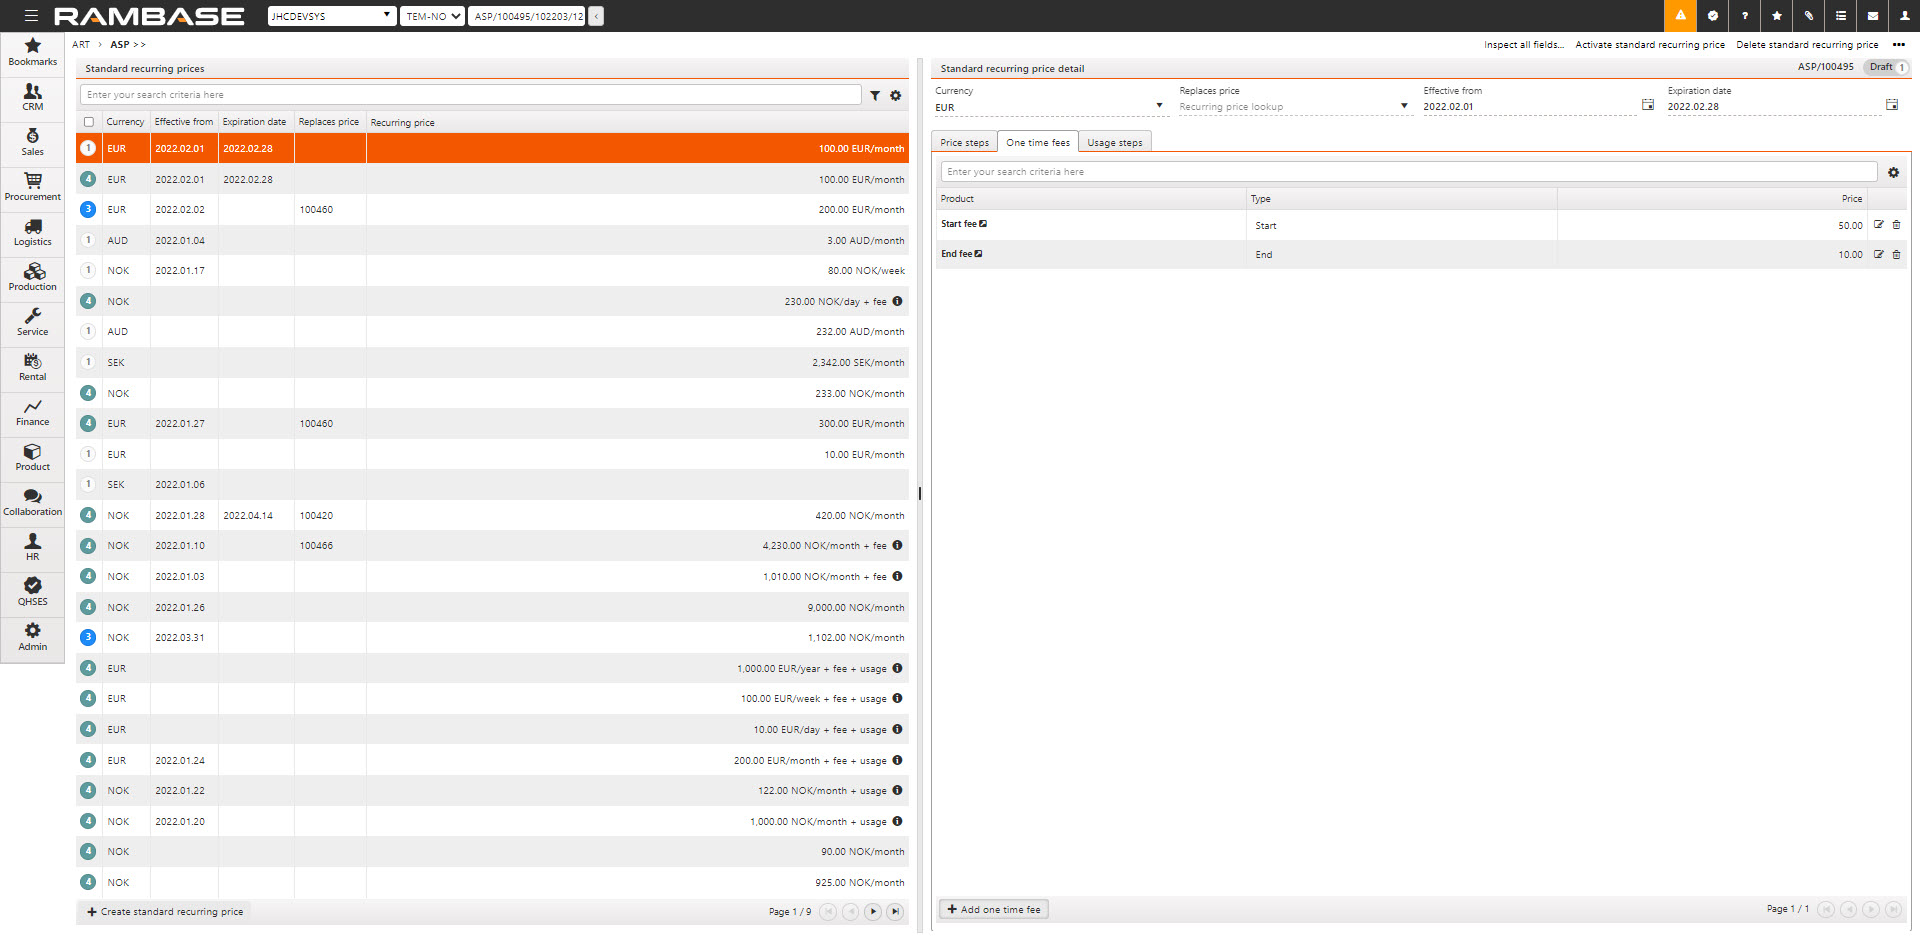
[en] One time fees
[en] You can add one time fees for Start, End and deposit. The one time fee will be added to the correct invoice period in the Recurring invoice plan (RNP).
[en] Select the One time fees folder and click the Add one time fee button.
[en] Start writing in the Product field to open the One time fee lookup or select the arrow to open it manually. Select Product (ART).
[en] Select type in the Type field, enter the price and click the check mark.
[en] Usage steps
[en] You can add prices for usage steps.
[en] Select Usage unit in the dropdown, the units available for you can be found in the UNI application
[en] Add Usage interval - Whole period, Day, or Week.
[en] Click the Add usage steps button to add from quantity, Days (only available if usage interval is set to Day) Price and click on the Create button.
[en] Service tool menu
[en] In the service tool menu in the top right corner select Activate standard recurring price to activate or Delete standard recurring price to delete.
[en] Create a Sales order (COA) with Subscription items
[en] To create a new Sales order with subscription item, enter the Sales order (COA) application by selecting Sales > Order handling > Sales orders in the RamBase menu to the left, or write COA in the program field and press enter.
[en] Here you will find all sales orders. Click on the Create new order button in the lower left corner opens a popup. Enter the customer’s name in the Customer field or click the arrow to open the lookup menu. Select the customer.
[en] If the customer has several addresses, choose the customer address in the Address field. The address displayed is the address chosen as default in the Customer (CUS) application. To add a new address, Click on the Add new shipping address button.
[en] Click on the Create button. The COA is assigned a Sales order number.
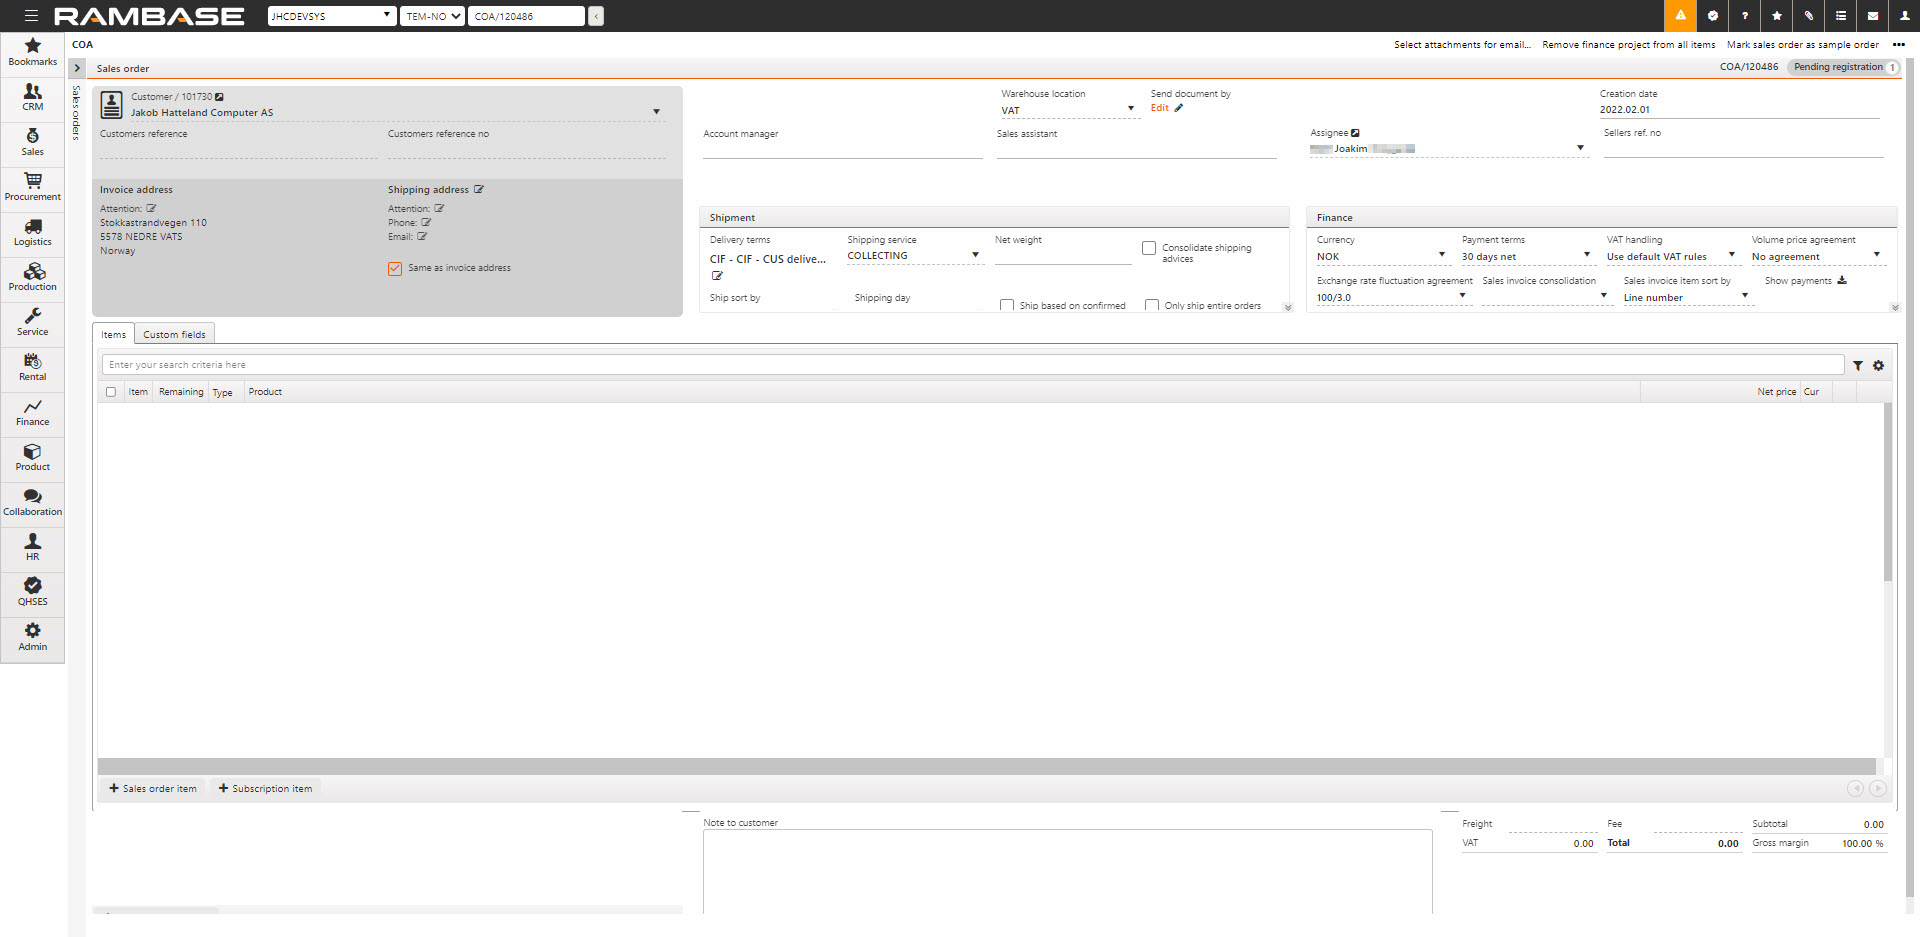
[en] Click on the Create button. The COA is assigned a Sales order number.
[en] To add a subscription item, Click on the Subscription item button, this will open a popup.
[en] Writing the product name in the Product field opens the Product lookup or click the arrow to open it manually. Select the Product (ART).
[en] Enter the quantity.
[en] Add Recurring price by writing in the Recurring price field, this will open the Recurring price lookup or click the arrow to open it manually. Note you will only see prices added to selected product.
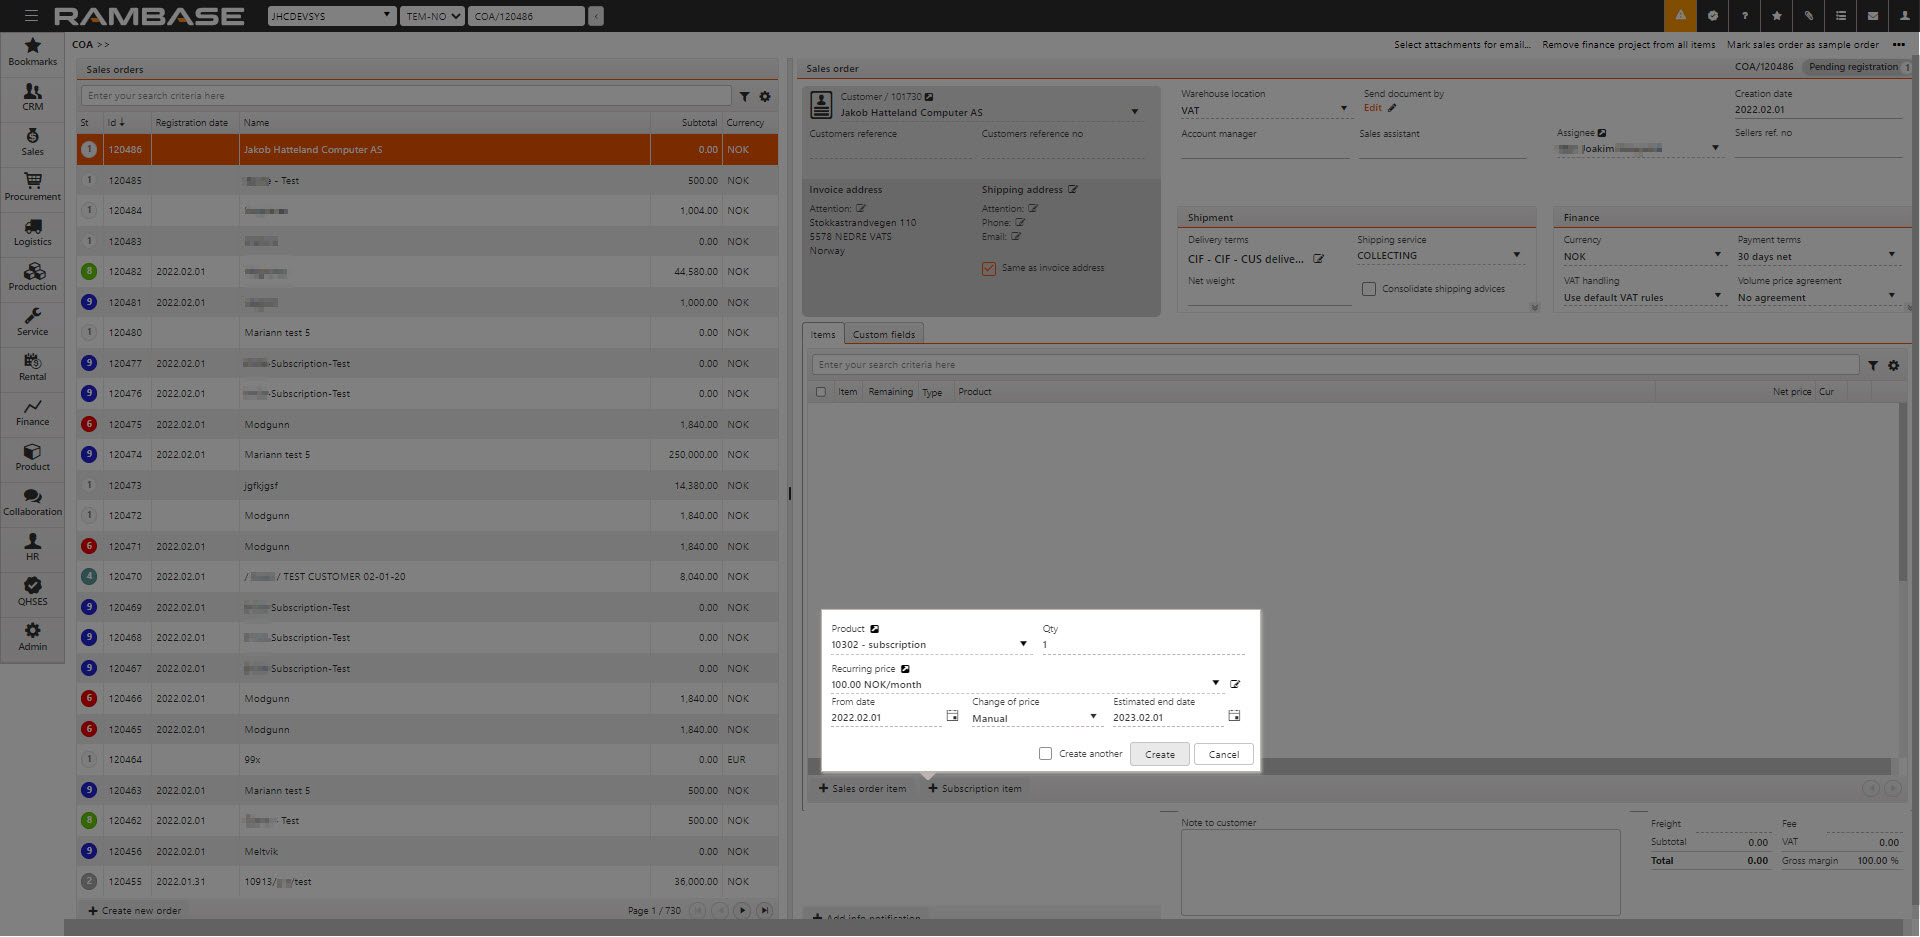
[en] Add Recurring price by writing in the Recurring price field, this will open the Recurring price lookup or click the arrow to open it manually. Note you will only see prices added to selected product.
[en] Select From date and Estimated end date. Start date will as default be set to today's date.
[en] If the CSV setting, Default offset for estimated end date of subscription items, is on, expected end date will be the number of months set after start date.
[en] This setting defines a default offset of months for the estimated end date of a subscription item. If no estimated end date is selected during creation of an item, the end date will be set to this amount of months after the start date.
[en] Example - The Default value is set to 12, and start date is set to 01.01.22, the expected end date will be set to 01.01.23.
[en] Change of price is set as default Manual, click the arrow to open the dropdown to select Auto or fixed.
[en] Click the Create button.
[en] Special price
[en] You can also add a special price for this order only. Click the plus icon to add a special price. This will open the Create new special price popup.
[en] The currency is locked and can only be changed on the Sales order (COA) main level.
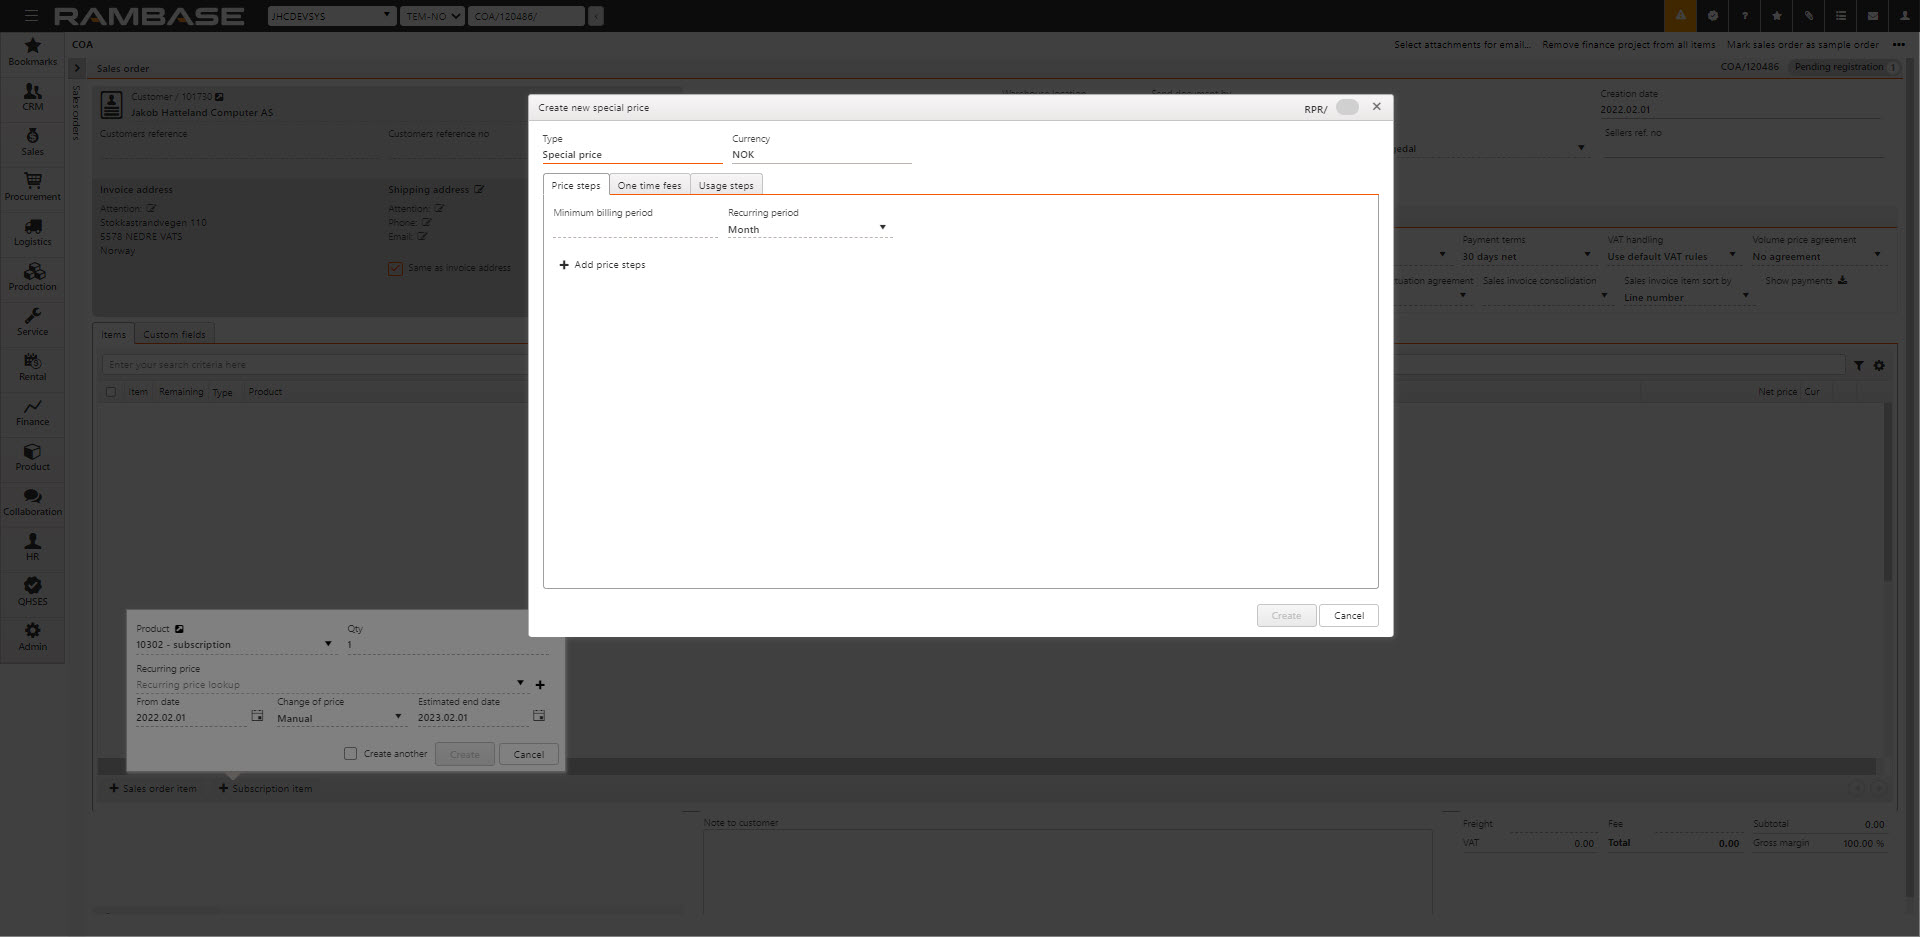
[en] How to add Price steps, One time fees and Usage steps are described under the Standard recurring prices (ASP) section above.
[en] When all the information is added click on the Create button to add the subscription item to the COA.
[en] You can add sales order items and subscription items to the same COA.
[en] Create Recurring invoice plan (RNP)
[en] Selecting Register sales order opens a Register rental order popup. Here you can choose to forward the COA to an existing recurring invoice plan (RNP) or create a new one
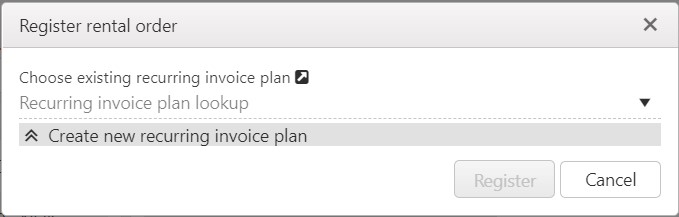
[en] To forward to an existing Recurring invoice plan (RNP) write in the Recurring invoice plan field or click on the arrow to open the lookup and select the invoice plan you would like to add it to.
[en] Note that you can not forward to an existing recurring invoice plan if there are matching periods, and the periods are invoiced in the current invoice plan.
[en] To create a new recurring invoice plan, click on the arrow to the left of the Create new recurring invoice plan field and fill out the form.
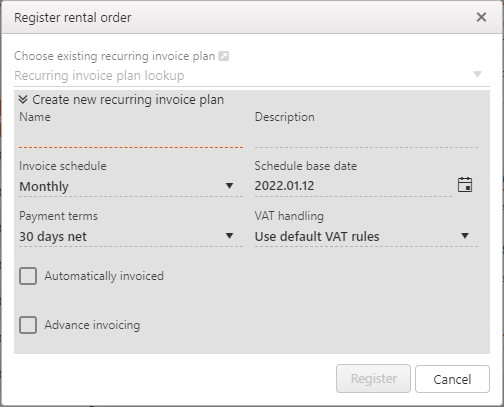
[en] Write a name, description, choose Payment terms and VAT handling.
[en] Invoice schedule indicates how long the periods are and how frequently an invoice will be created, weekly, fortnightly, monthly, quarterly, or annually.
[en] Schedule base date is the invoice period start date. If the Subscription from date is 15.11.21 but you would like to invoice the first of every month, the Schedule base date should be 01.12.21. The invoice periods will calculate from 15. November - 30. November, the future invoice periods will be the first of every month.
[en] Checking the box for Automatically invoiced creates an invoice from the Recurring invoice plan at the end of an invoice period.
[en] Checking the box Advanced invoicing allows periods to be invoiced in advanced. Note that Automatically invoiced will also be checked.
[en] A new field will be visible when checking the box for Advanced invoicing. Choose the number of days should be invoiced in advanced before the period starts in the Invoice offset dropdown.

[en] When the form is filled out, Click on the Register button. If there are no sales order items added, the Sales order (COA) goes to Status 9, and a recurring invoice plan is created.
[en] Recurring invoice plans (RNP)
[en] You can navigate to the Recurring invoice plans (RNP) by writing RNP in the Rambase program field and press Enter.
[en] From the COAITEM you can navigate to the Recurring invoice plans by choosing the Recurring invoice plans in the context menu or click on the Recurring invoice plan in the flow chart.

[en] All invoice plans created form Subscriptions orders items are displayed in the left view in the Recurring invoice plans (RNP) application, while information about the selected RNP is displayed to the right.
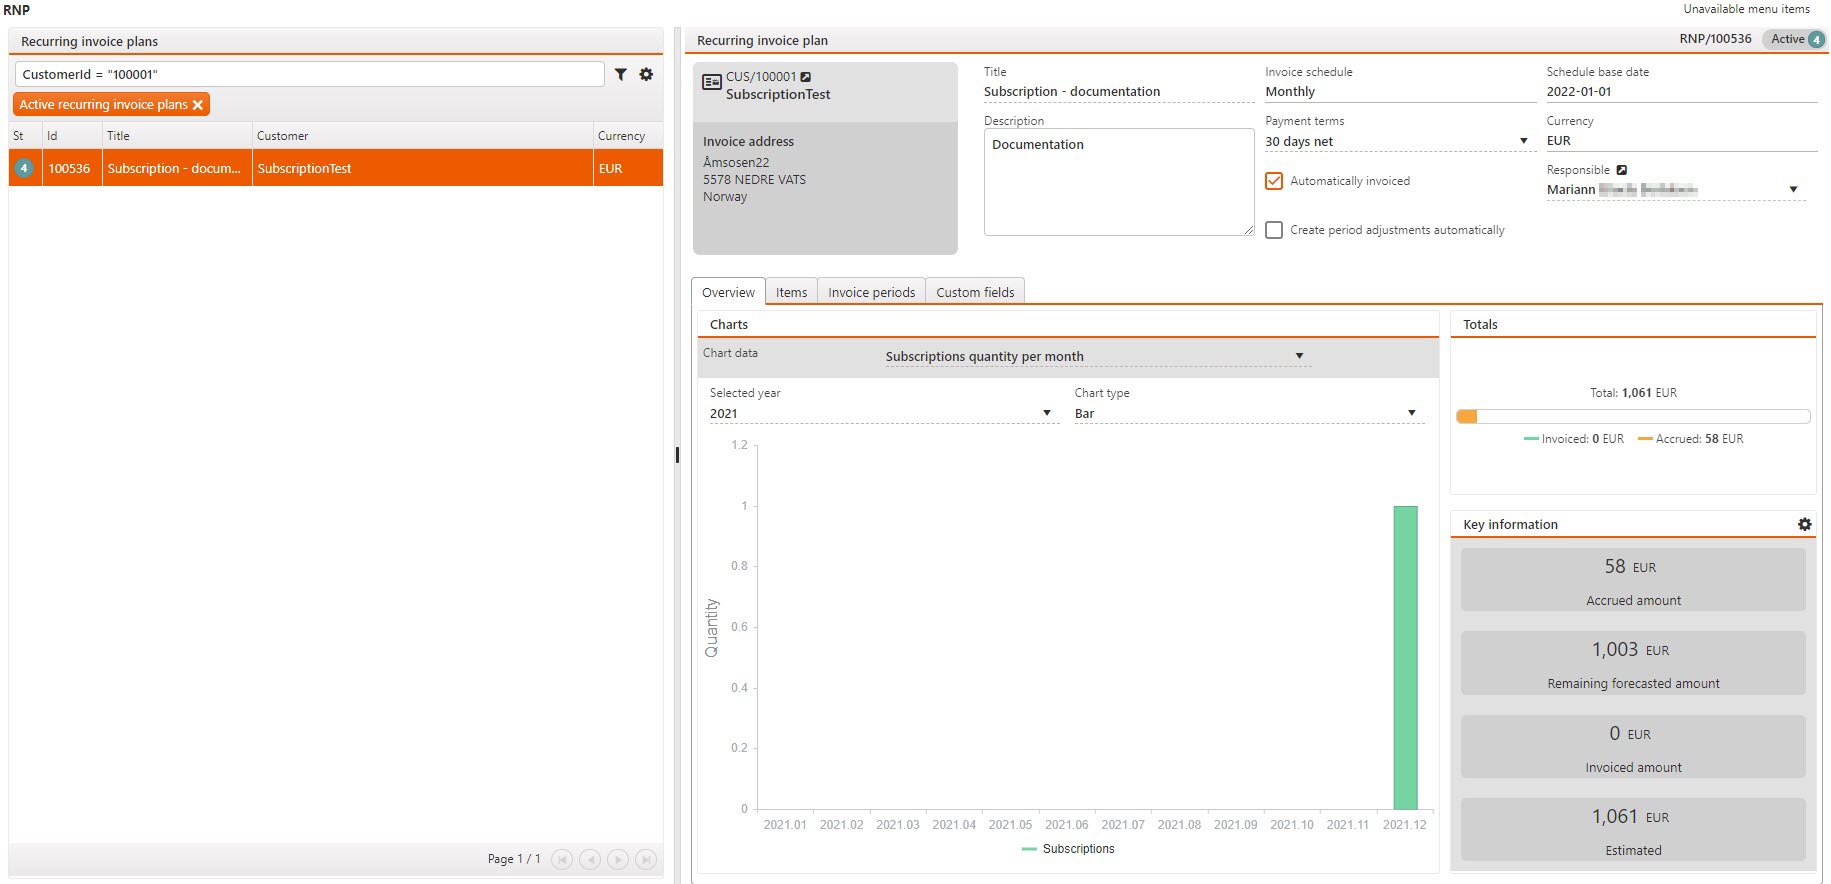
[en] The selected invoice plan shows what customer it belongs to. Title and description are the name and description text given when registering the Subscription order and can be edited on the RNP.
[en] If the box for Automatically invoiced is check, an invoice in will be created in status 1 after the end of a period. The invoice will be ready the following day and can be found under the Invoice periods tab on both main and item level. If the box is not checked, invoices must be created manually. Note that the invoice will be created in Status 1, and not registered.
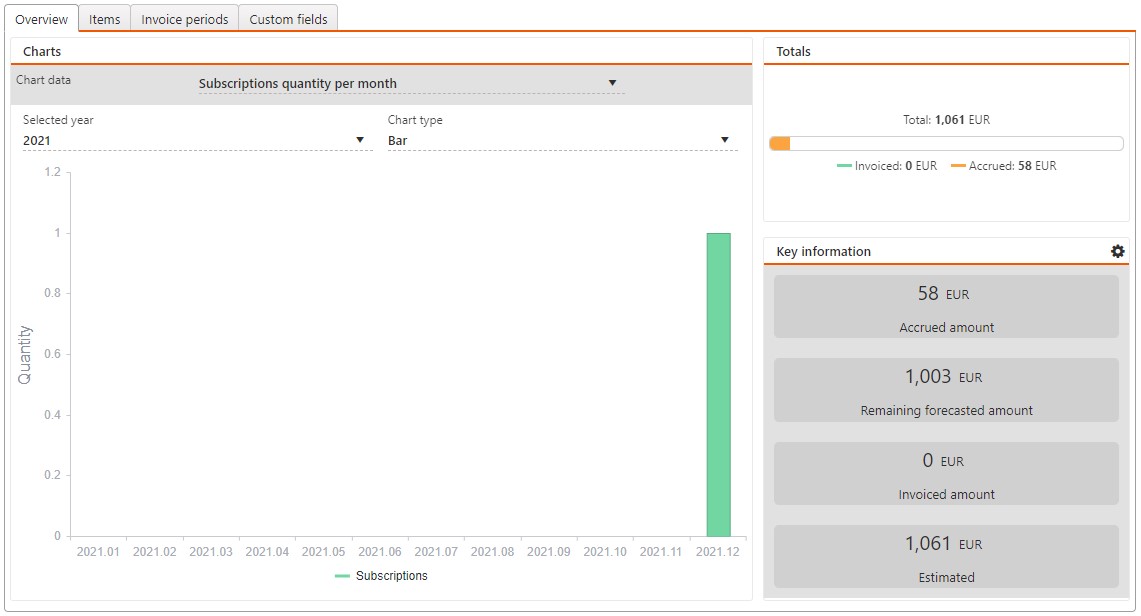
[en] Overview
[en] The Overview tab displays charts showing Subscriptions quantity and Recurring invoice plans.
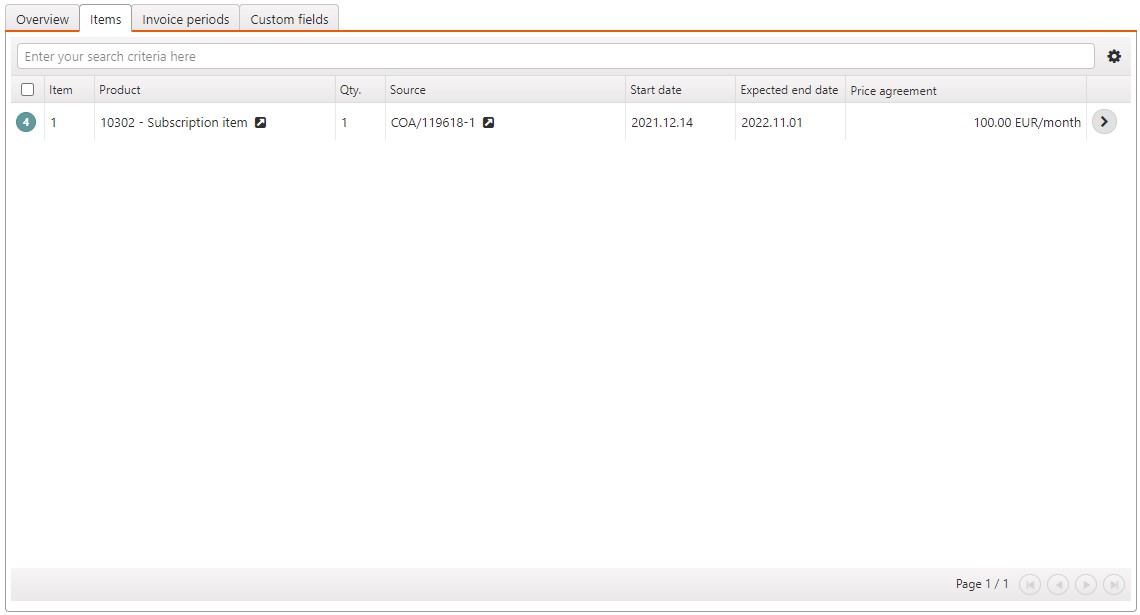
[en] Items
[en] Under the Items tab you will find all items forward to this recurring invoice plan from one or several Subscription orders. Clicking on the arrow to the right on an item, brings you to the item level.
[en] The product name, COA, start date, expected end date and price agreement will be listed here.
[en] Invoice periods
[en] Invoice periods tab list the invoice periods for all the items registered to this RNP. Here you will find periods that are invoiced, Pending invoice, Current and Forecast, Invoice date, link to the invoice and amount.
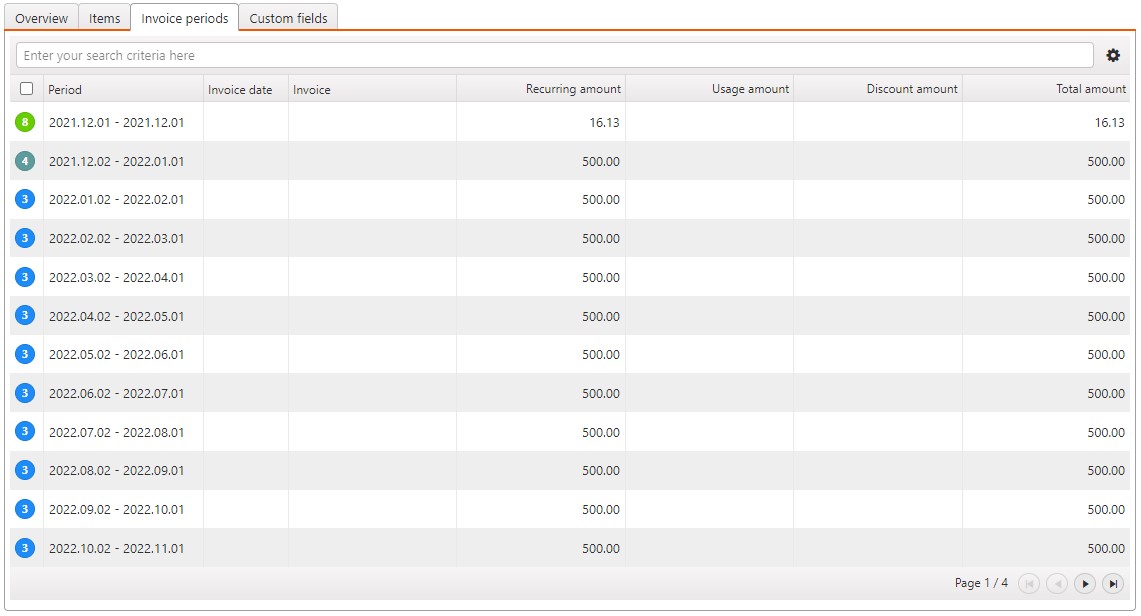
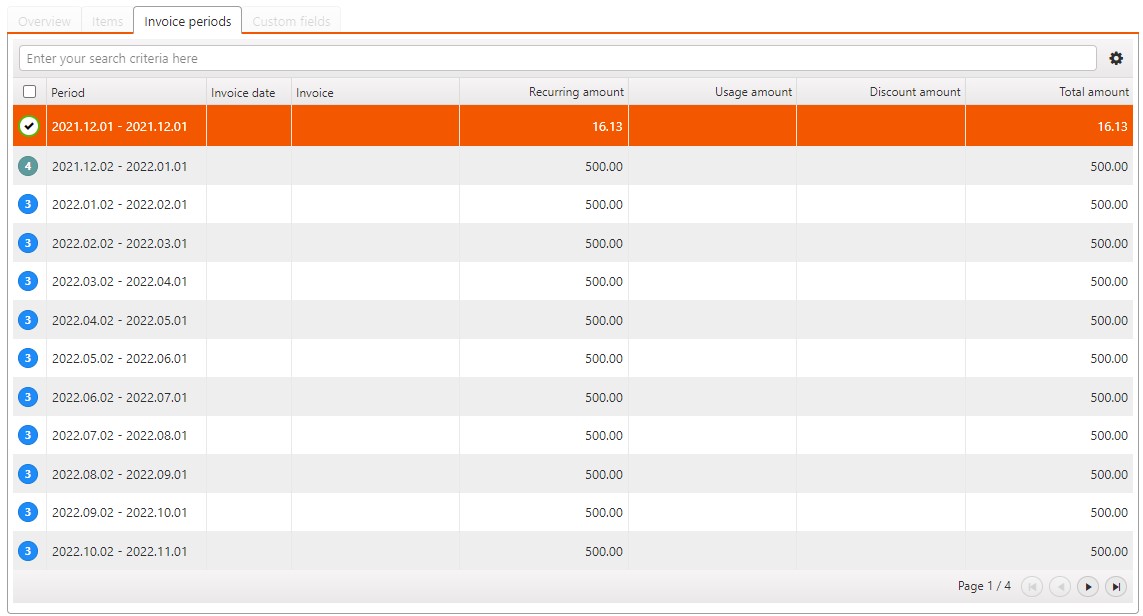
[en] Invoices can be created manually by selecting periods that are ready for invoicing (Status 8) and selecting Create invoiced for the selected periods in the upper right corner. It is only possible to click on the number 8, to select the periods.
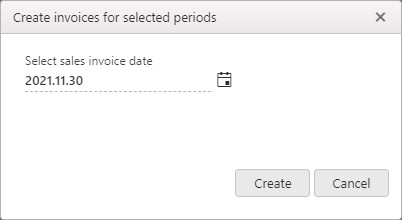
[en] Select sales invoice date in the Create invoices for selected periods popup and click the Create button.
[en] Note! You can back invoice, select dates back in time, but only back to the first date of the open financial period.
[en] Example – You back invoice a period from November 2021, but the financial period for November is closed, but the period for December 2021 is open, the first date you an choose is therefore 2021.12.01.
[en] The invoices will be created in Status 1 and can be found under the Invoice tab. Periods that it has been created an invoice for will have Status 9.
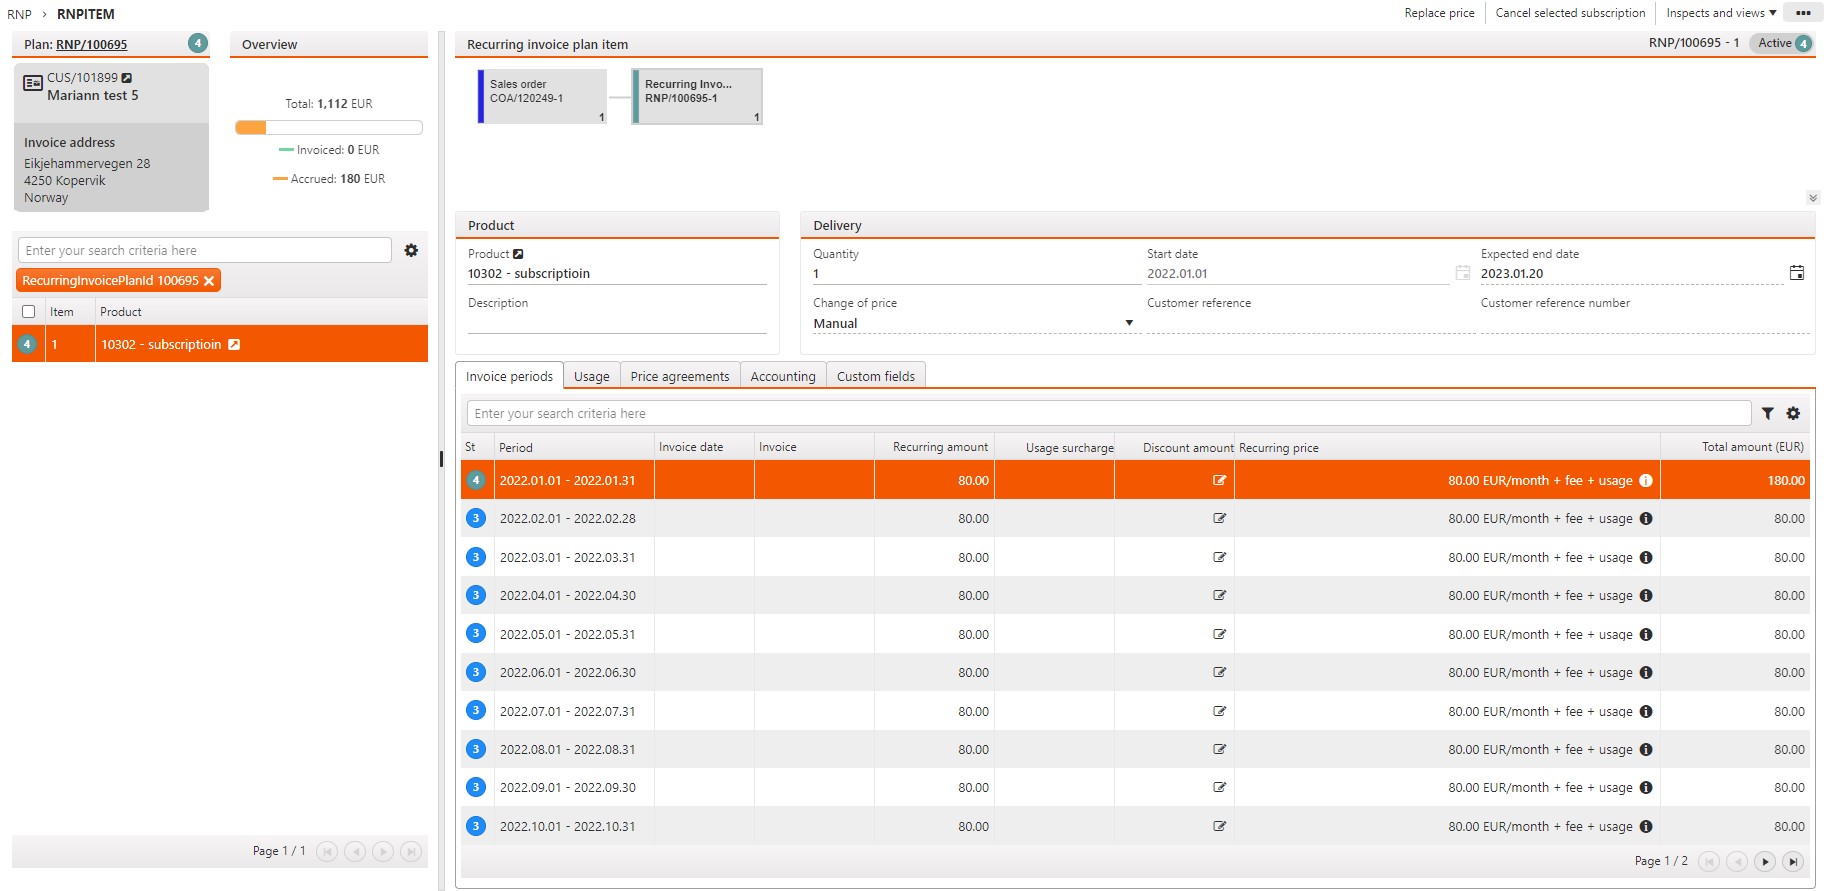
[en] RNPITEM
[en] You can navigate to the RNPITEM from the COAITEM application or by clicking on the arrow to the right on the item under the Item tab on an RNP. You can also write RNPITEM in the RamBase program bar, this will list all RNPITEMS.
[en] On the RNPITEM all items forwarded to this RNP are listed on the left side while information about the selected item is displayed to the right.
[en] On the overview of the selected RNPITEM you will find the flow chart, showing which subscription order the items originates from and the invoices created for each period.
[en] Under Product there is a link to the product, the description is copied from the text field on the Product (ART).
[en] Fields under Delivery are:
[en] Quantity
[en] Shows quantity for selected item. Cannot the changed.
[en] Start date
[en] Is set when item is added so sales order and cannot be changed.
[en] Expected end date
[en] Expected end date for this subscription item.
[en] If the CSV setting, Auto- renewable subscription, is ON, the subscription will automatically be renewed when expected end date is reached.
[en] A new period will be added automatically when the expected end date is reached if the plan has not been cancelled. Expected end date can also be changed manually and will affect the list of the invoice periods, periods will be added or remove.
[en] Change of price
[en] Can be Manual, Auto or Fixed.
[en] If change of price is set to Auto, the price will automatically change when there is an expiration date on the Standard recurring price (ASP), and the Replace price is filed. The price will also be changed if a change is made under the Change current price agreement tab.
[en] If the Change of price is set to Fixed, Change current price agreement under the Price agreement tab will not be visible, and the price will not be affected when the end date on the Standard recurring price (ASP) is reached.
[en] If Change of price is set to manual, the price will not be affected when the end date on the Standard recurring price (ASP) is reached. But will change if a change is made under the Change current price agreement tab.
[en] Customer reference
[en] Can be added and is editable
[en] Customer reference number
[en] Can be added and is editable
[en] Replace price
[en] You can replace the price by selecting Replace price in the context menu in the top right. This will open a popup. Select Edit, make changes or add new Price steps, One time fees, Usage steps and select Save.
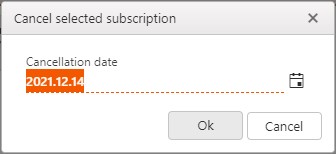
[en] Cancel selected subscription
[en] Cancel selected subscription can also be found in the context menu. Select it, choose a cancellation date, and click OK. Note that this will only cancel the item selected and not the main recurring invoice plan.
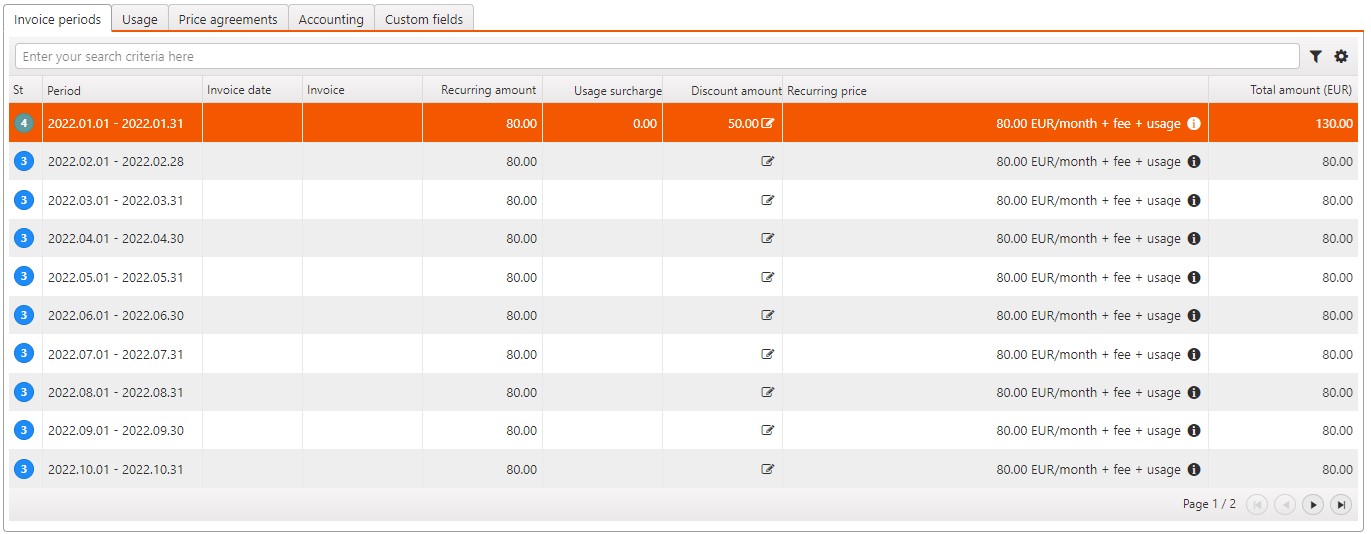
[en] Invoice periods
[en] Invoice periods tab list the invoice periods for selected item. Here you will find periods that are invoiced, pending invoice, Current and Forecast, Invoice date, link to the invoice, recurring amount, and total amount. It is not possible to create an invoice from item level.
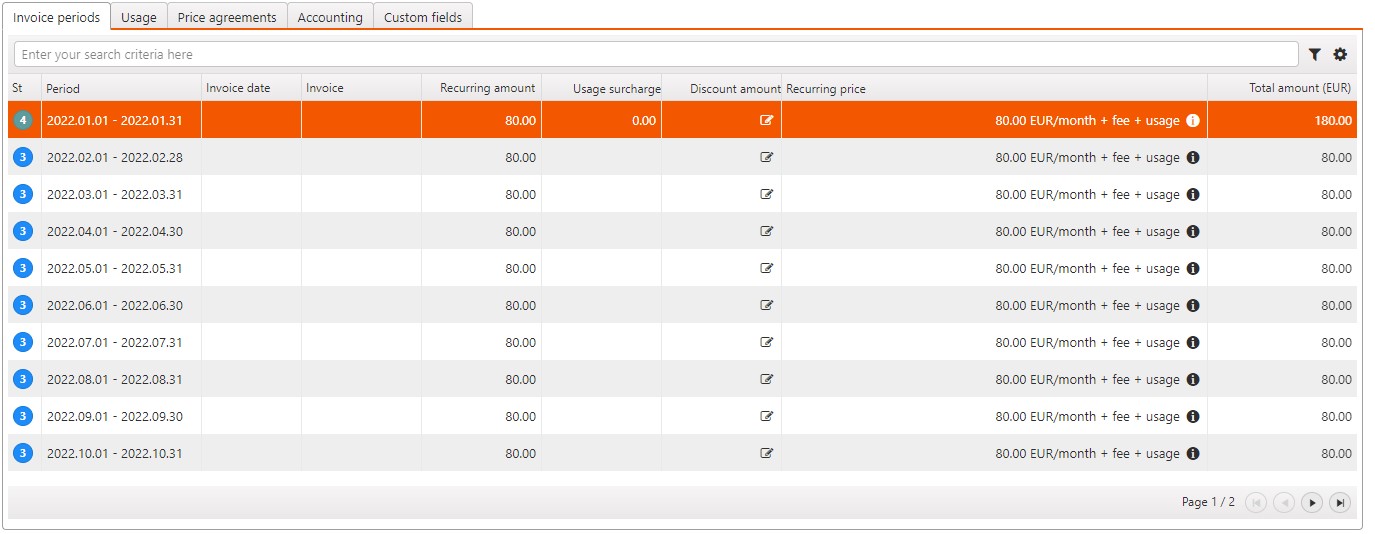
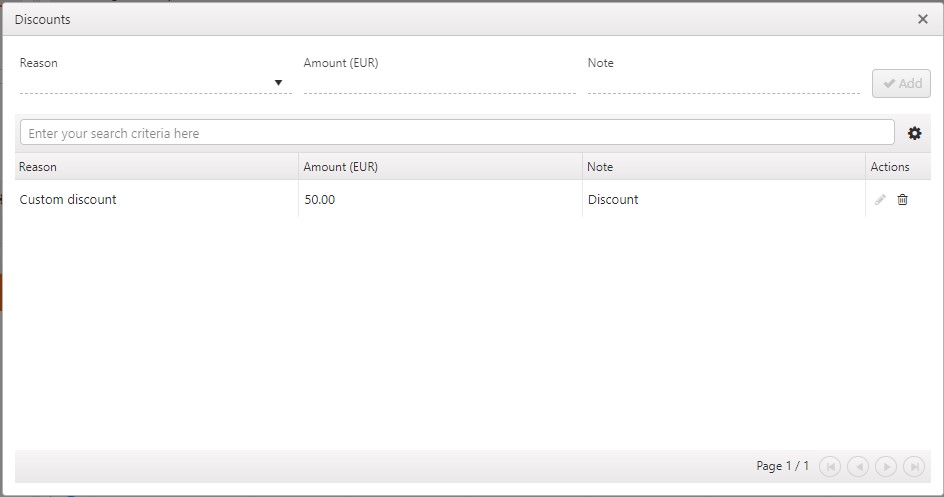
[en] You can add Discount to current and forecast periods.
[en] Discount can be added, edited, and removed by selecting the edit icon under the Discount tab.
[en] Select reason in the dropdown, add amount, write a note, and select Add in the Discount popup, or click on the bin or edit icon. You can add several lines. Click on the cross in the top right corner to exit the popup. The discounts are added to, edited, or removed from the selected date.
[en] Usage
[en] The prices for usage are created in the Standard recurring prices (ASP) application but can also be added by selecting Replace price, and under the Price agreement tab.
[en] You can add usage from the Usage tab, click on the Add usage button in the lower left corner, fill in date and usage in the popup and click on the Create button.
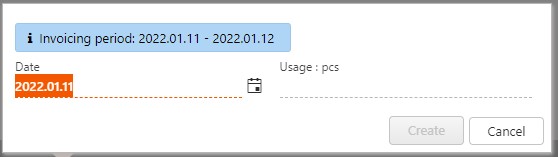
[en] The usage step is added. You can add several lines.
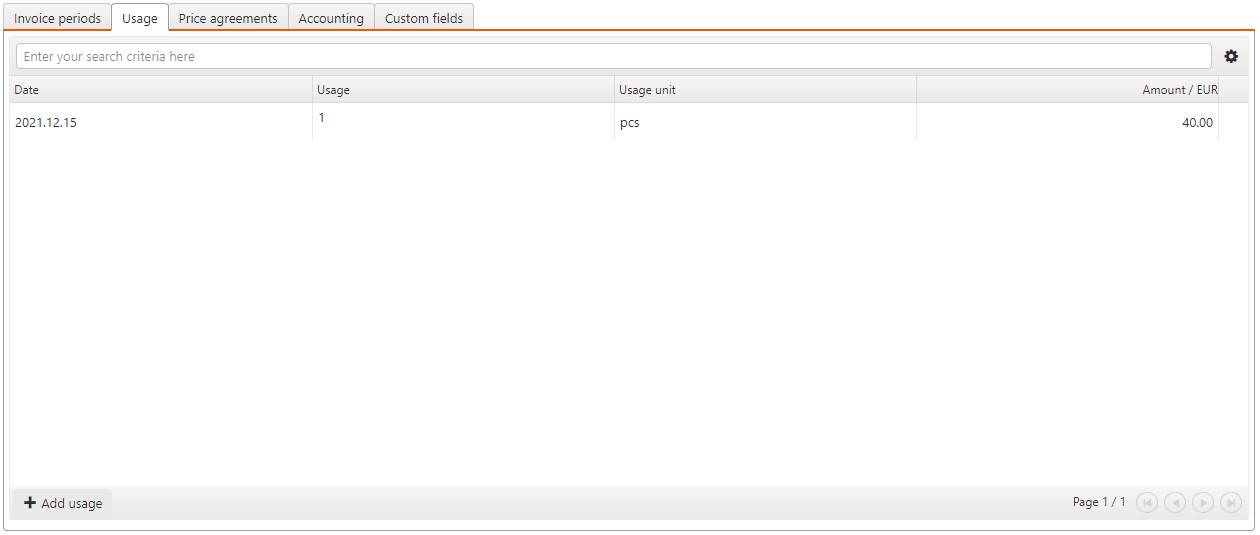
[en] You can edit usage quantity by selecting the edit icon, writing the new value, and clicking Enter.
[en] Selecting the bin icon to the far right and selecting Yes in the popup deletes the usage.
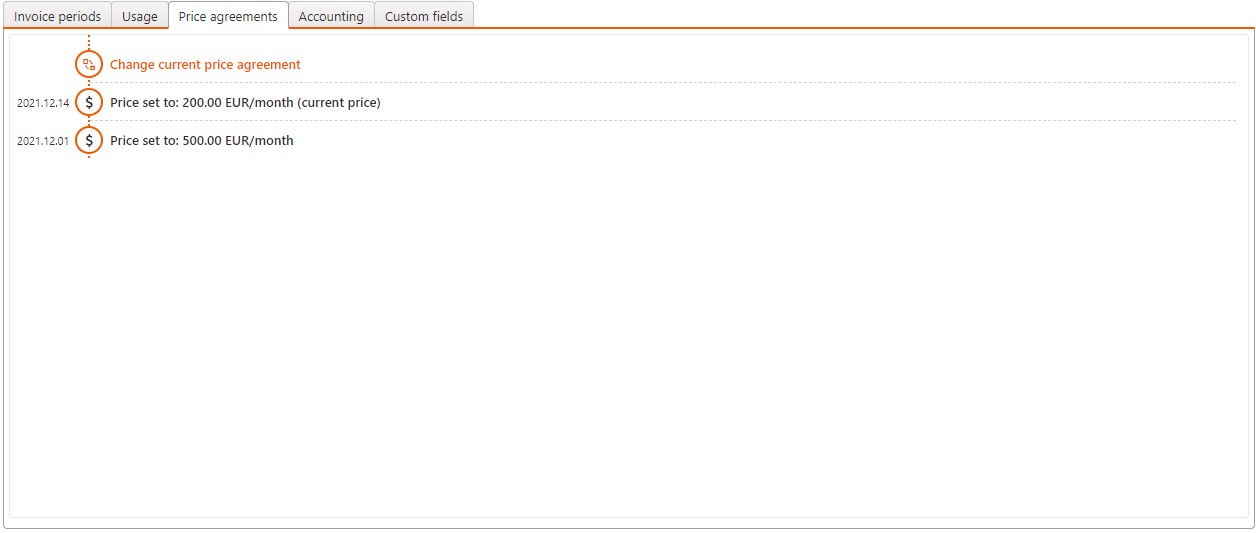
[en] Price agreements
[en] Under the Price agreements tab, you will see the current price and when the price was valid from. You can change the current price agreement by clicking on Change current price agreement and selecting edit in the popup. You can edit or change the price steps already created or add new price steps, Minimum billing period, Recurring period, One time fees and Usage steps. Select Save or cancel. The new price will be listed on the top with the date changes were made.
[en] Note that if you make several changes on the same date, only the last edited will be listed. It is not possible to change current price when Change of price is set to Fixed.