Scrap and release - Production work order (PWOD)
When manufacturing Product units (LCM) with complex structures (type = K or KA), the operator and planner need to be able to handle parts (type =P, C, K) that are broken and assess if they can be recovered. The scrap and release function is used to handle those situations.
Logic
A broken or partially broken Product unit (LCM), with parts that might be salvaged, is discovered in the production process. Scrap and release is initiated to either scrap or recover the affected parts. Scrap and release splits a sub Production work order (PWO) with quantity of 1, for the affected Product unit (LCM) in production, from the initial Production work order (PWO).
The Production work orders (PWO) can then be handled individually; normal production, scrap, or release back to stock.
Overview
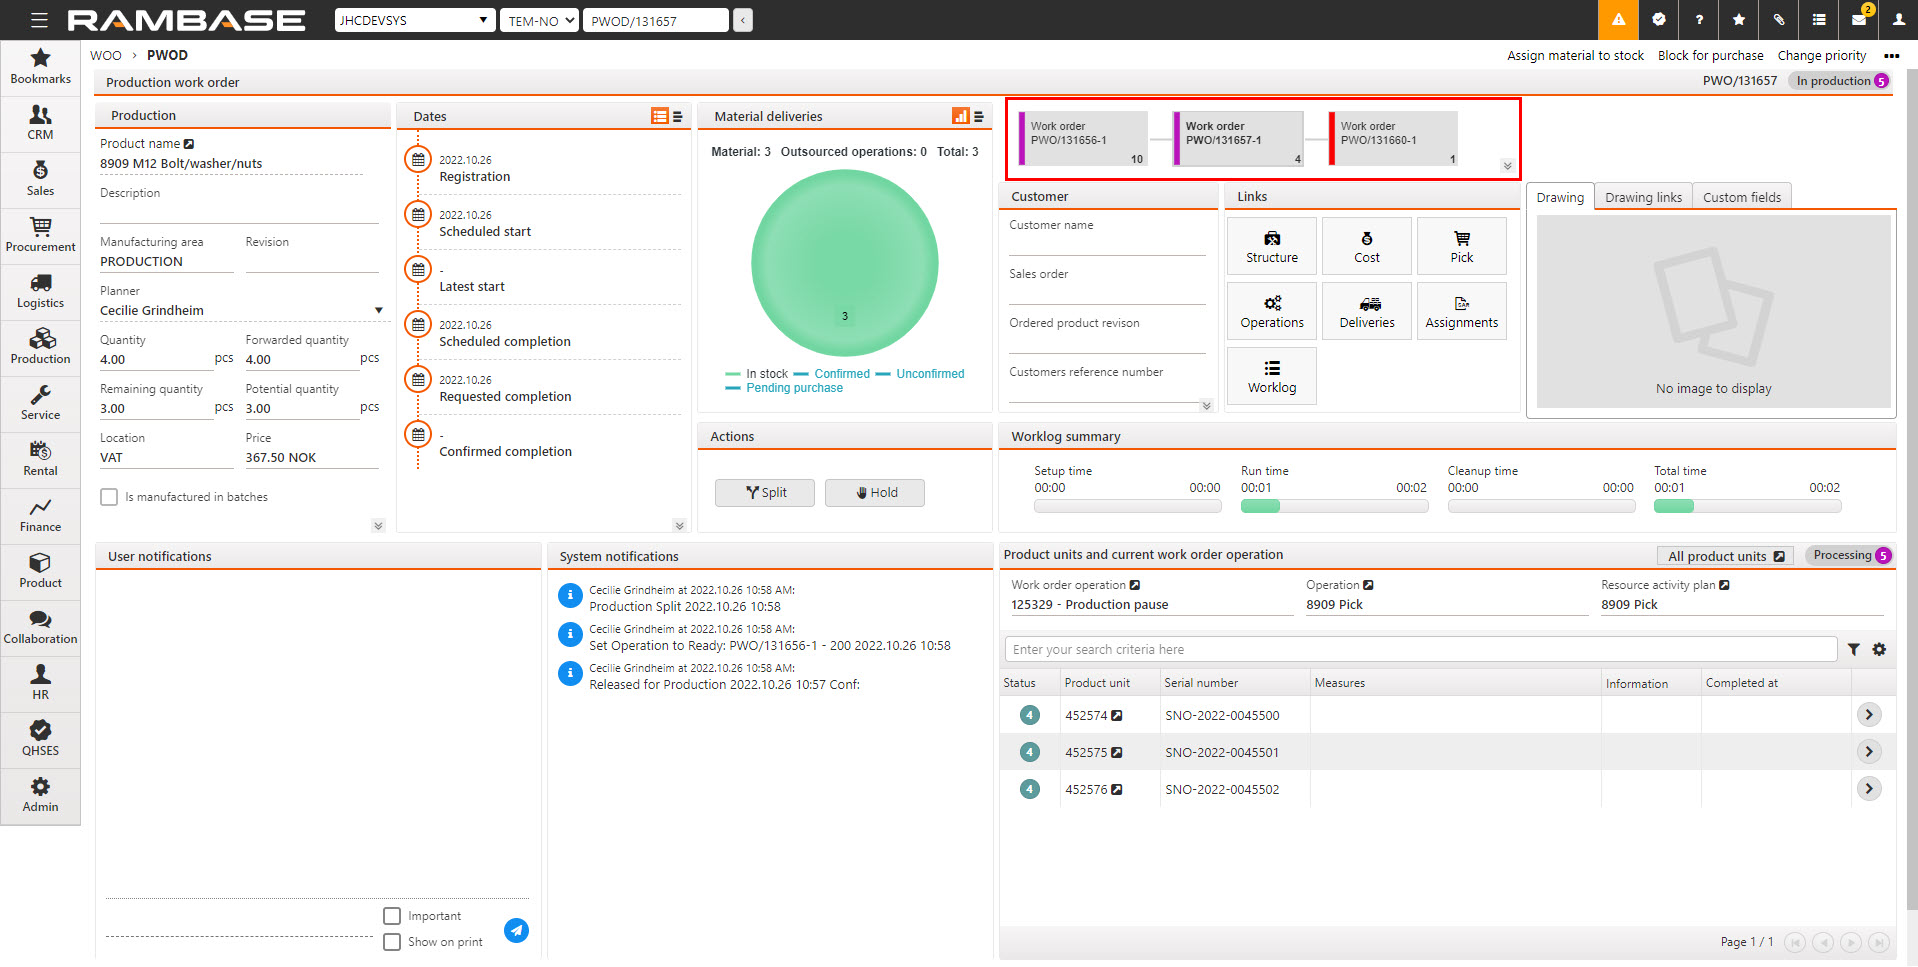
The scrap and release process is initiated from the Context menu in the Production work order (PWOD) application.
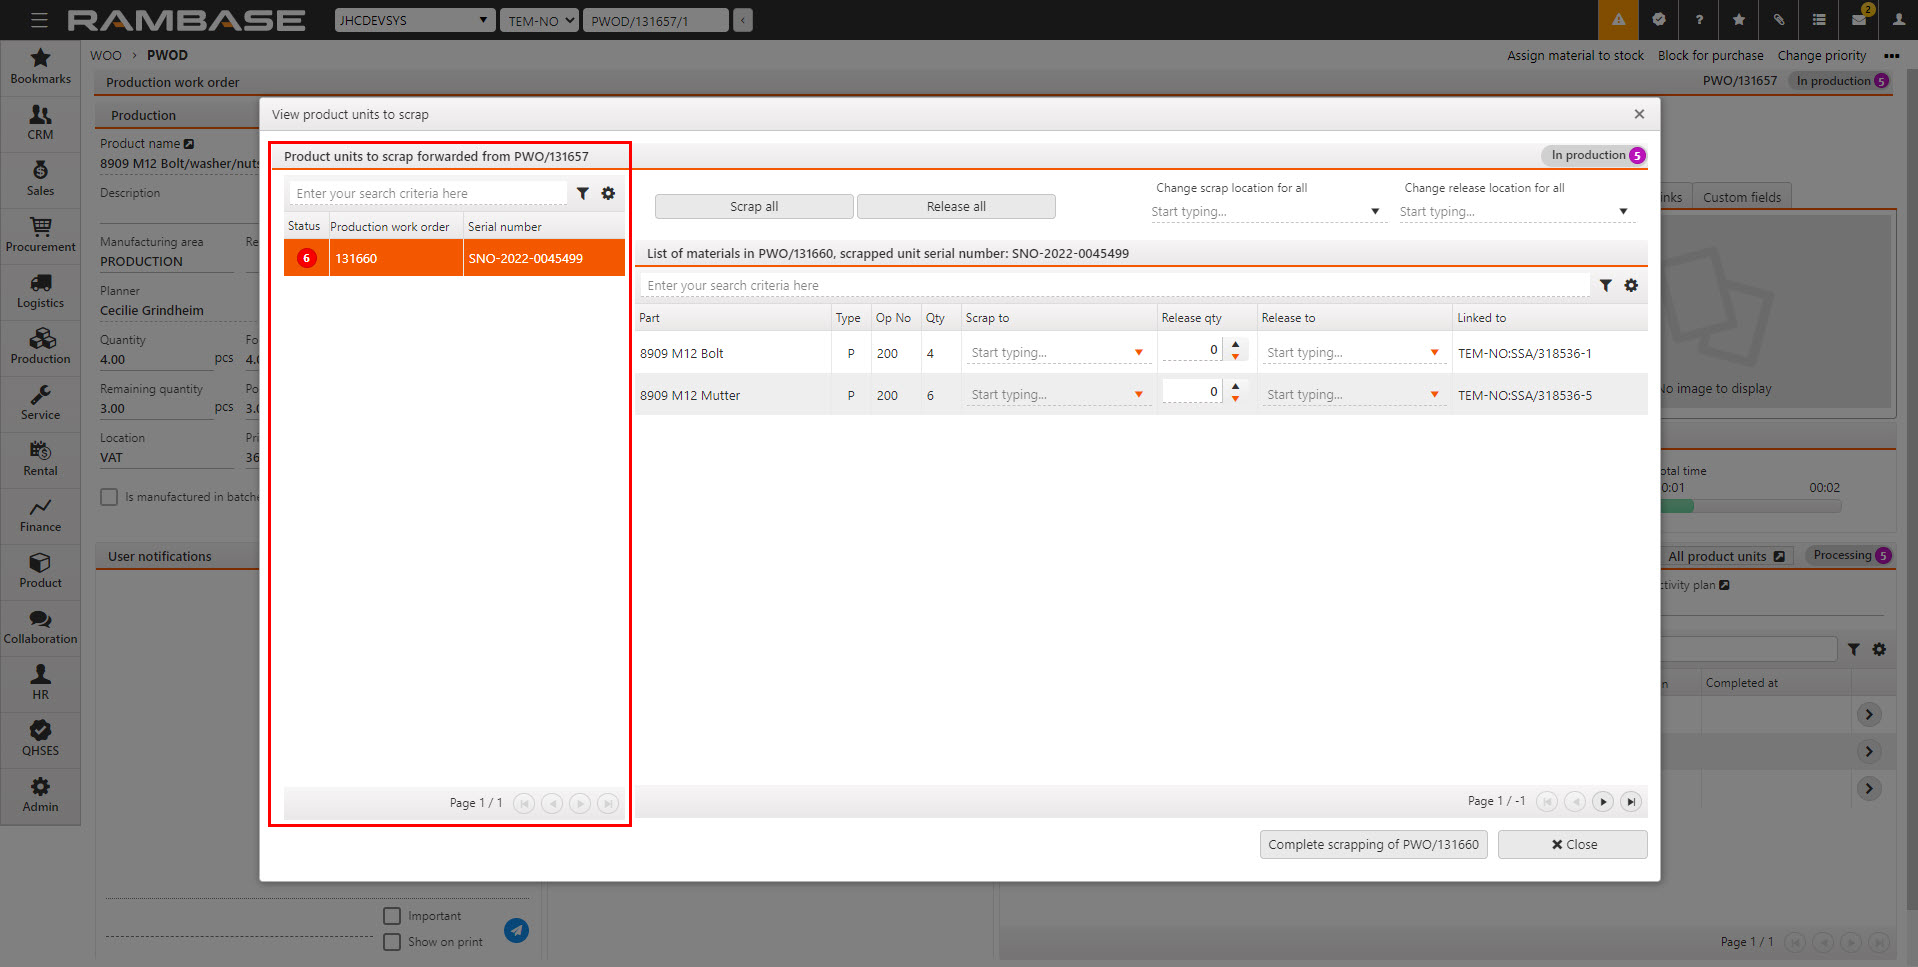
The Scrap and release and View product structures popups are comprised of two areas:
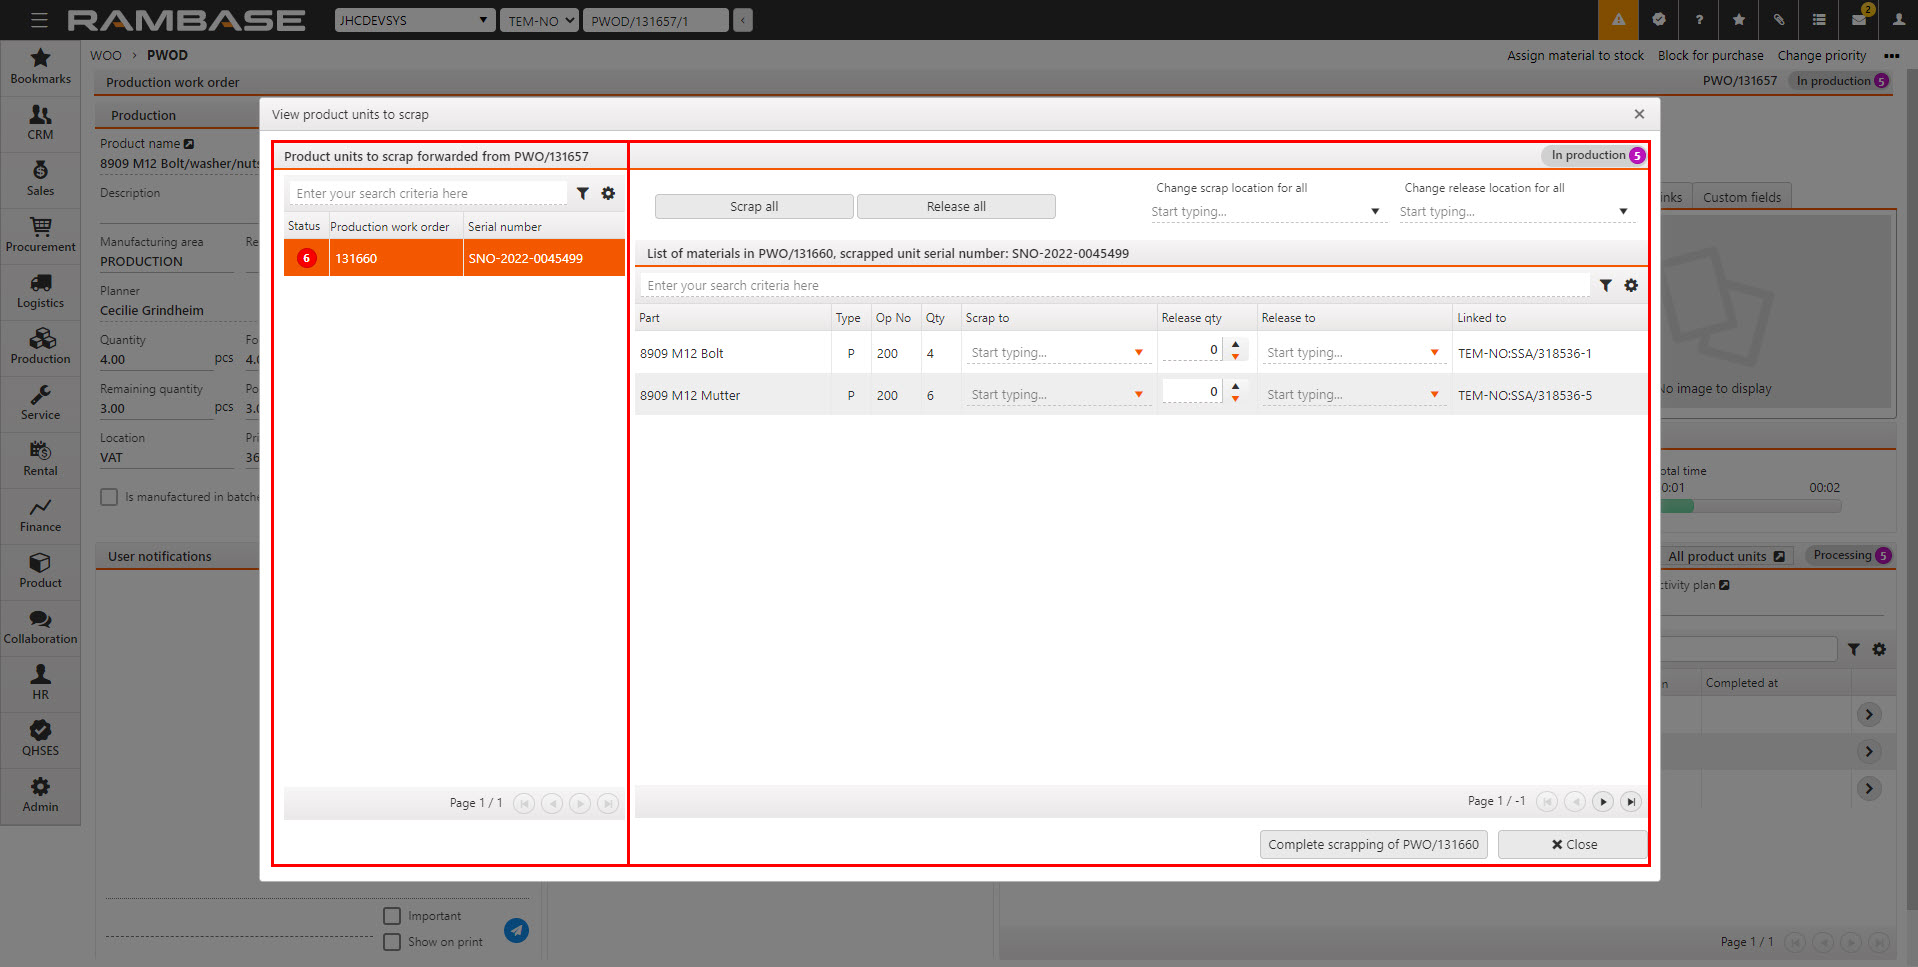
Product units to scrap forwarded from PWO/##### - A list displaying Production work orders (PWO) containing a Product unit (LCM) in Status 6 (In scrapping) or Production work orders (PWO) that have completed scrapping in Status 9.
List of materials in PWO, scrapped unit s/n: SNO-#### - A list displaying parts in the selected Production work order (PWO).
The Product units to scrap forwarded from PWO/###### list
The Product units to scrap forwarded from PWO/###### contains a search field with a corresponding Predefined filters icon.
The list can be filtered by clicking the Predefined filters and selecting the desired filters. The available filters are listed in the table below. Selected filters will be placed underneath the search field. Gray filters are deactivated. Orange filters are active.
Predefined filter | Function |
|---|---|
Active | Includes Production work orders (PWO) that are registered and not processed. Excludes Production work orders (PWO) in Status 1 and Status 9. |
In production | Includes Production work orders (PWO) in Status 5 (In production). |
In scrapping process | Includes Production work orders (PWO) in Status 6 (In scrapping process). |
Processed | Includes Production work orders (PWO) in Status 9 (Processed), meaning the production is completed and the goods are forwarded to Goods reception (SSA). |
Production completed | Includes Production work orders (PWO) in Status 8 (Production completed, pending forward to Goods reception (SSA). |
Pending goods reception | Includes Production work orders (PWO) in Status 3 (Pending goods reception). |
Pending scheduled production start | Includes Production work orders (PWO) in Status 4 (Pending scheduled production start). |
Pending purchase or production | Includes Production work orders (PWO) in Status 2 (Pending purchase or production). |
Pending registration | Includes Production work orders (PWO) in Status 1 (Pending registration). |
The PWO list also includes a Column settings icon which is used to select displayed columns, but also to Export list to Excel, Reset to Default View and Include custom fields. Click the Column settings icon and hover over the Columns option. Select the desired columns from the list. The available columns are described in the table below.
Column | Description |
|---|---|
Status | An icon indicating the status of the Production work order (PWO) |
Production work order | The identifier for the Production work order (PWO). |
Serial number | The serial number of the Product unit (LCM) being produced by the Production work order (PWO). |
Unit Id | The Product unit (LCM) document identifier. To view and edit details on the Product unit (LCM) from the Production work order (PWOD) application and open the Product unit (LCM) application, click on the View icon in the Product unit column in the Product units and current work order operation area. |
List of materials in PWO, scrapped unit s/n: SNO-#### - Right side list

The Scrap and release popup contains a list of materials where the user can efficiently handle the scrapping or releasing of parts.
This area will list all parts linked to the Production work order (PWO) in Status 6 containing the Product unit (LCM) to be scrapped. The following fields and functions are available:
Function or field | Result |
|---|---|
Scrap all parts button | Clicking the Scrap all parts button will set the released quantity of all the parts in the Production work order (PWO) to zero (0). Note the effects in the Release qty column. |
Release all parts button | Clicking the Release all parts button will set the release quantity of all parts in Production work order (PWO) to the total quantity of parts linked to the Production work order (PWO), the value of the Qty column. |
Change scrap location for all drop-down menu | Type the name for the intended location or click the Change scrap location for all drop-down menu to list all Locations (STL). The selection will apply to all parts and can be verified in the Scrap to drop-down menu. Clicking either the Predefined filters or Column settings icons will allow further customizing of the list and also display properties like Picking blocked and Linking blocked. |
Change release location for all drop-down menu | Type the name for the intended location or click the Change release location for all drop-down menu to list all Locations (STL). The selection will apply to all parts and can be verified in the Release to field in the part list, where the Stock location (STL) name will be displayed. Clicking either the Predefined filters or Column settings icons allows further customizing of the list and also display properties like Picking blocked and Linking blocked. |
Predefined filter icon | Clicking the Predefined filter icon will list all available filters. Selecting a filter will place it underneath the Enter your search criteria here field. Gray color equals inactive, orange color equals active. Descriptions of the predefined filters are available in the table below. |
Column settings icon | Clicking the Column settings icon gives the following options:
|
Scrap to drop-down menu | Type the name for the intended Stock location (STL) or click the Scrap to drop-down menu to list all Locations (STL), to specify where the part will be scrapped to. The selection will apply to the selected part. Clicking either the Predefined filters or Column settings icons will allow further customizing of the list and also display properties like Picking blocked and Linking blocked. |
Release qty field | The Release qty field can be used to decide the quantity being released to stock, but also the quantity being scrapped. When scrapping is started, the default value will be 0, meaning all parts will be scrapped to the selected location, if the Complete scrapping of PWO/#### button is clicked. If a part is to be salvaged, and the quantity of said part is 1, setting the Release qty to 1 will release that part back to stock. If 1 of 2 parts is to be salvaged, the quantity of the part being 2. Setting the Release qty to 1 will release 1 part back to stock and scrapping 1 part to the selected scrap location. |
Release to drop-down menu | Type the name for the intended Stock location (STL) or click the Scrap to drop-down menu to list all Locations (STL), to specify where the part will be released to. The selection will apply to the selected part. Clicking either the Predefined filters or Column settings icons will allow further customizing of the list and also display properties like Picking blocked and Linking blocked. |
Complete scrapping PWO/##### | Clicking the Complete scrapping of PWO/#### button will apply all the selections of quantity and locations made in the Scrap and release/View product units to scrap popup. To be a able to complete scrapping:
|
The Enter your search here field allows the user to search for specific parts. The scope of the search can also be specified by using the Predefined filters or from the Column settings.
Predefined filter | Description |
|---|---|
Confirmed | Includes parts with confirmed delivery date. |
Excluded Stock Assignments | Exclude parts with Stock assignments (SAR). |
In stock | Include parts that are in stock. |
Only Consumption Parts | Show only parts that are consumption parts, Type = C. |
Pending purchase | Show only parts in Purchase orders (SPO) pending Purchase order response (SOA) in Status 3. |
Unconfirmed | Show only Purchase order (SPO) items without confirmed delivery date. |
Columns | Description |
|---|---|
Part | Displays the part name set in the Product (ART) application. |
Type | Displays the part type, for example P (type = part), C (type = consumption part) etc. |
Op No | The sequence number of the operation the part designated to. Derived from the KITART application and set in the Product (ART) application via the Designer tab. |
Qty | Part quantity assigned to the Production work order (PWO). |
Scrap to | Contains the drop-down menu used to specify the Scrap to location. |
Release qty | Contains the field used to decide the quantity to be released to stock, or if set to 0 - scrapped. |
Release to | Contains the drop-down menu used to specify the Release to location. |
Linked to | Displays the Goods in (SSA) information of the part. |
Initiating and handling scrap and/or release
To start scrap and/or release of the Product unit's (LCM) parts, find the Context menu in the top right corner and click on the Start scrapping option.
From the Start scrapping popup, select the Product unit (LCM) intended for scrapping and press ENTER. This will split the main Production work order (PWO) and create a new sub Production work orders (PWO) for the Product unit (LCM) with the parts intended for scrapping or releasing back to stock. The split Production work order (PWO) will be in Status 6 (In scrapping process) with quantity of 1.
Undo scrapping - From the Production work order (PWO) in Status 6 (In scrapping), click on the Context menu and select the Undo scrapping option.
To undo the scrapping process, the split/sub Production work order (PWO) must still be in Status 6 (In scrapping).
The Production work order (PWO) will be returned to Status 5 (In production). But the Production work order (PWO) will still be split from the main Production work order (PWO).
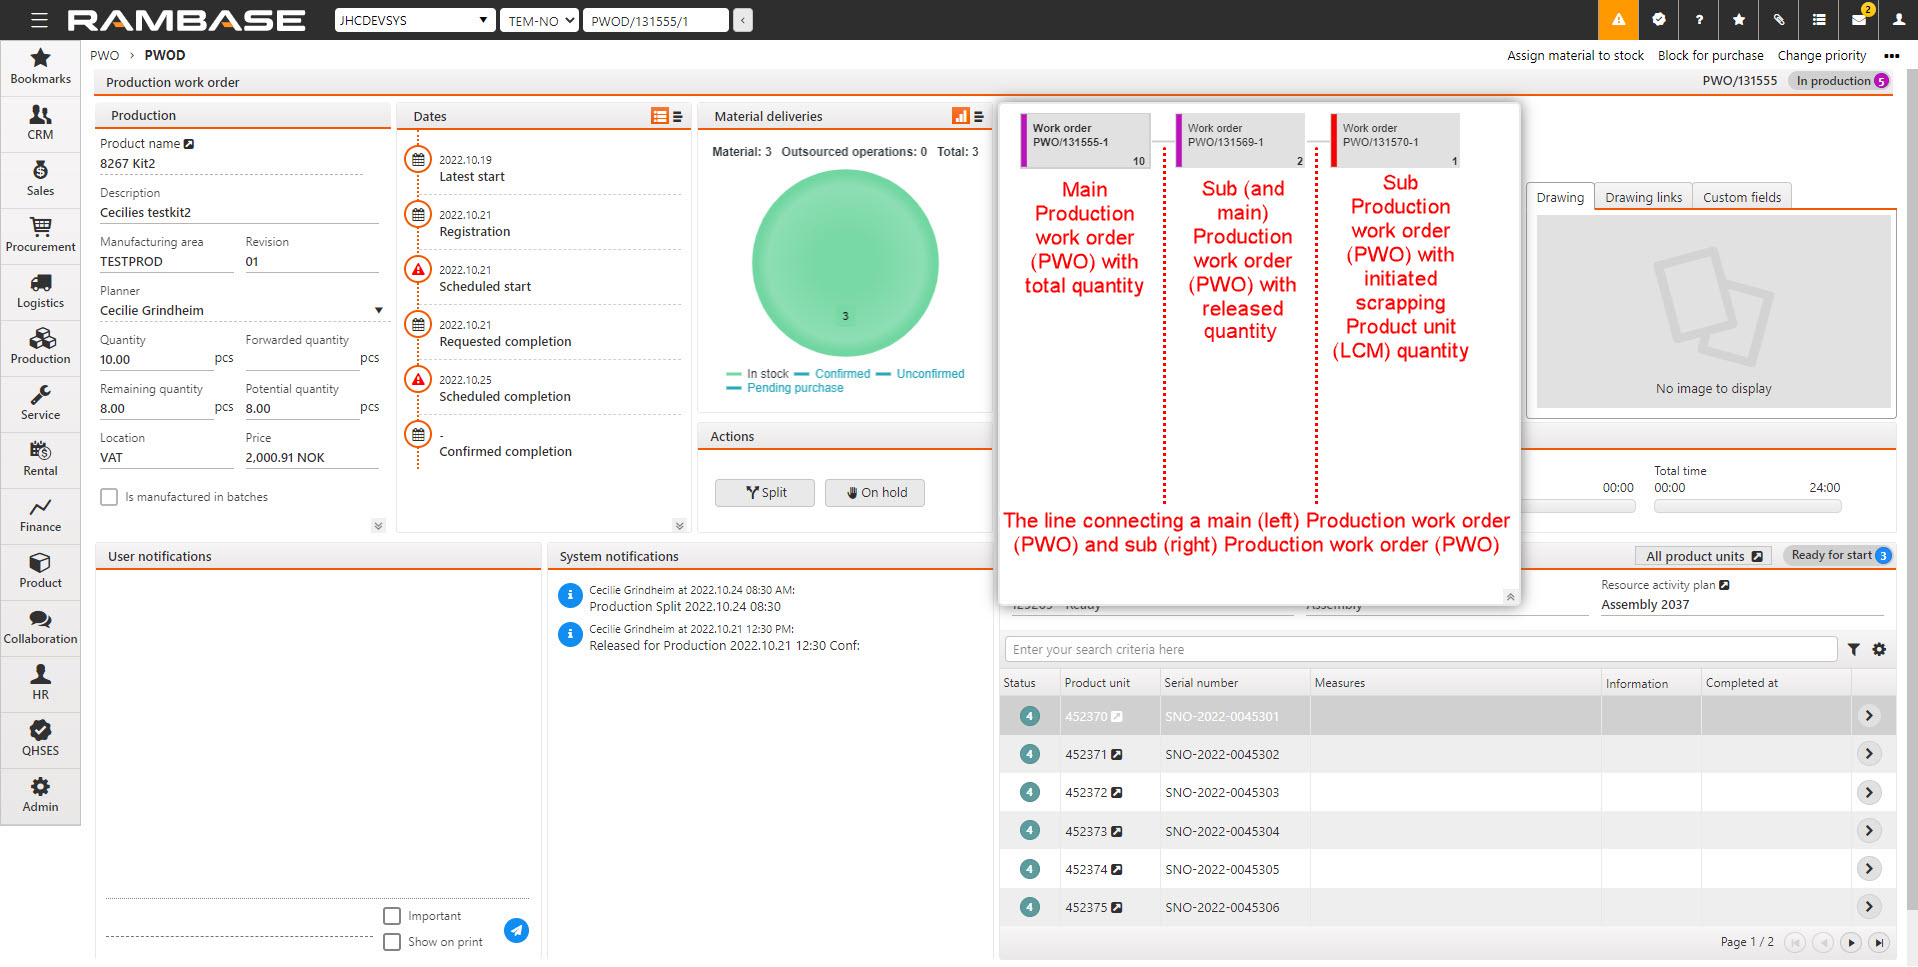
Note
Main and sub Production work orders (PWO) are relative, meaning a sub Production work order (PWO), of the initial Production work order (PWO), can be the main Production work order (PWO) of another sub Production work order (PWO).
From the Context menu, select the View product units to scrap to open the corresponding popup.
From the View product units to scrap popup, left side list, select the Production work order (PWO) with the Product unit (LCM) containing parts intended for either scrap or release to stock.
Continuing in the View product units to scrap popup, select the quantity for scrapping or releasing to stock:
Scrap quantity of the parts can be decided by either clicking the Scrap all button which will set the release quantity in the Release qty column to 0 for all parts. Or setting the individual part's scrap quantity by changing the Release qty drop-down menu to the intended quantity.
Release quantity of the parts can be decided by either clicking the Release all button which will set the release quantity, in the Release qty column, to the maximum quantity in the Qty column. Or setting the individual part's release quantity by changing the Release qty drop-down menu to the intended quantity.
Example 3. ExampleIf the total quantity of a part is 6 and the Release qty is set to 4. Then 4 of the parts will be released back to stock, and the remaining 2 will be scrapped to a selected scrap location.
Continuing in the View product units to scrap popup, select the intended quantity to verify the intended scrap or release locations.
If the selected part is to be scrapped to a specified location, verify the location in the Scrap to column by clicking the corresponding drop-down menu.
If all parts are to be scrapped to the same location, verify the location in the Change scrap location for all field in the header, by clicking the corresponding drop-down menu.
If the selected part is to be released back to stock to a specified location, verify the release location in the Release to column by clicking the corresponding drop-down menu.
If all parts are to be released back to stock to the same location, verify the location in the Change stock location for all field in the header, by clicking the corresponding drop-down menu.
Click the Complete scrapping of PWO/###### button to complete scrapping and releasing the intended quantity to the intended locations.
Note
While the scrap and release process is ongoing, the user can continue with other tasks. The process will work continue to work in the background.
From the Context menu, select the Scrap and release to open the corresponding popup.
From the Scrap and release popup, left side list, select the Production work order (PWO) with the Product unit (LCM) containing parts intended for either scrap or release to stock.
Continuing in the Scrap and release popup, select the quantity for scrapping or releasing to stock:
Scrap quantity of the parts can be decided by either clicking the Scrap all button which will set the release quantity in the Release qty column to 0 for all parts. Or setting the individual part's scrap quantity by changing the Release qty drop-down menu to the intended quantity.
Release quantity of the parts can be decided by either clicking the Release all button which will set the release quantity, in the Release qty column, to the maximum quantity in the Qty column. Or setting the individual part's release quantity by changing the Release qty drop-down menu to the intended quantity.
Example 4. ExampleIf the total quantity of a part is 6 and the Release qty is set to 4. Then 4 of the part will be released back to stock, and the remaining 2 will be scrapped to a selected scrap location.
Continuing in the View product units to scrap popup, select the intended quantity to verify the intended scrap or release locations.
If the selected part is to be scrapped to a specified location, verify the location in the Scrap to column by clicking the corresponding drop-down menu.
If all parts are to be scrapped to the same location, verify the location in the Change scrap location for all field in the header, by clicking the corresponding drop-down menu.
If the selected part is to be released back to stock to a specified location, verify the release location in the Release to column by clicking the corresponding drop-down menu.
If all parts are to be released back to stock to the same location, verify the location in the Change stock location for all field in the header, by clicking the corresponding drop-down menu.
Click the Complete scrapping of PWO/###### button to complete scrapping and releasing the intended quantity to the intended locations.
Note
While the scrap and release process is ongoing, the user can continue with other tasks. The process will continue to work in the background.
Relevant Company settings (CSV)
Setting | Description |
|---|---|
Default scrap stock location | Name of the stock location which will be used as default for scrapping |